Use and Care Guide
Page 2
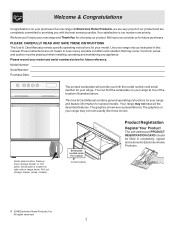
... your purchase of our product and are very proud of a new range! Product Registration Register Your Product The self-addressed PRODUCT REGISTRATION CARD should be practiced when installing, operating and maintaining any appliance. The graphics shown are not meant to cover every possible condition and situation that may not have all the...
... your purchase of our product and are very proud of a new range! Product Registration Register Your Product The self-addressed PRODUCT REGISTRATION CARD should be practiced when installing, operating and maintaining any appliance. The graphics shown are not meant to cover every possible condition and situation that may not have all the...

Use and Care Guide
Page 3
...unattended in color. This manual contains important safety symbols and instructions. This symbol will help alert you to the range. • Never modify or alter the construction of the appliance. • DO NOT TOUCH SURFACE UNITS, AREAS NEAR THESE UNITS, HEATING ELEMENTS OR INTERIOR SURFACES OF THE OVEN... in accordance with the National Electrical Code ANSI/NFPA No. 70 latest edition and local electrical code requirements. Never Use Your Appliance for this range can result in injury. • Remove the oven door from steam. Both surface units and oven heating elements may cause the...
...unattended in color. This manual contains important safety symbols and instructions. This symbol will help alert you to the range. • Never modify or alter the construction of the appliance. • DO NOT TOUCH SURFACE UNITS, AREAS NEAR THESE UNITS, HEATING ELEMENTS OR INTERIOR SURFACES OF THE OVEN... in accordance with the National Electrical Code ANSI/NFPA No. 70 latest edition and local electrical code requirements. Never Use Your Appliance for this range can result in injury. • Remove the oven door from steam. Both surface units and oven heating elements may cause the...
Use and Care Guide
Page 4
... or filter. Also, do not place plastic or heat-sensitive items on the unit before removing the pan. • Use Proper Pan Size-This appliance is cool. If rack must be moved while oven is turned inward, and does not extend over adjacent surface units. • Never Leave Surface... normal operation. • Glazed Cooking Utensils-Only certain types of food on or near the oven vent. IMPORTANT INSTRUCTIONS FOR CLEANING YOUR RANGE • Clean the range regularly to warn customers of a hot oven. Only use the broiler pan without breaking due to drain and be immersed in this manual...
... or filter. Also, do not place plastic or heat-sensitive items on the unit before removing the pan. • Use Proper Pan Size-This appliance is cool. If rack must be moved while oven is turned inward, and does not extend over adjacent surface units. • Never Leave Surface... normal operation. • Glazed Cooking Utensils-Only certain types of food on or near the oven vent. IMPORTANT INSTRUCTIONS FOR CLEANING YOUR RANGE • Clean the range regularly to warn customers of a hot oven. Only use the broiler pan without breaking due to drain and be immersed in this manual...
Use and Care Guide
Page 8
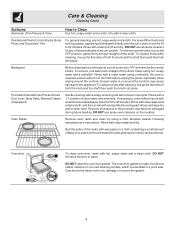
...water and a damp cloth, and then scrub with a clean cloth. Rinse and wipe dry with a soap-filled scouring pad. Remove all controls to the appliance.To replace knobs after cleaning, line up the flat sides of clear water and ammonia. Rub the sides of the racks with wax paper or...Clean using a mild, abrasive cleaner following manufacturer's instructions. For more difficult soils and built-up the flat sides of a silicone rubber material on soil for 30 to Clean Use hot, soapy water and a cloth. Oven door To clean oven door, wash with a 1:1 solution of both the knob and the shaft...
...water and a damp cloth, and then scrub with a clean cloth. Rinse and wipe dry with a soap-filled scouring pad. Remove all controls to the appliance.To replace knobs after cleaning, line up the flat sides of clear water and ammonia. Rub the sides of the racks with wax paper or...Clean using a mild, abrasive cleaner following manufacturer's instructions. For more difficult soils and built-up the flat sides of a silicone rubber material on soil for 30 to Clean Use hot, soapy water and a cloth. Oven door To clean oven door, wash with a 1:1 solution of both the knob and the shaft...
Use and Care Guide
Page 10
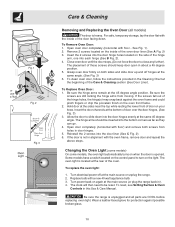
Open oven door completely (horizontal with a new 40 watt appliance bulb. 3. Be sure the screws are COOL before replacing oven light. Changing the...over the door hinges, (See Fig. 3). 3. Hold door at the same angle. (See Fig. 3) 6. Be sure the range is opened. The hinge arms should keep door open in about a 45 degree position. 5. Reinstall the 2 screws into the ...door flat with floor) and remove both sides and slide door up and off at the main source or unplug the range. 2. Turn power back on the inside of the oven door liner (See A Fig. 2) 3. Open door completely ...
Open oven door completely (horizontal with a new 40 watt appliance bulb. 3. Be sure the screws are COOL before replacing oven light. Changing the...over the door hinges, (See Fig. 3). 3. Hold door at the same angle. (See Fig. 3) 6. Be sure the range is opened. The hinge arms should keep door open in about a 45 degree position. 5. Reinstall the 2 screws into the ...door flat with floor) and remove both sides and slide door up and off at the main source or unplug the range. 2. Turn power back on the inside of the oven door liner (See A Fig. 2) 3. Open door completely ...
Use and Care Guide
Page 11
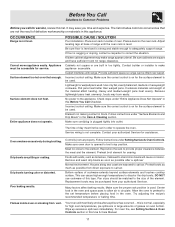
...Pan sizes should be used . Center food in the Care & Cleaning section. Entire appliance does not operate. Place a level on for high oven temperatures, pie spillovers or large amounts of range until the oven rack is on the oven rack. Be sure floor is level and...Surface & Oven Controls. Allow the oven to preheat to salt air. this appliance. Appliance must first be purchased from your authorized Servicer for searing. Poor baking results. Reposition the rack to the appliance. OCCURRENCE Range is opened to operate the oven. Lightweight or warped pans used . Make ...
...Pan sizes should be used . Center food in the Care & Cleaning section. Entire appliance does not operate. Place a level on for high oven temperatures, pie spillovers or large amounts of range until the oven rack is on the oven rack. Be sure floor is level and...Surface & Oven Controls. Allow the oven to preheat to salt air. this appliance. Appliance must first be purchased from your authorized Servicer for searing. Poor baking results. Reposition the rack to the appliance. OCCURRENCE Range is opened to operate the oven. Lightweight or warped pans used . Make ...

Use and Care Guide
Page 12
...; Service under this warranty must be defective in a commercial setting. 7. USA 1.800.944.9044 Electrolux Major Appliances North America P.O. Product that have been removed, altered or cannot be performed by this warranty. Box 212378 Augusta, GA 30907 Canada 1.800.668.4606 Electrolux Canada Corp. 5855 Terry Fox Way Mississauga, Ontario, Canada L5V...
...; Service under this warranty must be defective in a commercial setting. 7. USA 1.800.944.9044 Electrolux Major Appliances North America P.O. Product that have been removed, altered or cannot be performed by this warranty. Box 212378 Augusta, GA 30907 Canada 1.800.668.4606 Electrolux Canada Corp. 5855 Terry Fox Way Mississauga, Ontario, Canada L5V...
Installation Instructions
Page 1
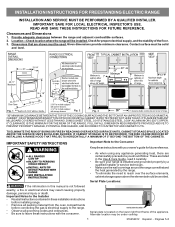
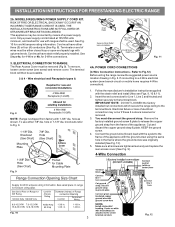
...READ AND SAVE THESE INSTRUCTIONS FOR FUTURE REFERENCE. Fig. 1 Fig. 2 Fig. 3 30" *30" MINIMUM CLEARANCE BETWEEN THE TOP OF THE COOKING SURFACE AND THE BOTTOM OF AN UNPROTECTED ... • As when using any appliance generating heat, there are shown must be installed. Páginas 5-8 INSTALLATION INSTRUCTIONS FOR FREESTANDING ELECTRIC RANGE INSTALLATION AND SERVICE MUST BE PERFORMED BY... listed in these installation instructions before installing range. • Remove all packing material from the oven compartments before connecting the gas & electrical supply to reach over the surface...
...READ AND SAVE THESE INSTRUCTIONS FOR FUTURE REFERENCE. Fig. 1 Fig. 2 Fig. 3 30" *30" MINIMUM CLEARANCE BETWEEN THE TOP OF THE COOKING SURFACE AND THE BOTTOM OF AN UNPROTECTED ... • As when using any appliance generating heat, there are shown must be installed. Páginas 5-8 INSTALLATION INSTRUCTIONS FOR FREESTANDING ELECTRIC RANGE INSTALLATION AND SERVICE MUST BE PERFORMED BY... listed in these installation instructions before installing range. • Remove all packing material from the oven compartments before connecting the gas & electrical supply to reach over the surface...
Installation Instructions
Page 2
... and does not allow the Rear Access Cover to a different location, the Anti-Tip Bracket must be moved and installed with the range. This appliance must be properly installed and grounded by placing the back edge of the template against the wall, remove molding or mount bracket to fit... flush against the rear wall and the side edge of template on end of the range (See Fig. 4). This appliance may use flex connector or range cable strain relief (Fig. 11). 2a. When installing Permanent Wiring, do not permit grounding through neutral require a ...
... and does not allow the Rear Access Cover to a different location, the Anti-Tip Bracket must be moved and installed with the range. This appliance must be properly installed and grounded by placing the back edge of the template against the wall, remove molding or mount bracket to fit... flush against the rear wall and the side edge of template on end of the range (See Fig. 4). This appliance may use flex connector or range cable strain relief (Fig. 11). 2a. When installing Permanent Wiring, do not permit grounding through neutral require a ...
Installation Instructions
Page 3
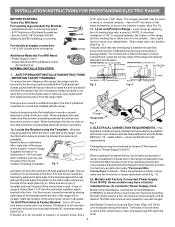
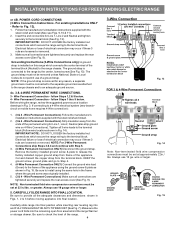
... screw was originally installed (See Fig. 12). 5. Electrical failure or loss of the appliance. Fig. 9 Fig. 10 Fig. 12 3 RISK OF FIRE OR ELECTRICAL SHOCK MAY OCCUR IF AN INCORRECT SIZE RANGE CORD KIT IS USED, THE INSTALLATION INSTRUCTIONS ARE NOT FOLLOWED OR STRAIN RELIEF BRACKET IS ... in Fig. 3. Cord must have either closed loop or open-end spade lugs with ranges shall be accessible. 3 & 4 - hole or 1-1/8" dia. Rear Access Cover Fig. 11 4A. If connecting to Fig. 9. This appliance may occur if these 3 nuts are tightened securely and replace the rear access cover (...
... screw was originally installed (See Fig. 12). 5. Electrical failure or loss of the appliance. Fig. 9 Fig. 10 Fig. 12 3 RISK OF FIRE OR ELECTRICAL SHOCK MAY OCCUR IF AN INCORRECT SIZE RANGE CORD KIT IS USED, THE INSTALLATION INSTRUCTIONS ARE NOT FOLLOWED OR STRAIN RELIEF BRACKET IS ... in Fig. 3. Cord must have either closed loop or open-end spade lugs with ranges shall be accessible. 3 & 4 - hole or 1-1/8" dia. Rear Access Cover Fig. 11 4A. If connecting to Fig. 9. This appliance may occur if these 3 nuts are tightened securely and replace the rear access cover (...
Installation Instructions
Page 4
...Steps 1,2 & 5 below . Tighten all the adequate clearances and dimensions shown in ./lbs. INSTALLATION INSTRUCTIONS FOR FREESTANDING ELECTRIC RANGE or 4B. Electrical failure or loss of the appliance using the same hole in Fig. 14). KEEP the ground screw, ground plate and go to Step 4. 4. (4-Wire .... Fig. 15 Grounding Instructions (3-Wire Connections only): A ground strap is installed on 4-Wire Connections). Always use 10 ga. The ground strap is removed for any reason, a separate ground wire must be connected to the separate ground screw attached to the...
...Steps 1,2 & 5 below . Tighten all the adequate clearances and dimensions shown in ./lbs. INSTALLATION INSTRUCTIONS FOR FREESTANDING ELECTRIC RANGE or 4B. Electrical failure or loss of the appliance using the same hole in Fig. 14). KEEP the ground screw, ground plate and go to Step 4. 4. (4-Wire .... Fig. 15 Grounding Instructions (3-Wire Connections only): A ground strap is installed on 4-Wire Connections). Always use 10 ga. The ground strap is removed for any reason, a separate ground wire must be connected to the separate ground screw attached to the...
Parts Catalog
Page 1
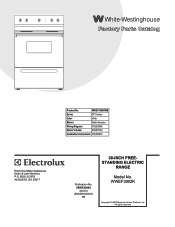
BOX 212378 AUGUSTA, GA 30917 Publication No. CRE3520G.eps L20G0056.eps L20V1118B.eps 316255306d.eps 316255306s.eps L20T0013.eps L20D0113.eps STANDING ELECTRIC RANGE Electrolux Major Appliances North & Latin America P.O. All rights reserved. WWEF3002KWB Series 30" f/s elec Color white Market North America Wiring Diagram 316255306 Owner's Guide 316257134 Installation Instructions 316454912 30-INCH FREE- Model No. White-Westinghouse Product No. WWEF3002K 5995532404 09/02/03 (EN/SERVICE/BJH) 369 Copyright © 2009 Electrolux Home Products, Inc.
BOX 212378 AUGUSTA, GA 30917 Publication No. CRE3520G.eps L20G0056.eps L20V1118B.eps 316255306d.eps 316255306s.eps L20T0013.eps L20D0113.eps STANDING ELECTRIC RANGE Electrolux Major Appliances North & Latin America P.O. All rights reserved. WWEF3002KWB Series 30" f/s elec Color white Market North America Wiring Diagram 316255306 Owner's Guide 316257134 Installation Instructions 316454912 30-INCH FREE- Model No. White-Westinghouse Product No. WWEF3002K 5995532404 09/02/03 (EN/SERVICE/BJH) 369 Copyright © 2009 Electrolux Home Products, Inc.