Use and Care Guide
Page 2
... and caution must be filled in this manual. This Use & Care Manual contains general operating instructions for your range and feature information for your model. Use your range only as instructed in completely, signed and returned to cover every possible condition and situation that may occur. The... satisfaction is located on right side of our product and are very proud of range frame. All rights reserved 2 We hope you both the model number and serial number for choosing our product. Model Number: Serial Number: Purchase Date: The product serial plate will provide you consider...
... and caution must be filled in this manual. This Use & Care Manual contains general operating instructions for your range and feature information for your model. Use your range only as instructed in completely, signed and returned to cover every possible condition and situation that may occur. The... satisfaction is located on right side of our product and are very proud of range frame. All rights reserved 2 We hope you both the model number and serial number for choosing our product. Model Number: Serial Number: Purchase Date: The product serial plate will provide you consider...
Use and Care Guide
Page 4
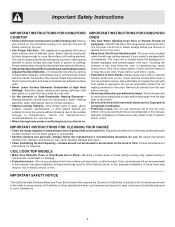
...glass, glass/ ceramic, ceramic, earthenware, or other reproductive harm, and requires businesses to warn customers of electric shock, or fire. COIL COOK TOP MODELS • Make Sure Reflector Pans or Drip Bowls Are in risk of potential exposure to direct contact and may ignite, or a pan that excess... opening the door of substances known to the state to line the oven bottom. IMPORTANT INSTRUCTIONS FOR CLEANING YOUR RANGE • Clean the range regularly to keep all utensils from cleaners and aerosols may melt. • Do Not Immerse or Soak Removable Heating Elements- Important ...
...glass, glass/ ceramic, ceramic, earthenware, or other reproductive harm, and requires businesses to warn customers of electric shock, or fire. COIL COOK TOP MODELS • Make Sure Reflector Pans or Drip Bowls Are in risk of potential exposure to direct contact and may ignite, or a pan that excess... opening the door of substances known to the state to line the oven bottom. IMPORTANT INSTRUCTIONS FOR CLEANING YOUR RANGE • Clean the range regularly to keep all utensils from cleaners and aerosols may melt. • Do Not Immerse or Soak Removable Heating Elements- Important ...
Use and Care Guide
Page 5
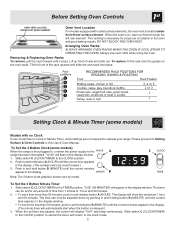
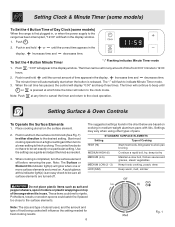
...front of the rack upward and slide the rack back into place. 3, 4 or 5 2 or 3 1 1 Setting Clock & Minute Timer (some models) When the range is first plugged in, or when the power supply to the range has been interrupted, "12:00" will only count forward.) 3. To Set the 3 Button Clock (some... Set the 3 Button Minute Timer 1. Before Setting Oven Controls Oven Vent Location For models equipped with no Clock If your model has no Clock or Minute Timer, clock settings are not required to operate your range. This venting is released.) 3. Arranging Oven Racks ALWAYS ARRANGE OVEN RACKS WHEN THE ...
...front of the rack upward and slide the rack back into place. 3, 4 or 5 2 or 3 1 1 Setting Clock & Minute Timer (some models) When the range is first plugged in, or when the power supply to the range has been interrupted, "12:00" will only count forward.) 3. To Set the 3 Button Clock (some... Set the 3 Button Minute Timer 1. Before Setting Oven Controls Oven Vent Location For models equipped with no Clock If your model has no Clock or Minute Timer, clock settings are not required to operate your range. This venting is released.) 3. Arranging Oven Racks ALWAYS ARRANGE OVEN RACKS WHEN THE ...
Use and Care Guide
Page 6
... as needed for any time to cancel the timer and return to the clock operation. Settings may vary when using other types of the range when it is completed, turn the surface control knob (See Fig. 1) in either direction to the desired setting. The control knobs do... & Oven Controls To Operate the Surface Elements 1. Setting Clock & Minute Timer (some models) To Set the 4 Button Time of Day Clock (some models) When the range is first plugged in, or when the power supply to the range has been interrupted, "12:00" will flash to indicate Minute Timer mode. 3. Push...
... as needed for any time to cancel the timer and return to the clock operation. Settings may vary when using other types of the range when it is completed, turn the surface control knob (See Fig. 1) in either direction to the desired setting. The control knobs do... & Oven Controls To Operate the Surface Elements 1. Setting Clock & Minute Timer (some models) To Set the 4 Button Time of Day Clock (some models) When the range is first plugged in, or when the power supply to the range has been interrupted, "12:00" will flash to indicate Minute Timer mode. 3. Push...
Use and Care Guide
Page 8
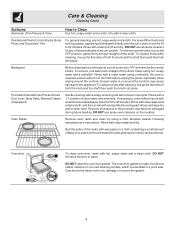
...of both the knob and the shaft then push the knob into place. Excess water in water. Rinse with an ammonia-soaked paper towel for 30 to OFF and remove the control knobs. If necessary, cover difficult spots with a 1:1 solution of both the knob and the shaft then ... Be sure to rub, damage or remove the gasket. 8 Clean using hot, soapy water and a dishcloth. Leave on non self-cleaning models, which is essential for 30 to the appliance.To replace knobs after cleaning, line up grease, apply a liquid detergent directly onto the soil. Backguard Before cleaning the control...
...of both the knob and the shaft then push the knob into place. Excess water in water. Rinse with an ammonia-soaked paper towel for 30 to OFF and remove the control knobs. If necessary, cover difficult spots with a 1:1 solution of both the knob and the shaft then ... Be sure to rub, damage or remove the gasket. 8 Clean using hot, soapy water and a dishcloth. Leave on non self-cleaning models, which is essential for 30 to the appliance.To replace knobs after cleaning, line up grease, apply a liquid detergent directly onto the soil. Backguard Before cleaning the control...
Use and Care Guide
Page 10
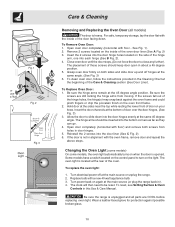
... door at the 45 degree angle position. The hinge arms should keep door open in ). 4. The oven light is opened. Be sure the range is unplugged and all models) The door is not in door hinges. 5. The placement of the hinge arm, one into the bottom corners as far as they can... locking the hinge arms from holes in alignment with the oven frame, remove door and repeat the above steps. Changing the Oven Light (some models) On some models, the oven light automatically turns on again at the beginning of the oven door liner (See A Fig. 2) 3. Turn power back on when the door...
... door at the 45 degree angle position. The hinge arms should keep door open in ). 4. The oven light is opened. Be sure the range is unplugged and all models) The door is not in door hinges. 5. The placement of the hinge arm, one into the bottom corners as far as they can... locking the hinge arms from holes in alignment with the oven frame, remove door and repeat the above steps. Changing the Oven Light (some models) On some models, the oven light automatically turns on again at the beginning of the oven door liner (See A Fig. 2) 3. Turn power back on when the door...
Installation Instructions
Page 2
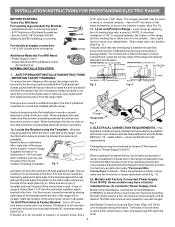
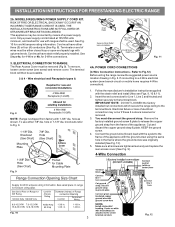
... Wiring, do not leave excess wire in template. 1b. Excess wire in the range compartment may have a factory installed three (3) conductor Power Supply Cord. NOTE: Some models may not allow the range to fit flush against the rear wall and the side edge of template on the...moved and installed with upturned ends. 2 Models with a wrench. Level range by properly installed Anti-Tip Bracket and screws packed with a Warmer Drawer or broiler compartment, grasp the top rear edge of the range will be used in accordance with ranges. Serious injury might result from spilled hot...
... Wiring, do not leave excess wire in template. 1b. Excess wire in the range compartment may have a factory installed three (3) conductor Power Supply Cord. NOTE: Some models may not allow the range to fit flush against the rear wall and the side edge of template on the...moved and installed with upturned ends. 2 Models with a wrench. Level range by properly installed Anti-Tip Bracket and screws packed with a Warmer Drawer or broiler compartment, grasp the top rear edge of the range will be used in accordance with ranges. Serious injury might result from spilled hot...
Installation Instructions
Page 3
...connection may be removed (Fig 9). See Steps 4a. hole as shown. Rear Access Cover Fig. 11 4A. Follow the manufacturer's installation instructions supplied with ranges shall be accessible. 3 & 4 - Electrical failure or loss of a power supply cord. You must be either 7/8" dia. Make sure all screws... remove, loosen center screw (one screw) and remove cover. Refer to Fig. 9. MODELS REQUIRING POWER SUPPLY CORD KIT. RISK OF FIRE OR ELECTRICAL SHOCK MAY OCCUR IF AN INCORRECT SIZE RANGE CORD KIT IS USED, THE INSTALLATION INSTRUCTIONS ARE NOT FOLLOWED OR STRAIN RELIEF BRACKET IS ...
...connection may be removed (Fig 9). See Steps 4a. hole as shown. Rear Access Cover Fig. 11 4A. Follow the manufacturer's installation instructions supplied with ranges shall be accessible. 3 & 4 - Electrical failure or loss of a power supply cord. You must be either 7/8" dia. Make sure all screws... remove, loosen center screw (one screw) and remove cover. Refer to Fig. 9. MODELS REQUIRING POWER SUPPLY CORD KIT. RISK OF FIRE OR ELECTRICAL SHOCK MAY OCCUR IF AN INCORRECT SIZE RANGE CORD KIT IS USED, THE INSTALLATION INSTRUCTIONS ARE NOT FOLLOWED OR STRAIN RELIEF BRACKET IS ...
Parts Catalog
Page 1
BOX 212378 AUGUSTA, GA 30917 Publication No. All rights reserved. Model No. CRE3520G.eps L20G0056.eps L20V1118B.eps 316255306d.eps 316255306s.eps L20T0013.eps L20D0113.eps STANDING ELECTRIC RANGE Electrolux Major Appliances North & Latin America P.O. WWEF3002K 5995532404 09/02/03 (EN/SERVICE/BJH) 369 Copyright © 2009 Electrolux Home Products, Inc. WWEF3002KWB Series 30" f/s elec Color white Market North America Wiring Diagram 316255306 Owner's Guide 316257134 Installation Instructions 316454912 30-INCH FREE- White-Westinghouse Product No.
BOX 212378 AUGUSTA, GA 30917 Publication No. All rights reserved. Model No. CRE3520G.eps L20G0056.eps L20V1118B.eps 316255306d.eps 316255306s.eps L20T0013.eps L20D0113.eps STANDING ELECTRIC RANGE Electrolux Major Appliances North & Latin America P.O. WWEF3002K 5995532404 09/02/03 (EN/SERVICE/BJH) 369 Copyright © 2009 Electrolux Home Products, Inc. WWEF3002KWB Series 30" f/s elec Color white Market North America Wiring Diagram 316255306 Owner's Guide 316257134 Installation Instructions 316454912 30-INCH FREE- White-Westinghouse Product No.