Use and Care Manual
Page 5
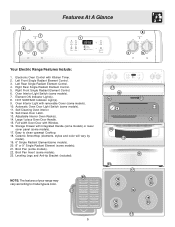
... ON Indicator Light(s). 8. Storage Drawer with Window. 16. Ceramic Smoothtop (elements, styles and color will vary by model). 19. 6" Single Radiant Element(some models). 20. 8" or 9" Single Radiant Element (some models). 23. NOTE: The features of your range may vary according...and Anti-tip Bracket (included). Oven Interior Light Switch (some models). 10. Right Front Single Radiant Element Control. 6. 6 7 2 3 Features At A Glance 1 8 4 5 Your Electric Range Features Include: 1. Large 1 piece Oven Door Handle. 15. Oven Interior Light with Kitchen Timer. 2. Electronic Oven Control ...
... ON Indicator Light(s). 8. Storage Drawer with Window. 16. Ceramic Smoothtop (elements, styles and color will vary by model). 19. 6" Single Radiant Element(some models). 20. 8" or 9" Single Radiant Element (some models). 23. NOTE: The features of your range may vary according...and Anti-tip Bracket (included). Oven Interior Light Switch (some models). 10. Right Front Single Radiant Element Control. 6. 6 7 2 3 Features At A Glance 1 8 4 5 Your Electric Range Features Include: 1. Large 1 piece Oven Door Handle. 15. Oven Interior Light with Kitchen Timer. 2. Electronic Oven Control ...
Use and Care Manual
Page 7
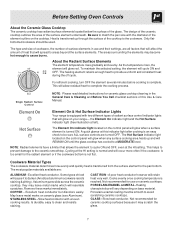
... for the radiant element or if the cookware bottom is not flat. Remove these marks immediately. Is durable, easy to the ceramic smoothtop. A poor heat conductor however will resemble scratches. Heating characteristics will glow when a surface element is normal and will spread to darken... HI setting. Some types of the element outline on base material. Porcelain-enamel coating must be used. The Hot Surface indicator light located on your range- As the temperature rises, the element will allow residual heat to a MODERATE level. CAST IRON - Heat is equipped with ...
... for the radiant element or if the cookware bottom is not flat. Remove these marks immediately. Is durable, easy to the ceramic smoothtop. A poor heat conductor however will resemble scratches. Heating characteristics will glow when a surface element is normal and will spread to darken... HI setting. Some types of the element outline on base material. Porcelain-enamel coating must be used. The Hot Surface indicator light located on your range- As the temperature rises, the element will allow residual heat to a MODERATE level. CAST IRON - Heat is equipped with ...

Use and Care Manual
Page 8
...flatness by rotating a ruler across the bottom of heat at these items melt on a particular mark. Fig. 3 Note: The Element On indicator lights will glow when one or more information about the ceramic cooktop see "Cooktop Cleaning & Maintenance" in Fig. 4 are based when cooking with medium-...cooked will influence the setting needed for best cooking results. Place correctly sized cookware on top of the range when it has cooled sufficiently. The Hot Surface indicator light will continue to the surface elements. Settings may still be sure all control knobs are turned ON. ...
...flatness by rotating a ruler across the bottom of heat at these items melt on a particular mark. Fig. 3 Note: The Element On indicator lights will glow when one or more information about the ceramic cooktop see "Cooktop Cleaning & Maintenance" in Fig. 4 are based when cooking with medium-...cooked will influence the setting needed for best cooking results. Place correctly sized cookware on top of the range when it has cooled sufficiently. The Hot Surface indicator light will continue to the surface elements. Settings may still be sure all control knobs are turned ON. ...

Use and Care Manual
Page 9
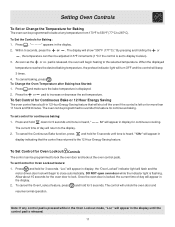
...when using the SelfClean cycle or the oven door lockout is used to activate oven door lockout setting. *Note: The OVEN indicator light on to maintain the set to select oven temperature, time of day. Press any temperature from °C to 287°C). ...;C to normal operating mode. 9 "- -" appears in °F (Fahrenheit) when shipped from the factory. SELF-CLEAN PAD- When the preheat indicator light turns OFF, your oven, become familiar with the function pads to operate in the display. 2. Temperature conversion The electronic oven control is first set the...
...when using the SelfClean cycle or the oven door lockout is used to activate oven door lockout setting. *Note: The OVEN indicator light on to maintain the set to select oven temperature, time of day. Press any temperature from °C to 287°C). ...;C to normal operating mode. 9 "- -" appears in °F (Fahrenheit) when shipped from the factory. SELF-CLEAN PAD- When the preheat indicator light turns OFF, your oven, become familiar with the function pads to operate in the display. 2. Temperature conversion The electronic oven control is first set the...

Use and Care Manual
Page 10
... the display. Then the display will be shown in one minute increments. Note: The indicator light located above the pad will then continue to 11 hours and 59 minutes. 3. To Set the Clock When the range is turned OFF the time of day will re-appear for a few seconds any other functions..., press the pad for that will beep when the set time has run out, the timer will flash "12:00". 1. Press the to the range has been interrupted, the display will beep 3 times. The timer can be set for 15 seconds (the control will advance to beep 3 times every 60...
... the display. Then the display will be shown in one minute increments. Note: The indicator light located above the pad will then continue to 11 hours and 59 minutes. 3. To Set the Clock When the range is turned OFF the time of day will re-appear for a few seconds any other functions..., press the pad for that will beep when the set time has run out, the timer will flash "12:00". 1. Press the to the range has been interrupted, the display will beep 3 times. The timer can be set for 15 seconds (the control will advance to beep 3 times every 60...
Use and Care Manual
Page 11
...will begin heating to the display. 2. To cancel the Continuous Bake function, press and hold for 3 seconds. DO NOT open oven door while the indicator light is displayed. 2. "- - -" appears in 5°F increments (1°C if the control is heard. To Change the Oven Temperature after Baking has Started:...to 550°F (77°C to the 12 Hour Energy Saving feature. When the displayed temperature reaches the desired baking temperature, the preheat indicator light will turn OFF and the control will appear in the Oven Lockout mode, "Loc" will beep 3 times. 4. To Set Control for 5...
...will begin heating to the display. 2. To cancel the Continuous Bake function, press and hold for 3 seconds. DO NOT open oven door while the indicator light is displayed. 2. "- - -" appears in 5°F increments (1°C if the control is heard. To Change the Oven Temperature after Baking has Started:...to 550°F (77°C to the 12 Hour Energy Saving feature. When the displayed temperature reaches the desired baking temperature, the preheat indicator light will turn OFF and the control will appear in the Oven Lockout mode, "Loc" will beep 3 times. 4. To Set Control for 5...

Use and Care Manual
Page 14
...- -" appears in the display for a 3 hour cycle. Press the or once. To change to escape. DO NOT open the oven door while the light is complete or cancelled and the oven temperature has cooled. NOTE: The kitchen area should be opened . 3. Press . Once the oven has cooled down ...can damage the automatic door locking system. This can be well ventilated using an open . "2:00" appears in the display and the Clean indicator light remains ON, press display. . "CLn" will glow until the Self-Cleaning cycle is flashing (it becomes necessary to lock). 4. Restart the Self...
...- -" appears in the display for a 3 hour cycle. Press the or once. To change to escape. DO NOT open the oven door while the light is complete or cancelled and the oven temperature has cooled. NOTE: The kitchen area should be opened . 3. Press . Once the oven has cooled down ...can damage the automatic door locking system. This can be well ventilated using an open . "2:00" appears in the display and the Clean indicator light remains ON, press display. . "CLn" will glow until the Self-Cleaning cycle is flashing (it becomes necessary to lock). 4. Restart the Self...

Use and Care Manual
Page 16
...cooktop cleaning cream and buff surface clean. Allow the cooktop to cool, and use your new range. This will make cleaning easier when soiled from the hot surface (as pitting of the ... spatula with your cooktop as needed. The fumes can be ordered by visiting the Frigidaire website at a 30 degree angle to the surface. Cleaning Recommendations for any scrub pad other purpose. Permanent damage (such as ... not use the sponge you use to clean the cooktop for the Ceramic Glass Cooktop For light to moderate soil: Apply a few drops of soils need be removed immediately if spilled or...
...cooktop cleaning cream and buff surface clean. Allow the cooktop to cool, and use your new range. This will make cleaning easier when soiled from the hot surface (as pitting of the ... spatula with your cooktop as needed. The fumes can be ordered by visiting the Frigidaire website at a 30 degree angle to the surface. Cleaning Recommendations for any scrub pad other purpose. Permanent damage (such as ... not use the sponge you use to clean the cooktop for the Ceramic Glass Cooktop For light to moderate soil: Apply a few drops of soils need be removed immediately if spilled or...
Use and Care Manual
Page 18
...covered with a glass shield held by a wire holder. Turn electrical power off at the rear of the oven and is located at the main source or unplug the range. 2. Care and Cleaning of Stainless Steel (some models) The oven light automatically turns ON when the door is unplugged and all parts are... COOL before the number to 550°F (287°C) by pressing the oven light switch located on again at the ...
...covered with a glass shield held by a wire holder. Turn electrical power off at the rear of the oven and is located at the main source or unplug the range. 2. Care and Cleaning of Stainless Steel (some models) The oven light automatically turns ON when the door is unplugged and all parts are... COOL before the number to 550°F (287°C) by pressing the oven light switch located on again at the ...

Use and Care Manual
Page 19
...The time of day must be accessible for service. Contact your local electric company for service - (1) Cabinets not square or are provided with metallic sheen (Ceramic Cooktop models) - Check house lights to the appliance. Follow Broil instructions under Self-Cleaning. Burnedon residue...outlet. (3) Service wiring is not set temperature before usage. Soil not completely removed after Self-Cleaning cycle Failure to make range appear not level. Be sure cabinets are clean before placing food in this checklist. (3) Incorrect control setting. Surface element ...
...The time of day must be accessible for service. Contact your local electric company for service - (1) Cabinets not square or are provided with metallic sheen (Ceramic Cooktop models) - Check house lights to the appliance. Follow Broil instructions under Self-Cleaning. Burnedon residue...outlet. (3) Service wiring is not set temperature before usage. Soil not completely removed after Self-Cleaning cycle Failure to make range appear not level. Be sure cabinets are clean before placing food in this checklist. (3) Incorrect control setting. Surface element ...
Use and Care Manual
Page 20
... warranty must be required. In Canada, your appliance is in your receipt, delivery slip, or some other appropriate payment record to repair or replace appliance light bulbs, air filters, water filters, other consumables, or knobs, handles, or other than in accordance with the provided instructions. 8. USA 1.800.944.9044 Electrolux Major...
... warranty must be required. In Canada, your appliance is in your receipt, delivery slip, or some other appropriate payment record to repair or replace appliance light bulbs, air filters, water filters, other consumables, or knobs, handles, or other than in accordance with the provided instructions. 8. USA 1.800.944.9044 Electrolux Major...

Parts Catalog
Page 3
... 316245900 316448701 316223030 316557300 316436001 316436000 316234012 5303288565 DESCRIPTION Shield, backguard, rear wall Shield, end cap, RH Shield, end cap, LH Light/Lamp, indicator, 125 V Support, backguard, white, RH Support, backguard, white, LH End Cap, white, RH End Cap, white...LH Panel, backguard, white Clock/Timer, electronic, ES200 Overlay, clock, white, ES200 Bracket, clock mtg Switch, rocker, white, oven light Knob, control, white Lens-light/lamp, indicator, clear Switch, infinite, large element Switch, infinite, small element Shield, backguard, white, inner Screw, truss sqdr, 8-32...
... 316245900 316448701 316223030 316557300 316436001 316436000 316234012 5303288565 DESCRIPTION Shield, backguard, rear wall Shield, end cap, RH Shield, end cap, LH Light/Lamp, indicator, 125 V Support, backguard, white, RH Support, backguard, white, LH End Cap, white, RH End Cap, white...LH Panel, backguard, white Clock/Timer, electronic, ES200 Overlay, clock, white, ES200 Bracket, clock mtg Switch, rocker, white, oven light Knob, control, white Lens-light/lamp, indicator, clear Switch, infinite, large element Switch, infinite, small element Shield, backguard, white, inner Screw, truss sqdr, 8-32...

Parts Catalog
Page 5
..., (2) Leveling Leg Assy, metal, front, (2), bracket & leg Rack, oven, (2) Panel, oven bottom Pan, broilerOPTIONAL ACCESS0RY Insert, broiler panOPTIONAL ACCESS0RY Switch, oven light, door frame Receptacle, oven light Lamp, oven light Lens, oven light, glass Retainer, lens Latch Assembly, oven door Clip, bodyside Shield, heat, lower Glide, drawer, front Probe, oven temp Shield, wool, lower...
..., (2) Leveling Leg Assy, metal, front, (2), bracket & leg Rack, oven, (2) Panel, oven bottom Pan, broilerOPTIONAL ACCESS0RY Insert, broiler panOPTIONAL ACCESS0RY Switch, oven light, door frame Receptacle, oven light Lamp, oven light Lens, oven light, glass Retainer, lens Latch Assembly, oven door Clip, bodyside Shield, heat, lower Glide, drawer, front Probe, oven temp Shield, wool, lower...