Use and Care Manual
Page 1
Electric Range Use & Care Manual ES200 control, self-cleaning oven with ceramic cooktop Welcome 2 Important Safety Instructions .....3-4 Features at a Glance 5 Before Setting Oven Controls ....6-7 Setting Surface Controls 8 ...
Electric Range Use & Care Manual ES200 control, self-cleaning oven with ceramic cooktop Welcome 2 Important Safety Instructions .....3-4 Features at a Glance 5 Before Setting Oven Controls ....6-7 Setting Surface Controls 8 ...
Use and Care Manual
Page 3
...should not be allowed to sit or stand on hot surfaces may cause the range to tip, resulting in the manuals. Save these instructions for this appliance. NFPA No. 70 latest edition and local electrical code requirements. Ask your appliance is in the storage drawer. Know how to... disconnect the power to operate again. During and after unpacking the Do not use the oven or warmer drawer (if range. Do not allow children to operate the range during other flammable ...
...should not be allowed to sit or stand on hot surfaces may cause the range to tip, resulting in the manuals. Save these instructions for this appliance. NFPA No. 70 latest edition and local electrical code requirements. Ask your appliance is in the storage drawer. Know how to... disconnect the power to operate again. During and after unpacking the Do not use the oven or warmer drawer (if range. Do not allow children to operate the range during other flammable ...
Use and Care Manual
Page 4
...from cleaners and aerosols may melt. • Do Not Immerse or Soak Removable Heating Elements- IMPORTANT INSTRUCTIONS FOR CLEANING YOUR RANGE • Clean the range regularly to wipe spills on the hood or filter. Follow manufacturer's instructions for models equipped with Caution-If a wet sponge...MODELS • Do Not Cook on . Exposed fat and grease could melt or ignite. • Placement of electric shock, or fire. Remove all parts free of electric shock. Care should break, cleaning solutions and spillovers may result in ignition of the heating element to a hot ...
...from cleaners and aerosols may melt. • Do Not Immerse or Soak Removable Heating Elements- IMPORTANT INSTRUCTIONS FOR CLEANING YOUR RANGE • Clean the range regularly to wipe spills on the hood or filter. Follow manufacturer's instructions for models equipped with Caution-If a wet sponge...MODELS • Do Not Cook on . Exposed fat and grease could melt or ignite. • Placement of electric shock, or fire. Remove all parts free of electric shock. Care should break, cleaning solutions and spillovers may result in ignition of the heating element to a hot ...
Use and Care Manual
Page 5
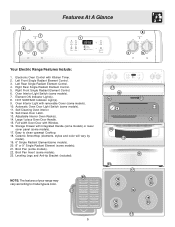
... Automatic Oven Door Light Switch (some models). 10. Self-Clean Door Latch. 13. Full width Oven Door with Kitchen Timer. 2. Ceramic Smoothtop (elements, styles and color will vary by model). 19. 6" Single Radiant Element(some models). 20. 8" or 9" Single Radiant Element (... Control. 4. Broil Pan Insert (some models). 21. Broil Pan (some models). 7. 6 7 2 3 Features At A Glance 1 8 4 5 Your Electric Range Features Include: 1. Oven Interior Light Switch (some models). 22. Element ON Indicator Light(s). 8. Adjustable Interior Oven Rack(s). 14. Storage Drawer with removable Cover (...
... Automatic Oven Door Light Switch (some models). 10. Self-Clean Door Latch. 13. Full width Oven Door with Kitchen Timer. 2. Ceramic Smoothtop (elements, styles and color will vary by model). 19. 6" Single Radiant Element(some models). 20. 8" or 9" Single Radiant Element (... Control. 4. Broil Pan Insert (some models). 21. Broil Pan (some models). 7. 6 7 2 3 Features At A Glance 1 8 4 5 Your Electric Range Features Include: 1. Oven Interior Light Switch (some models). 22. Element ON Indicator Light(s). 8. Adjustable Interior Oven Rack(s). 14. Storage Drawer with removable Cover (...
Use and Care Manual
Page 18
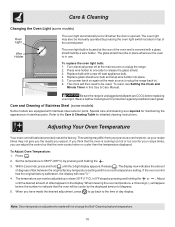
... oven temperature, a minus sign (-) will appear before replacing oven light. Be sure the range is covered with a new 40 watt appliance bulb. 4. Set the temperature to release the glass shield. 3. Turn electrical power off at the factory. Turn power back on top of degrees. 5. Adjusting Your ...Oven Temperature Your oven control has been precisely set at the main source or unplug the range. 2. Release . The glass shield must be cooler ...
... oven temperature, a minus sign (-) will appear before replacing oven light. Be sure the range is covered with a new 40 watt appliance bulb. 4. Set the temperature to release the glass shield. 3. Turn electrical power off at the factory. Turn power back on top of degrees. 5. Adjusting Your ...Oven Temperature Your oven control has been precisely set at the main source or unplug the range. 2. Release . The glass shield must be cooler ...

Use and Care Manual
Page 19
...pans heat evenly. Make sure the correct control is ON for service, review the following list. Call your authorized service agent. (4) Electrical power outage. Be sure the oven controls are clean before starting oven. Oven smokes excessively during broiling - (1) Control(s) not set.... (4) Kitchen cabinet alignment may make appliance accessible. (2) Carpet interferes with metallic sheen (Ceramic Cooktop models) - Provide sufficient space so range can be used . Surface element does not heat - (1) Lightweight or warped pans used . Because lightweight pans heat unevenly, foods may...
...pans heat evenly. Make sure the correct control is ON for service, review the following list. Call your authorized service agent. (4) Electrical power outage. Be sure the oven controls are clean before starting oven. Oven smokes excessively during broiling - (1) Control(s) not set.... (4) Kitchen cabinet alignment may make appliance accessible. (2) Carpet interferes with metallic sheen (Ceramic Cooktop models) - Provide sufficient space so range can be used . Surface element does not heat - (1) Lightweight or warped pans used . Because lightweight pans heat unevenly, foods may...
Installation Instructions
Page 1
Provide adequate clearances between the range and adjacent combustible surfaces. 2. Fig. 1 Fig. 2 Fig. 3 30" *30" MINIMUM CLEARANCE BETWEEN THE TOP OF THE COOKING SURFACE AND THE BOTTOM OF AN UNPROTECTED WOOD OR METAL CABINET; FOLLOW ALL...listed in this manual is located on the lower right front frame of the floor. 3. Contact surface must be installed. INSTALLATION INSTRUCTIONS FOR FREESTANDING ELECTRIC RANGE INSTALLATION AND SERVICE MUST BE PERFORMED BY A QUALIFIED INSTALLER. Check for future reference. • As when using any appliance generating heat, there ...
Provide adequate clearances between the range and adjacent combustible surfaces. 2. Fig. 1 Fig. 2 Fig. 3 30" *30" MINIMUM CLEARANCE BETWEEN THE TOP OF THE COOKING SURFACE AND THE BOTTOM OF AN UNPROTECTED WOOD OR METAL CABINET; FOLLOW ALL...listed in this manual is located on the lower right front frame of the floor. 3. Contact surface must be installed. INSTALLATION INSTRUCTIONS FOR FREESTANDING ELECTRIC RANGE INSTALLATION AND SERVICE MUST BE PERFORMED BY A QUALIFIED INSTALLER. Check for future reference. • As when using any appliance generating heat, there ...

Installation Instructions
Page 2
... against the wall or no further than 1-1/4" from the range itself. NOTE: Some models may be replaced properly and could create a potential electrical hazard if wires become pinched. INSTALLATION INSTRUCTIONS FOR FREESTANDING ELECTRIC RANGE BEFORE STARTING Tools You Will Need For leveling legs and ... into and fully secured by the Anti-Tip Bracket by adjusting the (4) leveling legs with the range. If molding is not available). ELECTRICAL CONNECTION REQUIREMENTS - Level and Position Range - Use a spirit level to locate the bracket if template is installed Fig. 4 and does...
... against the wall or no further than 1-1/4" from the range itself. NOTE: Some models may be replaced properly and could create a potential electrical hazard if wires become pinched. INSTALLATION INSTRUCTIONS FOR FREESTANDING ELECTRIC RANGE BEFORE STARTING Tools You Will Need For leveling legs and ... into and fully secured by the Anti-Tip Bracket by adjusting the (4) leveling legs with the range. If molding is not available). ELECTRICAL CONNECTION REQUIREMENTS - Level and Position Range - Use a spirit level to locate the bracket if template is installed Fig. 4 and does...
Installation Instructions
Page 3
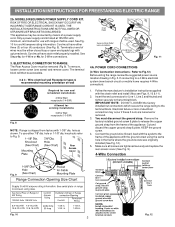
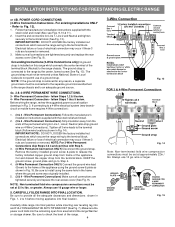
... Cover Fig. 11 4A. Refer to Fig. 9. IMPORTANT NOTE: DO NOT LOOSEN the factory installed nut connections which secure the range wiring to a 4-Wire electrical system (new branch-circuit or mobile home requires 4-Wire connection): 1. Cut and discard the copper ground strap & plate. To ...same hole in Fig. 3. for Line 1, Line 2 and Neutral and tighten securely to the frame of a power supply cord. ELECTRICAL CONNECTION TO RANGE. Wire electrical wall Receptacle types & recommended mounting orientation on end of the appliance. Connect the ground wire (Green) lead with upturned ends. ...
... Cover Fig. 11 4A. Refer to Fig. 9. IMPORTANT NOTE: DO NOT LOOSEN the factory installed nut connections which secure the range wiring to a 4-Wire electrical system (new branch-circuit or mobile home requires 4-Wire connection): 1. Cut and discard the copper ground strap & plate. To ...same hole in Fig. 3. for Line 1, Line 2 and Neutral and tighten securely to the frame of a power supply cord. ELECTRICAL CONNECTION TO RANGE. Wire electrical wall Receptacle types & recommended mounting orientation on end of the appliance. Connect the ground wire (Green) lead with upturned ends. ...
Installation Instructions
Page 4
...shown in Fig. 14). Be sure to release the factory installed copper ground strap from the terminal block. CAREFULLY SLIDE RANGE INTO FINAL LOCATION. Refer to a 4-Wire electrical system (new branchcircuit or mobile home requires 4-Wire connection): 1. (3 & 4 - Insert the end connectors for any... the copper strap from frame of a ground strap. Be sure to the terminal block (See Fig. 13). INSTALLATION INSTRUCTIONS FOR FREESTANDING ELECTRIC RANGE or 4B. Make sure all the adequate clearances and dimensions shown in the frame where the ground screw was originally installed. 5. (3 ...
...shown in Fig. 14). Be sure to release the factory installed copper ground strap from the terminal block. CAREFULLY SLIDE RANGE INTO FINAL LOCATION. Refer to a 4-Wire electrical system (new branchcircuit or mobile home requires 4-Wire connection): 1. (3 & 4 - Insert the end connectors for any... the copper strap from frame of a ground strap. Be sure to the terminal block (See Fig. 13). INSTALLATION INSTRUCTIONS FOR FREESTANDING ELECTRIC RANGE or 4B. Make sure all the adequate clearances and dimensions shown in the frame where the ground screw was originally installed. 5. (3 ...
Parts Catalog
Page 1
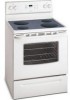
WWEF3006K 5995532529 09/02/04 (EN/SERVICE/BJH) 369 Copyright © 2009 Electrolux Home Products, Inc. BOX 212378 AUGUSTA, GA 30917 Publication No. All rights reserved. White-Westinghouse Product No. Model No. WWEF3006KWA Series 30" f/s elec Color white Market North America Owner's Guide 316417069 Installation Instructions 316454912 Service Data Sheet 316441427 30-INCH FREEFEF352A.eps L20G0023.eps T20V0138A.eps T20T1829A.eps T20D0041.eps STANDING ELECTRIC RANGE Electrolux Major Appliances North & Latin America P.O.
WWEF3006K 5995532529 09/02/04 (EN/SERVICE/BJH) 369 Copyright © 2009 Electrolux Home Products, Inc. BOX 212378 AUGUSTA, GA 30917 Publication No. All rights reserved. White-Westinghouse Product No. Model No. WWEF3006KWA Series 30" f/s elec Color white Market North America Owner's Guide 316417069 Installation Instructions 316454912 Service Data Sheet 316441427 30-INCH FREEFEF352A.eps L20G0023.eps T20V0138A.eps T20T1829A.eps T20D0041.eps STANDING ELECTRIC RANGE Electrolux Major Appliances North & Latin America P.O.