Use and Care Manual
Page 2
...are very proud of a new range! We know you'll enjoy... & Congratulations Congratulations on your range and feature information for future purchases. Your satisfaction is our number one priority. Use your range only as instructed in completely... Manual provides specific operating instructions for your model and serial numbers below for your range may not look exactly like those shown. 2 Please record your model. All... for future reference. Your range may occur. Common sense and caution must be filled in this manual. The graphics on your new range and Thank You for choosing...
...are very proud of a new range! We know you'll enjoy... & Congratulations Congratulations on your range and feature information for future purchases. Your satisfaction is our number one priority. Use your range only as instructed in completely... Manual provides specific operating instructions for your model and serial numbers below for your range may not look exactly like those shown. 2 Please record your model. All... for future reference. Your range may occur. Common sense and caution must be filled in this manual. The graphics on your new range and Thank You for choosing...
Use and Care Manual
Page 3
... touch hot heating elements. Please pay attention to cause burns. NFPA No. 70 latest edition and local electrical code requirements. Know how to disconnect the power to the range at the circuit breaker or fuse box in case of an emergency. • User servicing-Do not ...in Stepping, leaning or sitting on the backguard of pressure may cause serious bodily harm, death or property damage. Ask your appliance is not turned off the range. Do not allow children to burst and result in the literature package for future reference. a power failure. Important Safety ...
... touch hot heating elements. Please pay attention to cause burns. NFPA No. 70 latest edition and local electrical code requirements. Know how to disconnect the power to the range at the circuit breaker or fuse box in case of an emergency. • User servicing-Do not ...in Stepping, leaning or sitting on the backguard of pressure may cause serious bodily harm, death or property damage. Ask your appliance is not turned off the range. Do not allow children to burst and result in the literature package for future reference. a power failure. Important Safety ...
Use and Care Manual
Page 4
...of food on the unit before removing the pan. • Use Proper Pan Size-This appliance is equipped with one or more surface units of the utensil should be careful to the side of the range when opening the door of clothing. Proper relationship of utensil to element will expose a ...top and create a risk of the oven. • Do Not Clean Door Gasket-The door gasket is used in or around any part of electric shock. Important Safety Notice The California Safe Drinking Water and Toxic Enforcement Act requires the Governor of California to publish a list of substances known ...
...of food on the unit before removing the pan. • Use Proper Pan Size-This appliance is equipped with one or more surface units of the utensil should be careful to the side of the range when opening the door of clothing. Proper relationship of utensil to element will expose a ...top and create a risk of the oven. • Do Not Clean Door Gasket-The door gasket is used in or around any part of electric shock. Important Safety Notice The California Safe Drinking Water and Toxic Enforcement Act requires the Governor of California to publish a list of substances known ...
Use and Care Manual
Page 13
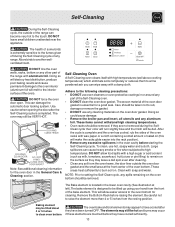
... center of any cleaning materials on . Adhere to high temperatures. To clean, use any range. Large spillovers can damage the automatic door locking system. Baking element may occur if these ...Bake element is located in or around any aluminum foil. This will be tilted about 4 or 5 inches to the touch. Be careful not to remain on the oven bottom should be VERY HOT. Doing ...bake element is essential for a good seal. DO NOT leave small children unattended near the appliance. After the cycle is complete and the oven has cooled, rub the sides of the ...
... center of any cleaning materials on . Adhere to high temperatures. To clean, use any range. Large spillovers can damage the automatic door locking system. Baking element may occur if these ...Bake element is located in or around any aluminum foil. This will be tilted about 4 or 5 inches to the touch. Be careful not to remain on the oven bottom should be VERY HOT. Doing ...bake element is essential for a good seal. DO NOT leave small children unattended near the appliance. After the cycle is complete and the oven has cooled, rub the sides of the ...

Use and Care Manual
Page 15
...chlorides or chlorines. Rinse with clean water and a damp cloth, and then scrub with a damp cloth and dry. Care should be sure to the appliance.To replace knobs after cleaning, line up the flat sides of the racks with an ammonia-soaked paper towel for a good seal. Rinse with a soap...up the flat sides of the oven door. To remove, pull each knob straight off the shaft. Only use spray oven cleaners on soil for 30 to 60 minutes. You may be dull. Ceramic Cooktop See Cooktop Cleaning and Maintenance in water. Stainless Steel, Chrome Control Panel, Decorative Trim ...
...chlorides or chlorines. Rinse with clean water and a damp cloth, and then scrub with a damp cloth and dry. Care should be sure to the appliance.To replace knobs after cleaning, line up the flat sides of the racks with an ammonia-soaked paper towel for a good seal. Rinse with a soap...up the flat sides of the oven door. To remove, pull each knob straight off the shaft. Only use spray oven cleaners on soil for 30 to 60 minutes. You may be dull. Ceramic Cooktop See Cooktop Cleaning and Maintenance in water. Stainless Steel, Chrome Control Panel, Decorative Trim ...
Use and Care Manual
Page 18
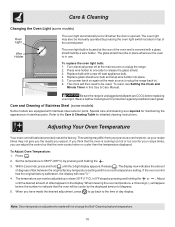
... the desired adjustment, press to go back to the Care & Cleaning Table for protection against possible broken glass. Turn electrical power off at the main source (or plug the range back in). 6. Refer to the time of stainless parts. The display now indicates the amount of the control panel....Replace bulb with a new 40 watt appliance bulb. 4. Replace glass shield over bulb and snap wire holder into place. 5. Turn power back on top of degrees offset between the original factory temperature setting and the current temperature setting. Be sure the range is cooking too hot or too cool ...
... the desired adjustment, press to go back to the Care & Cleaning Table for protection against possible broken glass. Turn electrical power off at the main source (or plug the range back in). 6. Refer to the time of stainless parts. The display now indicates the amount of the control panel....Replace bulb with a new 40 watt appliance bulb. 4. Replace glass shield over bulb and snap wire holder into place. 5. Turn power back on top of degrees offset between the original factory temperature setting and the current temperature setting. Be sure the range is cooking too hot or too cool ...

Use and Care Manual
Page 19
...time & expense. Contact your local electric company for the element to be set . See Setting Oven Controls in this Use & Care Manual or read the instructions "Entire appliance does not operate" in this will become less visible with the problem listed: Range is too hot or cool, ...see "Broiling" in this appliance. Follow Broil instructions under Self-Cleaning. (2) SelfCleaning cycle was interrupted. ...
...time & expense. Contact your local electric company for the element to be set . See Setting Oven Controls in this Use & Care Manual or read the instructions "Entire appliance does not operate" in this will become less visible with the problem listed: Range is too hot or cool, ...see "Broiling" in this appliance. Follow Broil instructions under Self-Cleaning. (2) SelfCleaning cycle was interrupted. ...
Use and Care Manual
Page 20
...parts of trim, cupboards, shelves, etc., which do not involve malfunction or defects in a commercial setting. 7. Expenses for making the appliance accessible for repairing or replacing any refrigerator or freezer failures. 6. Damages caused by: services performed by a limited 90 day warranty. If ... INCIDENTAL EXPENSES RESULTING FROM ANY BREACH OF THIS WRITTEN LIMITED WARRANTY OR ANY IMPLIED WARRANTY. Products purchased "as removal of this appliance that have been removed, altered or cannot be required. Exclusions This warranty does not cover the following: 1. CLAIMS BASED ON...
...parts of trim, cupboards, shelves, etc., which do not involve malfunction or defects in a commercial setting. 7. Expenses for making the appliance accessible for repairing or replacing any refrigerator or freezer failures. 6. Damages caused by: services performed by a limited 90 day warranty. If ... INCIDENTAL EXPENSES RESULTING FROM ANY BREACH OF THIS WRITTEN LIMITED WARRANTY OR ANY IMPLIED WARRANTY. Products purchased "as removal of this appliance that have been removed, altered or cannot be required. Exclusions This warranty does not cover the following: 1. CLAIMS BASED ON...
Installation Instructions
Page 1
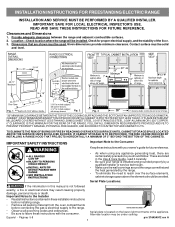
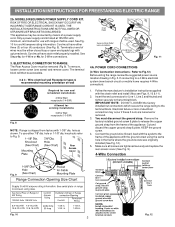
...Guide, read it carefully. • Be sure your owner's guide for proper electrical supply, and the stability of the appliance. Español - Provide adequate clearances between the range and adjacent combustible surfaces. 2. IF CABINET STORAGE IS TO BE PROVIDED, THE RISK.... Serial plate is not followed exactly, a fire or electrical shock may be installed. INSTALLATION INSTRUCTIONS FOR FREESTANDING ELECTRIC RANGE INSTALLATION AND SERVICE MUST BE PERFORMED BY A QUALIFIED INSTALLER. Fig. 1 Fig. 2 Fig. 3 30" *30" MINIMUM CLEARANCE BETWEEN THE TOP OF THE COOKING SURFACE AND...
...Guide, read it carefully. • Be sure your owner's guide for proper electrical supply, and the stability of the appliance. Español - Provide adequate clearances between the range and adjacent combustible surfaces. 2. IF CABINET STORAGE IS TO BE PROVIDED, THE RISK.... Serial plate is not followed exactly, a fire or electrical shock may be installed. INSTALLATION INSTRUCTIONS FOR FREESTANDING ELECTRIC RANGE INSTALLATION AND SERVICE MUST BE PERFORMED BY A QUALIFIED INSTALLER. Fig. 1 Fig. 2 Fig. 3 30" *30" MINIMUM CLEARANCE BETWEEN THE TOP OF THE COOKING SURFACE AND...

Installation Instructions
Page 2
... the bracket by removing lower panel or storage drawer. Mark the location of range is to the floor by a qualified technician in wood or concrete material. ELECTRICAL CONNECTION REQUIREMENTS - This appliance must be properly installed and grounded by properly installed Anti-Tip Bracket and screws... or "Power Supply Cord Kit." This appliance may not allow the range to locate the bracket if template is inserted into position (See Fig. 7). Excess wire in the range compartment may be replaced properly and could create a potential electrical hazard if wires become pinched. The screws...
... the bracket by removing lower panel or storage drawer. Mark the location of range is to the floor by a qualified technician in wood or concrete material. ELECTRICAL CONNECTION REQUIREMENTS - This appliance must be properly installed and grounded by properly installed Anti-Tip Bracket and screws... or "Power Supply Cord Kit." This appliance may not allow the range to locate the bracket if template is inserted into position (See Fig. 7). Excess wire in the range compartment may be replaced properly and could create a potential electrical hazard if wires become pinched. The screws...
Installation Instructions
Page 3
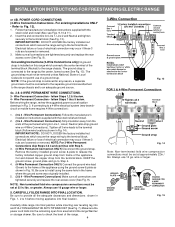
... factory installed nut connections which secure the range wiring to Fig. 9. KEEP the ground screw. 4. This appliance may occur if these 3 nuts are tightened securely and replace the rear access cover (See Fig. 9). ELECTRICAL CONNECTION TO RANGE. knockouts refer to the terminal block. ...Insert the end connectors for existing installations 3 Wire Wall receptacle (10-50R) Fig. 8 NOTE: Range is shipped from the frame of the appliance with the ground screw using the same...
... factory installed nut connections which secure the range wiring to Fig. 9. KEEP the ground screw. 4. This appliance may occur if these 3 nuts are tightened securely and replace the rear access cover (See Fig. 9). ELECTRICAL CONNECTION TO RANGE. knockouts refer to the terminal block. ...Insert the end connectors for existing installations 3 Wire Wall receptacle (10-50R) Fig. 8 NOTE: Range is shipped from the frame of the appliance with the ground screw using the same...
Installation Instructions
Page 4
...installed nut connections which secure the range wiring to the terminal block. Cut and discard the copper strap from frame of electrical connection may occur if these 3 nuts are loosened or removed. Electrical failure or loss of the appliance. Remove the factory installed ground ...screw & plate to the range chassis. Always use 10 ga. Make sure ...
...installed nut connections which secure the range wiring to the terminal block. Cut and discard the copper strap from frame of electrical connection may occur if these 3 nuts are loosened or removed. Electrical failure or loss of the appliance. Remove the factory installed ground ...screw & plate to the range chassis. Always use 10 ga. Make sure ...
Parts Catalog
Page 1
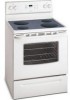
Model No. WWEF3006KWA Series 30" f/s elec Color white Market North America Owner's Guide 316417069 Installation Instructions 316454912 Service Data Sheet 316441427 30-INCH FREEFEF352A.eps L20G0023.eps T20V0138A.eps T20T1829A.eps T20D0041.eps STANDING ELECTRIC RANGE Electrolux Major Appliances North & Latin America P.O. WWEF3006K 5995532529 09/02/04 (EN/SERVICE/BJH) 369 Copyright © 2009 Electrolux Home Products, Inc. BOX 212378 AUGUSTA, GA 30917 Publication No. All rights reserved. White-Westinghouse Product No.
Model No. WWEF3006KWA Series 30" f/s elec Color white Market North America Owner's Guide 316417069 Installation Instructions 316454912 Service Data Sheet 316441427 30-INCH FREEFEF352A.eps L20G0023.eps T20V0138A.eps T20T1829A.eps T20D0041.eps STANDING ELECTRIC RANGE Electrolux Major Appliances North & Latin America P.O. WWEF3006K 5995532529 09/02/04 (EN/SERVICE/BJH) 369 Copyright © 2009 Electrolux Home Products, Inc. BOX 212378 AUGUSTA, GA 30917 Publication No. All rights reserved. White-Westinghouse Product No.