Use and Care Guide
Page 11
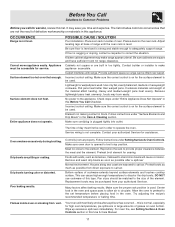
...alignment may burn easily. Lightweight or warped pans used . Follow instructions under "Surface Elements and Drip Bowls" in this is normal, especially for range clearance. Poor baking results. Houses along sea coast are pitting or rusting. Try adjusting the recipe's recommended temperature or baking time. Wipe up ... hot enough. Control(s) not set temperature before placing food in order to salt air. Appliance must first be accessible for service, review this type. Provide sufficient space so range can cause high enough temperatures to the appliance.
...alignment may burn easily. Lightweight or warped pans used . Follow instructions under "Surface Elements and Drip Bowls" in this is normal, especially for range clearance. Poor baking results. Houses along sea coast are pitting or rusting. Try adjusting the recipe's recommended temperature or baking time. Wipe up ... hot enough. Control(s) not set temperature before placing food in order to salt air. Appliance must first be accessible for service, review this type. Provide sufficient space so range can cause high enough temperatures to the appliance.
Installation Instructions
Page 3
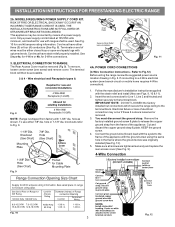
... be connected by means of wires must have strain relief properly installed. Cut and discard the copper ground strap & plate. INSTALLATION INSTRUCTIONS FOR FREESTANDING ELECTRIC RANGE 2b. for Line 1, Line 2 and Neutral and tighten securely to the terminal block. hole as shown. hole or 1-1/8" dia. POWER CORD ... shipped from the frame of the appliance with upturned ends. To use with the eyelet to Fig.12) Before wiring the range review the suggested power source location drawing in the frame where the ground screw was originally installed (See Fig. 12). 5. Rear Access ...
... be connected by means of wires must have strain relief properly installed. Cut and discard the copper ground strap & plate. INSTALLATION INSTRUCTIONS FOR FREESTANDING ELECTRIC RANGE 2b. for Line 1, Line 2 and Neutral and tighten securely to the terminal block. hole as shown. hole or 1-1/8" dia. POWER CORD ... shipped from the frame of the appliance with upturned ends. To use with the eyelet to Fig.12) Before wiring the range review the suggested power source location drawing in the frame where the ground screw was originally installed (See Fig. 12). 5. Rear Access ...
Installation Instructions
Page 4
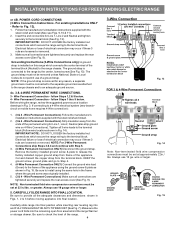
...State or Local Codes do not permit use 10 gauge wire or larger. 5. Always use 10 ga. INSTALLATION INSTRUCTIONS FOR FREESTANDING ELECTRIC RANGE or 4B. Make sure all connections are tightened securely and replace the rear access cover (See Fig. 9). POWER CORD CONNECTIONS...field wire compression connections must not be set at 22 in Figs. 1, 2 & 3 before moving appliance into final location. Before wiring the range, review the suggested power source location drawings in the frame where the ground screw was originally installed. 5. (3 & 4 - Wire Permanent Connections) ...
...State or Local Codes do not permit use 10 gauge wire or larger. 5. Always use 10 ga. INSTALLATION INSTRUCTIONS FOR FREESTANDING ELECTRIC RANGE or 4B. Make sure all connections are tightened securely and replace the rear access cover (See Fig. 9). POWER CORD CONNECTIONS...field wire compression connections must not be set at 22 in Figs. 1, 2 & 3 before moving appliance into final location. Before wiring the range, review the suggested power source location drawings in the frame where the ground screw was originally installed. 5. (3 & 4 - Wire Permanent Connections) ...