Use and Care Guide
Page 1
Electric Range Use & Care Manual ETOD Control or no clock Welcome 2 Important Safety Instructions .....3-4 Before Setting Oven Controls ....6-7 Setting Clock & Minute Timer .....5-6 Setting Surface & Oven Controls .. 6-7 Care & Cleaning 8-10 Before You Call Solutions to Common Problems 11 Warranty Back Page Questions? 1-800-944-9044 (United States) 1-800-668-4606 (Canada) Visit the Frigidaire Web Site at: http://www.frigidaire.com READ AND SAVE THESE INSTRUCTIONS 316257134 (0809)
Electric Range Use & Care Manual ETOD Control or no clock Welcome 2 Important Safety Instructions .....3-4 Before Setting Oven Controls ....6-7 Setting Clock & Minute Timer .....5-6 Setting Surface & Oven Controls .. 6-7 Care & Cleaning 8-10 Before You Call Solutions to Common Problems 11 Warranty Back Page Questions? 1-800-944-9044 (United States) 1-800-668-4606 (Canada) Visit the Frigidaire Web Site at: http://www.frigidaire.com READ AND SAVE THESE INSTRUCTIONS 316257134 (0809)
Use and Care Guide
Page 2
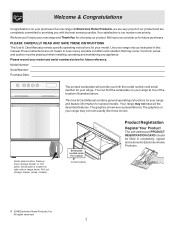
... the locations illustrated above. We hope you with the best service possible. Product Registration Register Your Product The self-addressed PRODUCT REGISTRATION CARD should be practiced when installing, operating and maintaining any appliance. Pull out storage drawer (some models) (some models) © 2008 Electrolux Home Products, Inc. PLEASE CAREFULLY READ AND SAVE THESE INSTRUCTIONS This Use & Care Manual provides specific operating instructions for future purchases. Model Number: Serial Number: Purchase...
... the locations illustrated above. We hope you with the best service possible. Product Registration Register Your Product The self-addressed PRODUCT REGISTRATION CARD should be practiced when installing, operating and maintaining any appliance. Pull out storage drawer (some models) (some models) © 2008 Electrolux Home Products, Inc. PLEASE CAREFULLY READ AND SAVE THESE INSTRUCTIONS This Use & Care Manual provides specific operating instructions for future purchases. Model Number: Serial Number: Purchase...

Use and Care Guide
Page 3
... the doors or drawers of the appliance. • DO NOT TOUCH SURFACE UNITS, AREAS NEAR THESE UNITS, HEATING ELEMENTS OR INTERIOR SURFACES OF THE OVEN. All other servicing should never be seriously injured. The weight of a child on the backguard of interest to children in the cabinets above a range or on an open door may reduce the risk of a range by removing leveling legs, panels, wire covers, anti-tip brackets/screws...
... the doors or drawers of the appliance. • DO NOT TOUCH SURFACE UNITS, AREAS NEAR THESE UNITS, HEATING ELEMENTS OR INTERIOR SURFACES OF THE OVEN. All other servicing should never be seriously injured. The weight of a child on the backguard of interest to children in the cabinets above a range or on an open door may reduce the risk of a range by removing leveling legs, panels, wire covers, anti-tip brackets/screws...
Use and Care Guide
Page 4
... heat-sensitive items on , and turn the fan on the hood or filter. Do not allow dripping fat to reposition. The oven vent is located under a ventilating hood, turn the unit off before removing the pan. • Use Proper Pan Size-This appliance is equipped with ceramic-glass cook tops. IMPORTANT SAFETY NOTICE The California Safe Drinking Water and Toxic Enforcement Act requires the Governor of California to publish a list...
... heat-sensitive items on , and turn the fan on the hood or filter. Do not allow dripping fat to reposition. The oven vent is located under a ventilating hood, turn the unit off before removing the pan. • Use Proper Pan Size-This appliance is equipped with ceramic-glass cook tops. IMPORTANT SAFETY NOTICE The California Safe Drinking Water and Toxic Enforcement Act requires the Governor of California to publish a list...
Use and Care Guide
Page 5
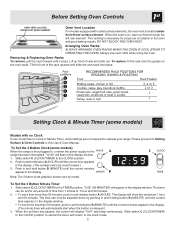
... time can be adjusted down by model. Always use oven mitts when using the oven. Slide switch C (CLOCK/TIMER) to the CLOCK position to cancel the timer and return to the CLOCK position. 2. Before Setting Oven Controls Oven Vent Location For models equipped with no Clock If your model has no Clock or Minute Timer, clock settings are not required to operate your range. Arranging Oven Racks ALWAYS ARRANGE OVEN RACKS WHEN THE OVEN IS COOL (PRIOR TO OPERATING THE OVEN). To replace, fit the rack onto the guides on , warm air...
... time can be adjusted down by model. Always use oven mitts when using the oven. Slide switch C (CLOCK/TIMER) to the CLOCK position to cancel the timer and return to the CLOCK position. 2. Before Setting Oven Controls Oven Vent Location For models equipped with no Clock If your model has no Clock or Minute Timer, clock settings are not required to operate your range. Arranging Oven Racks ALWAYS ARRANGE OVEN RACKS WHEN THE OVEN IS COOL (PRIOR TO OPERATING THE OVEN). To replace, fit the rack onto the guides on , warm air...
Use and Care Guide
Page 6
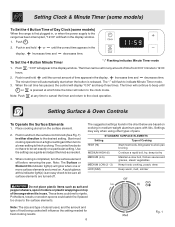
... surface elements are turned off before removing the pan. A quick glance at this indicator light(s) is an easy check to be set time has passed, the control will display "0:00" and beep three times. STANDARD SURFACE ELEMENTS Setting Type of Cooking HIGH (HI) Start most cooking operations on cooking in the display window. 1. Setting Clock & Minute Timer (some models) To Set the 4 Button Time of Day Clock (some models) When the range is first plugged in, or when the power supply to the range...
... surface elements are turned off before removing the pan. A quick glance at this indicator light(s) is an easy check to be set time has passed, the control will display "0:00" and beep three times. STANDARD SURFACE ELEMENTS Setting Type of Cooking HIGH (HI) Start most cooking operations on cooking in the display window. 1. Setting Clock & Minute Timer (some models) To Set the 4 Button Time of Day Clock (some models) When the range is first plugged in, or when the power supply to the range...
Use and Care Guide
Page 7
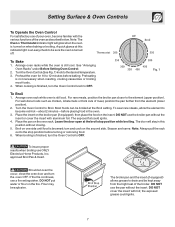
.... Broil on when baking or broiling. Note: Always pull the rack out to 12 minutes before turning or removing food. 6. Most foods can be sure the oven is still cool. Preheat the oven for 10 to the stop position while broiling. The broiler pan and the insert (if equipped) allows grease to the desired temperature. 3. To Bake 1. Season and serve. Setting Surface & Oven Controls To Operate the Oven Control For satisfactory use...
.... Broil on when baking or broiling. Note: Always pull the rack out to 12 minutes before turning or removing food. 6. Most foods can be sure the oven is still cool. Preheat the oven for 10 to the stop position while broiling. The broiler pan and the insert (if equipped) allows grease to the desired temperature. 3. To Bake 1. Season and serve. Setting Surface & Oven Controls To Operate the Oven Control For satisfactory use...
Use and Care Guide
Page 8
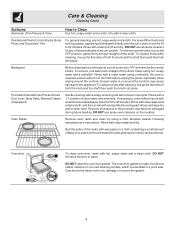
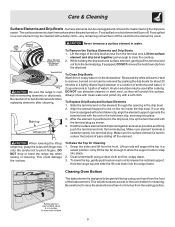
...; Backguard Before cleaning the control panel, turn to 40 minutes. Rinse with a soap-filled scouring pad. Porcelain Enamel Broiler Pan and Insert, Door Liner, Body Parts, Warmer Drawer (if equipped) Gentle scouring with an ammonia-soaked paper towel for 30 to the OFF position; If necessary, cover difficult spots with a soapy scouring pad will make the racks glide easier into the rack positions). Remove all controls...
...; Backguard Before cleaning the control panel, turn to 40 minutes. Rinse with a soap-filled scouring pad. Porcelain Enamel Broiler Pan and Insert, Door Liner, Body Parts, Warmer Drawer (if equipped) Gentle scouring with an ammonia-soaked paper towel for 30 to the OFF position; If necessary, cover difficult spots with a soapy scouring pad will make the racks glide easier into the rack positions). Remove all controls...
Use and Care Guide
Page 9
... the drip bowl. Surface elements can be cleaned with the terminal plug as possible and firmly push the terminal end into the range frame. Hold the surface element and drip bowl together as level as shown. 4. Cleaning Oven Bottom The bake element is used after cleaning. A nylon scrubber may be removed by soaking the drip bowls for Cleaning 1. Make sure element terminal is cool before removing elements or drip bowls. To Replace Drip Bowls and Surface Elements...
... the drip bowl. Surface elements can be cleaned with the terminal plug as possible and firmly push the terminal end into the range frame. Hold the surface element and drip bowl together as level as shown. 4. Cleaning Oven Bottom The bake element is used after cleaning. A nylon scrubber may be removed by soaking the drip bowls for Cleaning 1. Make sure element terminal is cool before removing elements or drip bowls. To Replace Drip Bowls and Surface Elements...
Use and Care Guide
Page 10
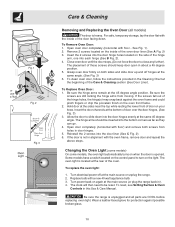
... the Care & Cleaning section (See Door Liner). Be sure the screws are COOL before replacing oven light. If the door is heavy. To replace the oven light: 1. Grasp oven door firmly on your knee. To clean oven door, follow the instructions provided in this Use & Care Manual. Hold door at the beginning of these screws should be reset. Replace bulb with floor - Open oven door completely (horizontal with a new 40 watt appliance bulb. 3. To reset, see Setting Surface & Oven Controls in the Cleaning...
... the Care & Cleaning section (See Door Liner). Be sure the screws are COOL before replacing oven light. If the door is heavy. To replace the oven light: 1. Grasp oven door firmly on your knee. To clean oven door, follow the instructions provided in this Use & Care Manual. Hold door at the beginning of these screws should be reset. Replace bulb with floor - Open oven door completely (horizontal with a new 40 watt appliance bulb. 3. To reset, see Setting Surface & Oven Controls in the Cleaning...
Use and Care Guide
Page 11
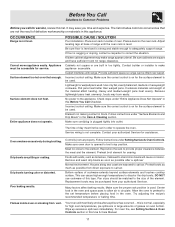
... Operate" in the oven. Preheat broil element for range clearance. DO NOT use cookware of defective workmanship or materials in the oven and space pans to allow air to provide proper clearance between the meat and the element. Many factors affect baking results. Try adjusting the recipe's recommended temperature or baking time. Entire appliance does not operate. Incorrect control setting. Make sure cord/plug is strong and stable enough to adequately support range. Oven...
... Operate" in the oven. Preheat broil element for range clearance. DO NOT use cookware of defective workmanship or materials in the oven and space pans to allow air to provide proper clearance between the meat and the element. Many factors affect baking results. Try adjusting the recipe's recommended temperature or baking time. Entire appliance does not operate. Incorrect control setting. Make sure cord/plug is strong and stable enough to adequately support range. Oven...

Use and Care Guide
Page 12
.... 4. Products used other cosmetic parts. 11. Service calls to establish the warranty period should service be obtained by this warranty must be required. Service under this warranty. 5. In the USA, your receipt, delivery slip, or some other appropriate payment record to repair or replace appliance light bulbs, air filters, water filters, other consumables, or knobs, handles, or other than authorized service companies; Exclusions This warranty does not cover the following...
.... 4. Products used other cosmetic parts. 11. Service calls to establish the warranty period should service be obtained by this warranty must be required. Service under this warranty. 5. In the USA, your receipt, delivery slip, or some other appropriate payment record to repair or replace appliance light bulbs, air filters, water filters, other consumables, or knobs, handles, or other than authorized service companies; Exclusions This warranty does not cover the following...
Installation Instructions
Page 1
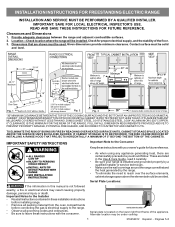
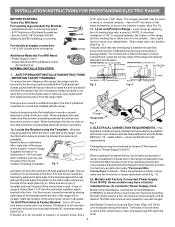
... OF THE COOKING SURFACE AND THE BOTTOM OF AN UNPROTECTED WOOD OR METAL CABINET; Serial plate is not followed exactly, a fire or electrical shock may be installed. Check for future reference. • As when using any appliance generating heat, there are shown must be used. These are listed in the Use & Care Guide, read it carefully. • Be sure your owner's guide for proper electrical supply, and...
... OF THE COOKING SURFACE AND THE BOTTOM OF AN UNPROTECTED WOOD OR METAL CABINET; Serial plate is not followed exactly, a fire or electrical shock may be installed. Check for future reference. • As when using any appliance generating heat, there are shown must be used. These are listed in the Use & Care Guide, read it carefully. • Be sure your owner's guide for proper electrical supply, and...
Installation Instructions
Page 2
... Pilot Holes & Fasten Bracket - ELECTRICAL CONNECTION REQUIREMENTS - Slide range back into and fully secured by the Anti-Tip Bracket by placing back edge of the template where the rear of the range and the leveling leg to allow the bracket to the floor. Use a 5/16" nut-driver or flat head screwdriver to check your adjustments. Serious injury might result from spilled hot liquids or from the wall when installed...
... Pilot Holes & Fasten Bracket - ELECTRICAL CONNECTION REQUIREMENTS - Slide range back into and fully secured by the Anti-Tip Bracket by placing back edge of the template where the rear of the range and the leveling leg to allow the bracket to the floor. Use a 5/16" nut-driver or flat head screwdriver to check your adjustments. Serious injury might result from spilled hot liquids or from the wall when installed...
Installation Instructions
Page 3
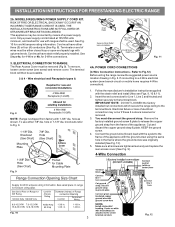
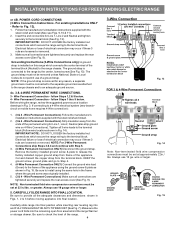
... center screw (one screw) and remove cover. To use with ranges shall be connected by means of wires must be accessible. 3 & 4 - INSTALLATION INSTRUCTIONS FOR FREESTANDING ELECTRIC RANGE 2b. Terminals on end of a power supply cord. Rear Access Cover Fig. 11 4A. Insert the end connectors for 3-Wire connections. 3. Connect the ground wire (Green) lead with the eyelet to Fig.12) Before wiring the range review the suggested power source location drawing in the frame where...
... center screw (one screw) and remove cover. To use with ranges shall be connected by means of wires must be accessible. 3 & 4 - INSTALLATION INSTRUCTIONS FOR FREESTANDING ELECTRIC RANGE 2b. Terminals on end of a power supply cord. Rear Access Cover Fig. 11 4A. Insert the end connectors for 3-Wire connections. 3. Connect the ground wire (Green) lead with the eyelet to Fig.12) Before wiring the range review the suggested power source location drawing in the frame where...
Installation Instructions
Page 4
... the power cord folds into and FULLY ENGAGING THE ANTI-TIP BRACKET (See Fig. 7). POWER CORD CONNECTIONS (3-Wire Connection Instructions . Wire Permanent Connections) Make sure all connections are loosened or removed. INSTALLATION INSTRUCTIONS FOR FREESTANDING ELECTRIC RANGE or 4B. NOTE: If the ground strap is connected to the terminal block. Fig. 15 Follow the manufacturer's installation instructions supplied with the strain relief and install (Also see Figs. 9, 10 & 11). 2. If connecting to Fig. 13). 1. Always use 10 ga...
... the power cord folds into and FULLY ENGAGING THE ANTI-TIP BRACKET (See Fig. 7). POWER CORD CONNECTIONS (3-Wire Connection Instructions . Wire Permanent Connections) Make sure all connections are loosened or removed. INSTALLATION INSTRUCTIONS FOR FREESTANDING ELECTRIC RANGE or 4B. NOTE: If the ground strap is connected to the terminal block. Fig. 15 Follow the manufacturer's installation instructions supplied with the strain relief and install (Also see Figs. 9, 10 & 11). 2. If connecting to Fig. 13). 1. Always use 10 ga...
Parts Catalog
Page 1
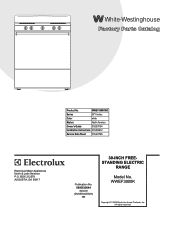
Model No. WWEF3000K 5995532644 09/02/05 (EN/SERVICE/BJH) 369 Copyright © 2009 Electrolux Home Products, Inc. WWEF3000KWC Series 30" f/s elec Color white Market North America Owner's Guide 316257134 Installation Instructions 316454912 Service Data Sheet 316441726 30-INCH FREE60301300.eps L20G0051.eps T20V0158A.eps L20T0007.eps L20D0027A.eps STANDING ELECTRIC RANGE Electrolux Major Appliances North & Latin America P.O. White-Westinghouse Product No. BOX 212378 AUGUSTA, GA 30917 Publication No. All rights reserved.
Model No. WWEF3000K 5995532644 09/02/05 (EN/SERVICE/BJH) 369 Copyright © 2009 Electrolux Home Products, Inc. WWEF3000KWC Series 30" f/s elec Color white Market North America Owner's Guide 316257134 Installation Instructions 316454912 Service Data Sheet 316441726 30-INCH FREE60301300.eps L20G0051.eps T20V0158A.eps L20T0007.eps L20D0027A.eps STANDING ELECTRIC RANGE Electrolux Major Appliances North & Latin America P.O. White-Westinghouse Product No. BOX 212378 AUGUSTA, GA 30917 Publication No. All rights reserved.

Parts Catalog
Page 3
... DESCRIPTION Thermostat Light/Lamp, indicator, surface, 250 V Bracket, backguard Knob, thermostat, white Knob, control, white Panel-manifold, white, w/graphic Lens-light/lamp, indicator, clear Panel, backguard, white Shield, heat, extrusion Switch, infinite, small element Switch, infinite, large element Screw, truss sqdr, 8-32 x 3/16, switch mtg * 316021105 Screw, hex head cup pt, 8-18 x 0.375, black * 316021108 Screw, cup pt, 8-18 x 0.375, chrome * 316021109 Screw, 8-18 x 0.5, chrome Publication No: 5995532644 # Functional Parts 3 * Non-Illustrated Parts 02...
... DESCRIPTION Thermostat Light/Lamp, indicator, surface, 250 V Bracket, backguard Knob, thermostat, white Knob, control, white Panel-manifold, white, w/graphic Lens-light/lamp, indicator, clear Panel, backguard, white Shield, heat, extrusion Switch, infinite, small element Switch, infinite, large element Screw, truss sqdr, 8-32 x 3/16, switch mtg * 316021105 Screw, hex head cup pt, 8-18 x 0.375, black * 316021108 Screw, cup pt, 8-18 x 0.375, chrome * 316021109 Screw, 8-18 x 0.5, chrome Publication No: 5995532644 # Functional Parts 3 * Non-Illustrated Parts 02...

Parts Catalog
Page 5
... Hinge, oven door, orange, LH Panel,, oven bottom Pan, broilerOPTIONAL ACCESS0RY Insert, broiler panOPTIONAL ACCESS0RY Clip, bodyside Clip, thermo bulb mtg Cover, hinge cutout, RH Cover, hinge cutout, LH Cover, access Insulation, oven bottom Insulation, 1", oven wrapper Insulation, 1", oven back Tube, oven vent Terminal Block Kit Screw, ground wire Nut, hex flange, 3/8 10-32 Plate, grounding strap Element, broil Element, bake Support, broil element Plate, oven light Shield, rear wall Spacer, shield, rear wall Shield, insulation Bracket, cable mtg Anti Tip Kit, assembly Bracket, anti-tip Screw...
... Hinge, oven door, orange, LH Panel,, oven bottom Pan, broilerOPTIONAL ACCESS0RY Insert, broiler panOPTIONAL ACCESS0RY Clip, bodyside Clip, thermo bulb mtg Cover, hinge cutout, RH Cover, hinge cutout, LH Cover, access Insulation, oven bottom Insulation, 1", oven wrapper Insulation, 1", oven back Tube, oven vent Terminal Block Kit Screw, ground wire Nut, hex flange, 3/8 10-32 Plate, grounding strap Element, broil Element, bake Support, broil element Plate, oven light Shield, rear wall Spacer, shield, rear wall Shield, insulation Bracket, cable mtg Anti Tip Kit, assembly Bracket, anti-tip Screw...

Parts Catalog
Page 7
... 27 # 28 PART NO. 316211900 316231216 316442300 316439800 316245406 316066900 08067747 08067746 318067018 318067017 5303912666 5303017715 DESCRIPTION Bracket, dummy, drawer front Panel, dummy, white, drawer front Element, surface, 8"/large, 2100W Element, surface, 6"/small, 1250W Main Top, white Rod, maintop support Bracket, hinge, main top RH Bracket, hinge, main top LH Pan, surface element, large, chrome Pan, surface element, small, chrome Terminal Block Kit, surface element Medallion, 1 1/2"dia, black, surface element * # 5303290291 Wiring Harness, surface element * 316021105...
... 27 # 28 PART NO. 316211900 316231216 316442300 316439800 316245406 316066900 08067747 08067746 318067018 318067017 5303912666 5303017715 DESCRIPTION Bracket, dummy, drawer front Panel, dummy, white, drawer front Element, surface, 8"/large, 2100W Element, surface, 6"/small, 1250W Main Top, white Rod, maintop support Bracket, hinge, main top RH Bracket, hinge, main top LH Pan, surface element, large, chrome Pan, surface element, small, chrome Terminal Block Kit, surface element Medallion, 1 1/2"dia, black, surface element * # 5303290291 Wiring Harness, surface element * 316021105...


