
Owners Manual
Page 1
Westinghouse Accu-Smart® Multi-Stage Air Purifier Owner's Manual WAP-811 WAP-812 PLEASE READ AND SAVE ALL INSTRUCTIONS TO ENSURE EFFECTIVE USE OF THIS APPLIANCE 1
Westinghouse Accu-Smart® Multi-Stage Air Purifier Owner's Manual WAP-811 WAP-812 PLEASE READ AND SAVE ALL INSTRUCTIONS TO ENSURE EFFECTIVE USE OF THIS APPLIANCE 1
Owners Manual
Page 2
Table of Contents Using the product 3 Get to Know Your Product (WAP-811 3 Get to Know Your Product (WAP-812 5 Using the Product 6 Using the Remote Control 7 Safety Issues 8 Cautions On Use 9 Features and Functions 10 8-Stage Purification System 10 Accu-Smart® Purification Management System 10 Filter Life 11 WAP-811 11 WAP-812 11 Replacing Filters 12 WAP-811 12 WAP-812 13 Troubleshooting 14 Specifications 14 Warranty 15 2
Table of Contents Using the product 3 Get to Know Your Product (WAP-811 3 Get to Know Your Product (WAP-812 5 Using the Product 6 Using the Remote Control 7 Safety Issues 8 Cautions On Use 9 Features and Functions 10 8-Stage Purification System 10 Accu-Smart® Purification Management System 10 Filter Life 11 WAP-811 11 WAP-812 11 Replacing Filters 12 WAP-811 12 WAP-812 13 Troubleshooting 14 Specifications 14 Warranty 15 2
Owners Manual
Page 3
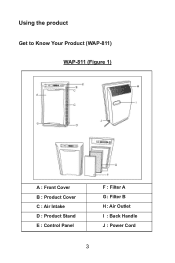
Using the product Get to Know Your Product (WAP-811) WAP-811 (Figure 1) A : Front Cover B : Product Cover C : Air Intake D : Product Stand E : Control Panel F : Filter A G : Filter B H : Air Outlet I : Back Handle J : Power Cord 3
Using the product Get to Know Your Product (WAP-811) WAP-811 (Figure 1) A : Front Cover B : Product Cover C : Air Intake D : Product Stand E : Control Panel F : Filter A G : Filter B H : Air Outlet I : Back Handle J : Power Cord 3
Owners Manual
Page 5
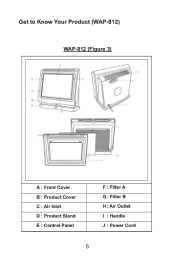
Get to Know Your Product (WAP-812) WAP-812 (Figure 3) A : Front Cover B : Product Cover C : Air Inlet D : Product Stand E : Control Panel F : Filter A G : Filter B H : Air Outlet I : Handle J : Power Cord 5
Get to Know Your Product (WAP-812) WAP-812 (Figure 3) A : Front Cover B : Product Cover C : Air Inlet D : Product Stand E : Control Panel F : Filter A G : Filter B H : Air Outlet I : Handle J : Power Cord 5
Owners Manual
Page 6
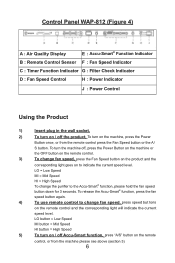
... the remote control and the corresponding light will indicate the current speed level. Control Panel WAP-812 (Figure 4) A : Air Quality Display E : Accu-Smart® Function Indicator B : Remote Control Sensor F : Fan Speed Indicator C : Timer Function Indicator G : Filter Check Indicator D : Fan Speed Control H : Power Indicator J : Power Control Using the Product 1) Insert plug in the wall socket. 2) To turn on / off the product, To turn on / off , press the Power Button on the machine or the OFF button on the remote control. 3) To change the purifier to indicate...
... the remote control and the corresponding light will indicate the current speed level. Control Panel WAP-812 (Figure 4) A : Air Quality Display E : Accu-Smart® Function Indicator B : Remote Control Sensor F : Fan Speed Indicator C : Timer Function Indicator G : Filter Check Indicator D : Fan Speed Control H : Power Indicator J : Power Control Using the Product 1) Insert plug in the wall socket. 2) To turn on / off the product, To turn on / off , press the Power Button on the machine or the OFF button on the remote control. 3) To change the purifier to indicate...
Owners Manual
Page 7
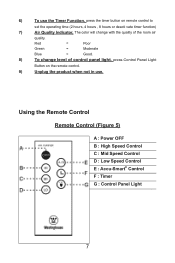
Using the Remote Control Remote Control (Figure 5) A : Power OFF B : High Speed Control C : Mid Speed Control D : Low Speed Control E : Accu-Smart® Control F : Timer G : Control Panel Light 7 Red = Poor Green = Moderate Blue = Good. 8) To change with the quality of control panel light, press Control Panel Light Button on remote control to set the operating time (2 hours, 4 hours , 8 hours or deacti vate timer function) 7) Air Quality Indicator, The color will change level of the room air quality. 6) To use the Timer Function, press...
Using the Remote Control Remote Control (Figure 5) A : Power OFF B : High Speed Control C : Mid Speed Control D : Low Speed Control E : Accu-Smart® Control F : Timer G : Control Panel Light 7 Red = Poor Green = Moderate Blue = Good. 8) To change with the quality of control panel light, press Control Panel Light Button on remote control to set the operating time (2 hours, 4 hours , 8 hours or deacti vate timer function) 7) Air Quality Indicator, The color will change level of the room air quality. 6) To use the Timer Function, press...
Owners Manual
Page 8
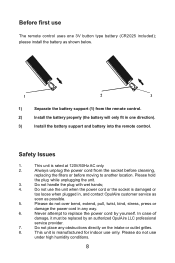
... indoor use The remote control uses one direction). 3) Install the battery support and battery into the remote control. Do not handle the plug with wet hands; 4. Please do not use the unit when the power cord or the socket is damaged or too loose when plugged in, and contact OpulAire customer service as soon as shown below. 1) Separate the battery support (1) from the socket before cleaning, replacing the filters or...
... indoor use The remote control uses one direction). 3) Install the battery support and battery into the remote control. Do not handle the plug with wet hands; 4. Please do not use the unit when the power cord or the socket is damaged or too loose when plugged in, and contact OpulAire customer service as soon as shown below. 1) Separate the battery support (1) from the socket before cleaning, replacing the filters or...
Owners Manual
Page 9
.... 2. catalytic carbon and HEPA filter's are not washable and must be received properly. 9. Long time use the unit without filters installed properly. 5. Please keep the unit away from places where any thing can be used in any way not instructed by this manual. 6. Do not use of time; In case of 12 inches from remote control and keep the unit a distance of fault, please cut off the power and...
.... 2. catalytic carbon and HEPA filter's are not washable and must be received properly. 9. Long time use the unit without filters installed properly. 5. Please keep the unit away from places where any thing can be used in any way not instructed by this manual. 6. Do not use of time; In case of 12 inches from remote control and keep the unit a distance of fault, please cut off the power and...
Owners Manual
Page 10
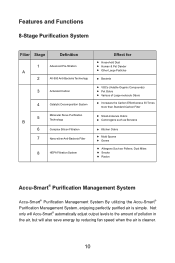
... more than Standard Carbon Filter Small-molecule Odors Carcinogens such as Benzene Kitchen Odors Mold Spores Germs Allergens Such as Pollens, Dust Mites Smoke Radon Accu-Smart® Purification Management System Accu-Smart® Purification Management System By utilizing the Accu-Smart® Purification Management System, enjoying perfectly purified air is cleaner. 10
... more than Standard Carbon Filter Small-molecule Odors Carcinogens such as Benzene Kitchen Odors Mold Spores Germs Allergens Such as Pollens, Dust Mites Smoke Radon Accu-Smart® Purification Management System Accu-Smart® Purification Management System By utilizing the Accu-Smart® Purification Management System, enjoying perfectly purified air is cleaner. 10
Owners Manual
Page 11
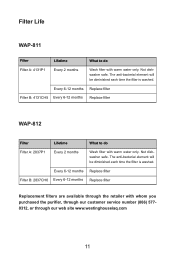
... Wash filter with warm water only. Not dishwasher safe. Every 6-12 months Replace filter Filter B: 2837CH6 Every 6-12 months Replace filter Replacement filters are available through the retailer with whom you purchased the purifier, through our customer service number (866) 5770312, or through our web site www.westinghouseiaq.com 11 Not dishwasher safe. The anti-bacterial element will be diminished each time the filter is washed. Filter Life...
... Wash filter with warm water only. Not dishwasher safe. Every 6-12 months Replace filter Filter B: 2837CH6 Every 6-12 months Replace filter Replacement filters are available through the retailer with whom you purchased the purifier, through our customer service number (866) 5770312, or through our web site www.westinghouseiaq.com 11 Not dishwasher safe. The anti-bacterial element will be diminished each time the filter is washed. Filter Life...
Owners Manual
Page 12
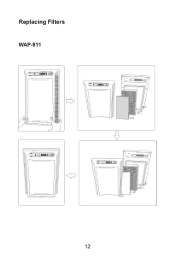
Replacing Filters WAP-811 12
Replacing Filters WAP-811 12
Owners Manual
Page 13
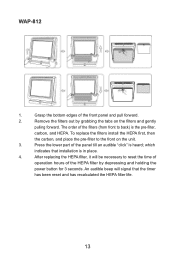
...) is in place. 4. After replacing the HEPA filter, it will signal that installation is the pre-filter, carbon, and HEPA. which indicates that the timer has been reset and has recalculated the HEPA filter life. 13 An audible beep will be necessary to the front on the filters and gently pulling forward. Remove the filters out by depressing and holding the power button for 3 seconds. Grasp the bottom...
...) is in place. 4. After replacing the HEPA filter, it will signal that installation is the pre-filter, carbon, and HEPA. which indicates that the timer has been reset and has recalculated the HEPA filter life. 13 An audible beep will be necessary to the front on the filters and gently pulling forward. Remove the filters out by depressing and holding the power button for 3 seconds. Grasp the bottom...
Owners Manual
Page 14
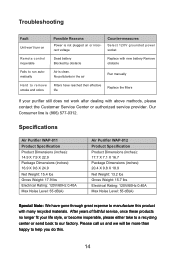
Troubleshooting Fault Unit won't turn on Possible Reasons Power is not plugged on or incorrect voltage Counter-measures Select 120V grounded power socket Remote control inoperable Dead battery Blocked by obstacle Replace with many recycled materials. After years of faithful service, once these products no longer fit your purifier still does not work after dealing with above methods, please contact the Customer Service Center or authorized...
Troubleshooting Fault Unit won't turn on Possible Reasons Power is not plugged on or incorrect voltage Counter-measures Select 120V grounded power socket Remote control inoperable Dead battery Blocked by obstacle Replace with many recycled materials. After years of faithful service, once these products no longer fit your purifier still does not work after dealing with above methods, please contact the Customer Service Center or authorized...
Owners Manual
Page 15
... purchase is used by permission by OpulAire LLC, Naperville, Illinois, USA. OpulAire LLC will pay for factory specified parts and repair labor costs to correct defects in materials or workmanship. Repairs when your appliance, or to the consumer is the responsibility of the consumer, the cost to return the product to replace house fuses or correct house wiring. Shipping to the consumer is operated and maintained...
... purchase is used by permission by OpulAire LLC, Naperville, Illinois, USA. OpulAire LLC will pay for factory specified parts and repair labor costs to correct defects in materials or workmanship. Repairs when your appliance, or to the consumer is the responsibility of the consumer, the cost to return the product to replace house fuses or correct house wiring. Shipping to the consumer is operated and maintained...

Owners Manual
Page 16
LLC, Naperville, Illinois, USA. Distributed by OpulAire LLC 3108 State Route 59, Suite 124-238, Naperville, IL 60564, USA www.westinghouseiaq.com 866 577-0312 This product is distributed and licensed by Westinghouse Electric Co 16 Westinghouse and the Westinghouse logo are used by permission by OpulAire.
LLC, Naperville, Illinois, USA. Distributed by OpulAire LLC 3108 State Route 59, Suite 124-238, Naperville, IL 60564, USA www.westinghouseiaq.com 866 577-0312 This product is distributed and licensed by Westinghouse Electric Co 16 Westinghouse and the Westinghouse logo are used by permission by OpulAire.

Owners Manual
Page 32
Westinghouse and the Westinghouse logo are used by permission by OpulAire. LLC, Naperville, Illinois, USA. Distributed by OpulAire LLC 3108 State Route 59, Suite 124-238, Naperville, IL 60564, USA www.westinghouseiaq.com 866 577-0312 This product is distributed and licensed by Westinghouse Electric Co 32
Westinghouse and the Westinghouse logo are used by permission by OpulAire. LLC, Naperville, Illinois, USA. Distributed by OpulAire LLC 3108 State Route 59, Suite 124-238, Naperville, IL 60564, USA www.westinghouseiaq.com 866 577-0312 This product is distributed and licensed by Westinghouse Electric Co 32

Owners Manual
Page 48
Westinghouse and the Westinghouse logo are used by permission by OpulAire. Distributed by OpulAire LLC 3108 State Route 59, Suite 124-238, Naperville, IL 60564, USA www.westinghouseiaq.com 866 577-0312 This product is distributed and licensed by Westinghouse Electric Co LLC, Naperville, Illinois, USA.
Westinghouse and the Westinghouse logo are used by permission by OpulAire. Distributed by OpulAire LLC 3108 State Route 59, Suite 124-238, Naperville, IL 60564, USA www.westinghouseiaq.com 866 577-0312 This product is distributed and licensed by Westinghouse Electric Co LLC, Naperville, Illinois, USA.