Installation Instructions
Page 2
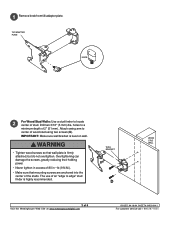
WARNING • Tighten wood screws so that mounting screws are anchored into the center of wood stud using two screws (D). WALL BRACKET D WOOD STUD WALL 2 of 80 in • lb (9 N.M.). • Make sure that wall plate is level on wall. Attach swing arm to edge" stud finder is highly recommended. Drill two 3/16...2" (51 mm). Overtightening can damage the screws, greatly reducing their holding power. • Never tighten in excess of 6 Visit the Westinghouse Web Site at www.westinghousedigital.com ISSUED: 04-16-04 SHEET #: 095-9194-1 For customer service call 1-866-287-5555.
WARNING • Tighten wood screws so that mounting screws are anchored into the center of wood stud using two screws (D). WALL BRACKET D WOOD STUD WALL 2 of 80 in • lb (9 N.M.). • Make sure that wall plate is level on wall. Attach swing arm to edge" stud finder is highly recommended. Drill two 3/16...2" (51 mm). Overtightening can damage the screws, greatly reducing their holding power. • Never tighten in excess of 6 Visit the Westinghouse Web Site at www.westinghousedigital.com ISSUED: 04-16-04 SHEET #: 095-9194-1 For customer service call 1-866-287-5555.
Installation Instructions
Page 3
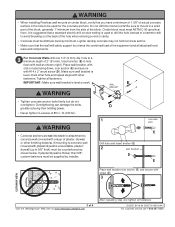
... or cavity. • Concrete must be 2000 psi density minimum. Place wall bracket, with slot on cinder block, verify that the wall will safely support four times the combined load of 6 Visit the Westinghouse Web Site at www.westinghousedigital.com After repeating step one 1/4" (6 mm)...level, mark other hole and repeat steps with other finishing material. Tighten all attached hardware and components. WARNING • When installing Peerless wall mounts on tube facing down, over anchor (E) and secure with screw (D) 3 CUTAWAY VIEW 3 of the equipment and all fasteners. Lighter ...
... or cavity. • Concrete must be 2000 psi density minimum. Place wall bracket, with slot on cinder block, verify that the wall will safely support four times the combined load of 6 Visit the Westinghouse Web Site at www.westinghousedigital.com After repeating step one 1/4" (6 mm)...level, mark other hole and repeat steps with other finishing material. Tighten all attached hardware and components. WARNING • When installing Peerless wall mounts on tube facing down, over anchor (E) and secure with screw (D) 3 CUTAWAY VIEW 3 of the equipment and all fasteners. Lighter ...