User Manual
Page 2
CONNECT POWER CABLE 8 4. TURN THE POWER ON 8 CONTROL PANEL BUTTONS 9 OSD MENU FUNCTIONS 10 IMAGE MENU (WHILE IN A/V INPUTS 11 AUDIO MENU 12 COLOR MENU 13 MISCELLANEOUS MENU (WHILE IN A/V INPUTS 14 IMAGE MENU (WHILE ... 1 ATTACHING THE BASE STAND TO THE LCD MONITOR 6 2. CONNECT INPUTS 7 3. CONTENTS IMPORTANT PRODUCT SAFETY INSTRUCTIONS 2 SAFETY GUIDELINES 3 FCC COMPLIANCE STATEMENT 3 CLEANING THE LCD MONITOR 4 FEATURES ...5 POWER SAVER 5 PLUG & PLAY 5 INSTALLATION 6 PACKAGE CONTENTS 6 1.
CONNECT POWER CABLE 8 4. TURN THE POWER ON 8 CONTROL PANEL BUTTONS 9 OSD MENU FUNCTIONS 10 IMAGE MENU (WHILE IN A/V INPUTS 11 AUDIO MENU 12 COLOR MENU 13 MISCELLANEOUS MENU (WHILE IN A/V INPUTS 14 IMAGE MENU (WHILE ... 1 ATTACHING THE BASE STAND TO THE LCD MONITOR 6 2. CONNECT INPUTS 7 3. CONTENTS IMPORTANT PRODUCT SAFETY INSTRUCTIONS 2 SAFETY GUIDELINES 3 FCC COMPLIANCE STATEMENT 3 CLEANING THE LCD MONITOR 4 FEATURES ...5 POWER SAVER 5 PLUG & PLAY 5 INSTALLATION 6 PACKAGE CONTENTS 6 1.
User Manual
Page 9
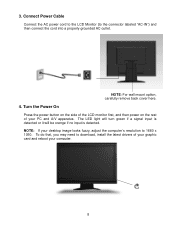
... Connect the AC power cord to the LCD Monitor (to 1680 x 1050. NOTE: For wall mount option, carefully remove back cover here. 4. To do that, you may need to download, install the latest drivers of your PC and A/V apparatus. Turn the Power On Press the power button on the side of the LCD monitor... first, and then power on the rest of your graphic card and reboot your desktop image looks fuzzy, adjust the computer's resolution to...
... Connect the AC power cord to the LCD Monitor (to 1680 x 1050. NOTE: For wall mount option, carefully remove back cover here. 4. To do that, you may need to download, install the latest drivers of your PC and A/V apparatus. Turn the Power On Press the power button on the side of the LCD monitor... first, and then power on the rest of your graphic card and reboot your desktop image looks fuzzy, adjust the computer's resolution to...
User Manual
Page 10
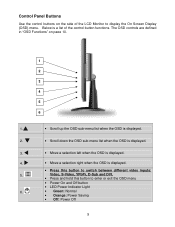
... is a list of the LCD Monitor to enter or exit the OSD menu • Power On and Off button • LED Power Indicator Light • Green: Normal • Orange: Power Saving • Off: Power Off 9 The OSD controls are defined in "OSD Functions" on the side of the ...control button functions. Below is displayed. • Press this button to switch between different video inputs: Video, S-Video, ...
... is a list of the LCD Monitor to enter or exit the OSD menu • Power On and Off button • LED Power Indicator Light • Green: Normal • Orange: Power Saving • Off: Power Off 9 The OSD controls are defined in "OSD Functions" on the side of the ...control button functions. Below is displayed. • Press this button to switch between different video inputs: Video, S-Video, ...
User Manual
Page 11
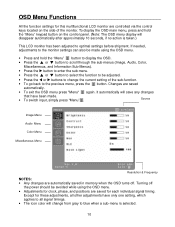
...Audio, Color, Miscellaneous, and Information Sub-Menus). • Press the button to enter the sub-menu. • Press the ▲ or ▼ button to select the function to be adjusted. • Press the or buttons to change from gray to optimal settings before shipment. Changes are automatically... saved in memory when the OSD turns off the power should be made . • To switch input...
...Audio, Color, Miscellaneous, and Information Sub-Menus). • Press the button to enter the sub-menu. • Press the ▲ or ▼ button to select the function to be adjusted. • Press the or buttons to change from gray to optimal settings before shipment. Changes are automatically... saved in memory when the OSD turns off the power should be made . • To switch input...


