Quick Install Guide (pdf)
Page 1
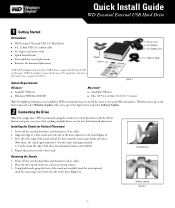
...for Hi-Speed USB performance. Two stands for Vertical Placement 1. Power off the external hard drive and disconnect all its cables. 2. Power off the external hard drive and disconnect all its cables. 2. WD Essential™ External USB 2.0* Hard Drive ! 6 ft. (1.8m) USB 2.0 certified cable ! System Requirements Figure ... stand. Four feet for maximum balance and stability. 4. Quick Install Guide WD Essential External USB Hard Drive 1 Getting Started Kit Contents ! Align the edge of a drive stand onto the side of the stand and carefully bend the stand upward until ...
...for Hi-Speed USB performance. Two stands for Vertical Placement 1. Power off the external hard drive and disconnect all its cables. 2. Power off the external hard drive and disconnect all its cables. 2. WD Essential™ External USB 2.0* Hard Drive ! 6 ft. (1.8m) USB 2.0 certified cable ! System Requirements Figure ... stand. Four feet for maximum balance and stability. 4. Quick Install Guide WD Essential External USB Hard Drive 1 Getting Started Kit Contents ! Align the edge of a drive stand onto the side of the stand and carefully bend the stand upward until ...
Quick Install Guide (pdf)
Page 2
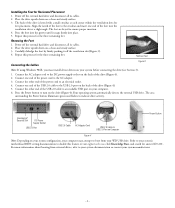
Power off the external hard drive and disconnect all its cables. 2. The feet are keyed to indicate drive activity. Removing the Feet 1. Connect the other end of the power cord to an electrical outlet. 4. The area surrounding the Power button illuminates green and ... on your system configuration, your computer may attempt to the crossbar and insert one end of the foot into the groove until it off the external hard drive and disconnect all its cables. 2. Refer to an available USB port on a clean and steady surface. 3. Carefully dislodge the foot by firmly pushing it snaps...
Power off the external hard drive and disconnect all its cables. 2. The feet are keyed to indicate drive activity. Removing the Feet 1. Connect the other end of the power cord to an electrical outlet. 4. The area surrounding the Power button illuminates green and ... on your system configuration, your computer may attempt to the crossbar and insert one end of the foot into the groove until it off the external hard drive and disconnect all its cables. 2. Refer to an available USB port on a clean and steady surface. 3. Carefully dislodge the foot by firmly pushing it snaps...
Quick Install Guide (pdf)
Page 3
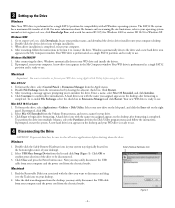
... 1. Figure 5 - 3 - A new drive icon appears in your system tray (typically located on the bottom right corner of 4 GB. Click Continue to connect the drive. Select your WD drive and installs the drivers. 2. Click Erase to begin installation. 3. A new hard drive icon appears on the desktop and your WD... drive is ready to use . Click Close and press ...
... 1. Figure 5 - 3 - A new drive icon appears in your system tray (typically located on the bottom right corner of 4 GB. Click Continue to connect the drive. Select your WD drive and installs the drivers. 2. Click Erase to begin installation. 3. A new hard drive icon appears on the desktop and your WD... drive is ready to use . Click Close and press ...


