Quick Install Guide
Page 7
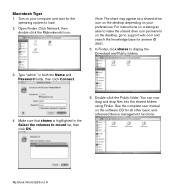
... depending on your preferences. In Finder, click shares to mount list, then click OK. 6. Make sure that shares is highlighted in both the Name and Password fields, then click Connect. 4. Click Network, then double-click the Mybookworld icon. You can now drag and drop files into the shared folders using Finder... to load. 2. For instructions on creating an alias to make the shared drive icon permanent on the software CD for answer ID 2541. 5. My Book World Edition | 6 Double-click the Public folder. Macintosh Tiger 1. Open Finder.
... depending on your preferences. In Finder, click shares to mount list, then click OK. 6. Make sure that shares is highlighted in both the Name and Password fields, then click Connect. 4. Click Network, then double-click the Mybookworld icon. You can now drag and drop files into the shared folders using Finder... to load. 2. For instructions on creating an alias to make the shared drive icon permanent on the software CD for answer ID 2541. 5. My Book World Edition | 6 Double-click the Public folder. Macintosh Tiger 1. Open Finder.

User Manual
Page 4
... Changing Your Password 51 5 MioNet® Remote Access 54 MioNet Overview 54 Remote Access Setup 54 Using MioNet Web (after registration 57 6 How to Play/Stream Video, Music & Photos . . . . .64 Media Server Overview 64 Media Types Supported 64 Media Storage 64 Media Devices 66 7 Using iTunes with My Book World Edition 73 iTunes...
... Changing Your Password 51 5 MioNet® Remote Access 54 MioNet Overview 54 Remote Access Setup 54 Using MioNet Web (after registration 57 6 How to Play/Stream Video, Music & Photos . . . . .64 Media Server Overview 64 Media Types Supported 64 Media Storage 64 Media Devices 66 7 Using iTunes with My Book World Edition 73 iTunes...

User Manual
Page 14
... restore the admin user name and password for the device. See "Connecting and Managing a USB Hard Drive" on page 173. Reset button Press to a USB hard drive for detailed instructions. OVERVIEW - 8 For more information on how to reset the system, see "Resetting the My Book World Edition" on page 163 for additional storage...
... restore the admin user name and password for the device. See "Connecting and Managing a USB Hard Drive" on page 173. Reset button Press to a USB hard drive for detailed instructions. OVERVIEW - 8 For more information on how to reset the system, see "Resetting the My Book World Edition" on page 163 for additional storage...
User Manual
Page 26
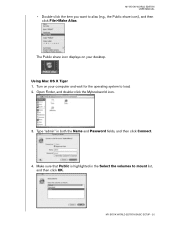
MY BOOK WORLD EDITION USER MANUAL • Double-click the item you want to mount list, and then click OK. Using Mac OS X Tiger 1. The Public share icon displays on your desktop. Open Finder, and double-click the Mybookworld icon. 3. MY BOOK WORLD EDITION BASIC SETUP - 20 Turn on your computer and wait for the operating system to load. 2. Type "admin" in the Select the volumes to alias (e.g., the Public share icon), and then click File>Make Alias. Make sure that Public is highlighted in both the Name and Password fields, and then click Connect. 4.
MY BOOK WORLD EDITION USER MANUAL • Double-click the item you want to mount list, and then click OK. Using Mac OS X Tiger 1. The Public share icon displays on your desktop. Open Finder, and double-click the Mybookworld icon. 3. MY BOOK WORLD EDITION BASIC SETUP - 20 Turn on your computer and wait for the operating system to load. 2. Type "admin" in the Select the volumes to alias (e.g., the Public share icon), and then click File>Make Alias. Make sure that Public is highlighted in both the Name and Password fields, and then click Connect. 4.
User Manual
Page 28
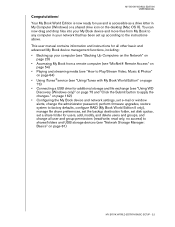
... Configuring the My Book device and network settings, set e-mail or window alerts, change the administrator password, perform firmware upgrades, restore system to factory defaults, configure RAID (My Book World Edition II only), manage file share preferences, set the backup destination folder, set disk quotas, set up...is now ready for additional storage and file exchange (see "Network Storage Manager: Basics" on page 81) MY BOOK WORLD EDITION BASIC SETUP - 22 Your My Book World Edition is accessible as a drive letter in your computer (see "Backing Up Computers on the Network" on page 23) ...
... Configuring the My Book device and network settings, set e-mail or window alerts, change the administrator password, perform firmware upgrades, restore system to factory defaults, configure RAID (My Book World Edition II only), manage file share preferences, set the backup destination folder, set disk quotas, set up...is now ready for additional storage and file exchange (see "Network Storage Manager: Basics" on page 81) MY BOOK WORLD EDITION BASIC SETUP - 22 Your My Book World Edition is accessible as a drive letter in your computer (see "Backing Up Computers on the Network" on page 23) ...
User Manual
Page 52
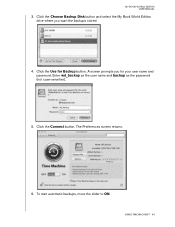
Enter wd_backup as the user name and backup as the password (not case-sensitive). 5. The Preferences screen returns. 6. USING TIME MACHINE™ - 46 A screen prompts you want the backups stored. 4. To start automatic backups, move the slider to ON. MY BOOK WORLD EDITION USER MANUAL 3. Click the Connect button. Click the Choose Backup Disk button and select the My Book World Edition drive where you for Backup button. Click the Use for your user name and password.
Enter wd_backup as the user name and backup as the password (not case-sensitive). 5. The Preferences screen returns. 6. USING TIME MACHINE™ - 46 A screen prompts you want the backups stored. 4. To start automatic backups, move the slider to ON. MY BOOK WORLD EDITION USER MANUAL 3. Click the Connect button. Click the Choose Backup Disk button and select the My Book World Edition drive where you for Backup button. Click the Use for your user name and password.
User Manual
Page 56
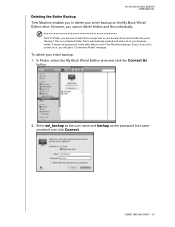
...entire backup on the My Book World Edition drive. Note: In Finder, you will see a folder that is automatically created and where all of your entire backup: 1. To delete your backups reside. Enter wd_backup as the user name and backup as the password (not casesensitive) and click Connect.... In Finder, select the My Book World Edition drive and click the Connect As button. 2. This is a protected folder that corresponds to delete your ...
...entire backup on the My Book World Edition drive. Note: In Finder, you will see a folder that is automatically created and where all of your entire backup: 1. To delete your backups reside. Enter wd_backup as the user name and backup as the password (not casesensitive) and click Connect.... In Finder, select the My Book World Edition drive and click the Connect As button. 2. This is a protected folder that corresponds to delete your ...

User Manual
Page 57
To change your default password for your My Book World to access Time Machine. The following screen displays. Enter your password: 1. Select the backup folder and then drag the *.sparsebundle file to the My Book World web user interface. 2. Changing Your Password You can change your username and password and click Login (default username and password are "admin"). Log in to the Trash icon. USING TIME MACHINE™ - 51 MY BOOK WORLD EDITION USER MANUAL 3.
To change your default password for your My Book World to access Time Machine. The following screen displays. Enter your password: 1. Select the backup folder and then drag the *.sparsebundle file to the My Book World web user interface. 2. Changing Your Password You can change your username and password and click Login (default username and password are "admin"). Log in to the Trash icon. USING TIME MACHINE™ - 51 MY BOOK WORLD EDITION USER MANUAL 3.
User Manual
Page 58
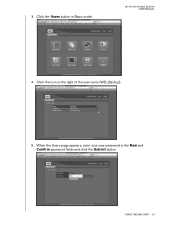
3. Click the icon to the right of the user name (WD_Backup). 5. MY BOOK WORLD EDITION USER MANUAL 4. When the Users page appears, enter your new password in Basic mode. Click the Users button in the New and Confirm password fields and click the Submit button USING TIME MACHINE™ - 52
3. Click the icon to the right of the user name (WD_Backup). 5. MY BOOK WORLD EDITION USER MANUAL 4. When the Users page appears, enter your new password in Basic mode. Click the Users button in the New and Confirm password fields and click the Submit button USING TIME MACHINE™ - 52

User Manual
Page 60
...the Connect screen on your business colleagues. If you can only view the content you to share a folder of pictures on your My Book World Edition with friends (no upload required) or a folder of the CD. 3. Then you have connected the device properly as shown in the ...7: Click Run setup.exe and then Allow. 4. Click Accept in My Book World Edition's Network Storage Manager allows you choose to load. 2. See "Remote Access" on your unique username and password. Remote Access Setup My Book World Edition comes with them. MIONET® REMOTE ACCESS - 54 Turn on page 97 for...
...the Connect screen on your business colleagues. If you can only view the content you to share a folder of pictures on your My Book World Edition with friends (no upload required) or a folder of the CD. 3. Then you have connected the device properly as shown in the ...7: Click Run setup.exe and then Allow. 4. Click Accept in My Book World Edition's Network Storage Manager allows you choose to load. 2. See "Remote Access" on your unique username and password. Remote Access Setup My Book World Edition comes with them. MIONET® REMOTE ACCESS - 54 Turn on page 97 for...
User Manual
Page 63
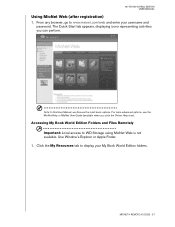
.../web and enter your My Book World Edition folders. Note: In this User Manual, we discuss the most basic options. Accessing My Book World Edition Folders and Files Remotely Important: Local access to display your username and password. The Quick Start tab appears, displaying... icons representing activities you click the Online Help icon). MY BOOK WORLD EDITION USER MANUAL Using MioNet Web (after...
.../web and enter your My Book World Edition folders. Note: In this User Manual, we discuss the most basic options. Accessing My Book World Edition Folders and Files Remotely Important: Local access to display your username and password. The Quick Start tab appears, displaying... icons representing activities you click the Online Help icon). MY BOOK WORLD EDITION USER MANUAL Using MioNet Web (after...
User Manual
Page 89
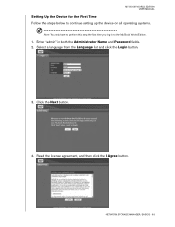
Click the Next button. 4. Read the license agreement, and then click the I Agree button. MY BOOK WORLD EDITION USER MANUAL Setting Up the Device for the First Time Follow the steps below to continue setting up the device on all operating systems. Note: You only have to the My Book World Edition. 1. NETWORK STORAGE MANAGER: BASICS - 83 Enter "admin" in to perform this step the first time you log in both the Administrator Name and Password fields. 2. Select a language from the Language list and click the Login button. 3.
Click the Next button. 4. Read the license agreement, and then click the I Agree button. MY BOOK WORLD EDITION USER MANUAL Setting Up the Device for the First Time Follow the steps below to continue setting up the device on all operating systems. Note: You only have to the My Book World Edition. 1. NETWORK STORAGE MANAGER: BASICS - 83 Enter "admin" in to perform this step the first time you log in both the Administrator Name and Password fields. 2. Select a language from the Language list and click the Login button. 3.
User Manual
Page 90
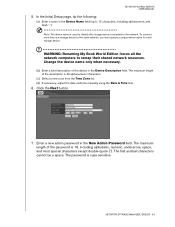
... specify a unique device name for each storage device. The password is 16, including alphabetic, numeric, underscore, space, and most special characters except double-quote ("). WARNING: Renaming My Book World Edition forces all the network computers to 15 characters, including alphanumeric ...and dash '-'). The maximum length of the password is case sensitive. The first and last characters cannot be a space. Click...
... specify a unique device name for each storage device. The password is 16, including alphabetic, numeric, underscore, space, and most special characters except double-quote ("). WARNING: Renaming My Book World Edition forces all the network computers to 15 characters, including alphanumeric ...and dash '-'). The maximum length of the password is case sensitive. The first and last characters cannot be a space. Click...
User Manual
Page 91
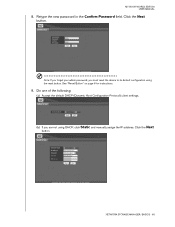
Note: If you forget your admin password, you are not using the reset button. See "Reset Button" on page 8 for instructions. 9. NETWORK STORAGE MANAGER: BASICS - 85 MY BOOK WORLD EDITION USER MANUAL 8. Click the Next button. Click the Next button. Retype the new password in the Confirm Password field. Do one of the following: (a) Accept the default DHCP (Dynamic Host Configuration Protocol) client settings. (b) If you must reset the device to its default configuration using DHCP, click Static and manually assign the IP address.
Note: If you forget your admin password, you are not using the reset button. See "Reset Button" on page 8 for instructions. 9. NETWORK STORAGE MANAGER: BASICS - 85 MY BOOK WORLD EDITION USER MANUAL 8. Click the Next button. Click the Next button. Retype the new password in the Confirm Password field. Do one of the following: (a) Accept the default DHCP (Dynamic Host Configuration Protocol) client settings. (b) If you must reset the device to its default configuration using DHCP, click Static and manually assign the IP address.

User Manual
Page 93
MY BOOK WORLD EDITION USER MANUAL Configure in the administrator name and password. Type in the upper left corner of warnings or errors related to load. 2. In the Tool list, click Network Storage Manager. Type in the ... Click the Bookmarks link in the administrator name and password (the default password is "admin" unless it has already been changed by the web-based, password protected user interface over the network. In the Language list, click the language for your region. My Book World Edition's Network Storage Manager Features The web-based management utility...
MY BOOK WORLD EDITION USER MANUAL Configure in the administrator name and password. Type in the upper left corner of warnings or errors related to load. 2. In the Tool list, click Network Storage Manager. Type in the ... Click the Bookmarks link in the administrator name and password (the default password is "admin" unless it has already been changed by the web-based, password protected user interface over the network. In the Language list, click the language for your region. My Book World Edition's Network Storage Manager Features The web-based management utility...

User Manual
Page 96
... see "Network" on page 91. Remote Access Enables or disables the MioNet function. The device name is the name by which your My Book World Edition is connected to the device, the USB hard drive displays as device name, firmware version, current date/time, system uptime, IP address, volume ...change a device name and/or a description of the device. This menu also displays a list of the buttons to enter or change the user password. The table below describes the options. When a USB hard drive is identified on page 97. Device Name Use this storage device. Category Description ...
... see "Network" on page 91. Remote Access Enables or disables the MioNet function. The device name is the name by which your My Book World Edition is connected to the device, the USB hard drive displays as device name, firmware version, current date/time, system uptime, IP address, volume ...change a device name and/or a description of the device. This menu also displays a list of the buttons to enter or change the user password. The table below describes the options. When a USB hard drive is identified on page 97. Device Name Use this storage device. Category Description ...
User Manual
Page 99
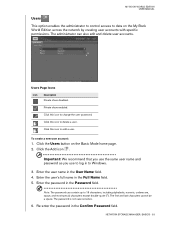
... create a new user account: 1. Important: We recommend that you use the same user name and password as you use to log in the Full Name field. 5. MY BOOK WORLD EDITION USER MANUAL Users This option enables the administrator to control access to data on the Basic Mode home page. 2. Click... the Users button on the My Book World Edition across the network by creating user accounts with specific permissions. Enter the user's full name in to add a user. The password is not case sensitive. 6. Click this icon to Windows. 3. Users Page Icons Icon...
... create a new user account: 1. Important: We recommend that you use the same user name and password as you use to log in the Full Name field. 5. MY BOOK WORLD EDITION USER MANUAL Users This option enables the administrator to control access to data on the Basic Mode home page. 2. Click... the Users button on the My Book World Edition across the network by creating user accounts with specific permissions. Enter the user's full name in to add a user. The password is not case sensitive. 6. Click this icon to Windows. 3. Users Page Icons Icon...
User Manual
Page 100
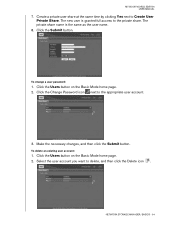
The private share name is granted full access to the appropriate user account. 3. To change a user password: 1. Click the Users button on the Basic Mode home page. 2. Select the user account you want to Create User Private Share. Create a private user share ... new user is the same as the user name. 8. Make the necessary changes, and then click the Submit button. Click the Submit button. MY BOOK WORLD EDITION USER MANUAL 7. Click the Change Password icon next to the private share.
The private share name is granted full access to the appropriate user account. 3. To change a user password: 1. Click the Users button on the Basic Mode home page. 2. Select the user account you want to Create User Private Share. Create a private user share ... new user is the same as the user name. 8. Make the necessary changes, and then click the Submit button. Click the Submit button. MY BOOK WORLD EDITION USER MANUAL 7. Click the Change Password icon next to the private share.
User Manual
Page 101
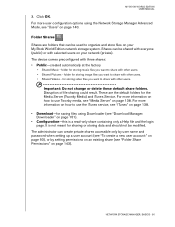
...• Shared Pictures - folder for saving files using the Network Storage Manager Advanced Mode, see "Media Server" on your My Book World Edition network storage system. For more user configuration options using Downloader (see "Folder Share Permissions" on your network (private). Folder Shares Shares ... password when setting up a user account (see "To create a new user account:" on page 93), or by setting permissions on an existing share (see "Download Manager: Downloader" on page 140. These are folders that can be used to share with other users. MY BOOK WORLD EDITION...
...• Shared Pictures - folder for saving files using the Network Storage Manager Advanced Mode, see "Media Server" on your My Book World Edition network storage system. For more user configuration options using Downloader (see "Folder Share Permissions" on your network (private). Folder Shares Shares ... password when setting up a user account (see "To create a new user account:" on page 93), or by setting permissions on an existing share (see "Download Manager: Downloader" on page 140. These are folders that can be used to share with other users. MY BOOK WORLD EDITION...
User Manual
Page 104
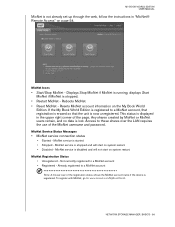
...if MioNet is lost. Resets MioNet account information on page 54. This status is displayed in "MioNet® Remote Access" on the My Book World Edition. Any shares created by MioNet or MioNet users remain, and no data is stopped. • Restart MioNet - MioNet Registration Status • ...; Stopped - If the My Book World Edition is registered to : www.mionet.com/MyBookWorld. MY BOOK WORLD EDITION USER MANUAL MioNet is not already set up through the web, follow the instructions in the upper right corner of the MioNet username and password. MioNet service is disabled and will ...
...if MioNet is lost. Resets MioNet account information on page 54. This status is displayed in "MioNet® Remote Access" on the My Book World Edition. Any shares created by MioNet or MioNet users remain, and no data is stopped. • Restart MioNet - MioNet Registration Status • ...; Stopped - If the My Book World Edition is registered to : www.mionet.com/MyBookWorld. MY BOOK WORLD EDITION USER MANUAL MioNet is not already set up through the web, follow the instructions in the upper right corner of the MioNet username and password. MioNet service is disabled and will ...


