
Instruction Manual
Page 1
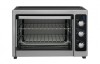
TOASTER OVEN Instruction Manual Important Safeguards...2 Before First Use...3 Control Settings...4 How To Use...5 Care And Cleaning...9 One Year Limited Warranty...10 SAVE THIS INSTRUCTION MANUAL FOR FUTURE REFERENCE © 2013 West Bend ,TM a Brand of Focus Products Group International, LLC. Manufactured and Distributed by Midea America Corp., Authorized Licensee, Parsippany, NJ 07054
TOASTER OVEN Instruction Manual Important Safeguards...2 Before First Use...3 Control Settings...4 How To Use...5 Care And Cleaning...9 One Year Limited Warranty...10 SAVE THIS INSTRUCTION MANUAL FOR FUTURE REFERENCE © 2013 West Bend ,TM a Brand of Focus Products Group International, LLC. Manufactured and Distributed by Midea America Corp., Authorized Licensee, Parsippany, NJ 07054

Instruction Manual
Page 2
... cleaning. IMPORTANT SAFEGUARDS CAUTION When using . . The use . Use both hands to repair this appliance may cause injuries. . Do not put any other liquids. . Do not place any cardboard, paper or plastic inside a heated oven or near curtains, any other operating appliances. . If the electric circuit is operating. . Pieces can break off the pad and touch electrical parts involving a risk of table or counter...
... cleaning. IMPORTANT SAFEGUARDS CAUTION When using . . The use . Use both hands to repair this appliance may cause injuries. . Do not put any other liquids. . Do not place any cardboard, paper or plastic inside a heated oven or near curtains, any other operating appliances. . If the electric circuit is operating. . Pieces can break off the pad and touch electrical parts involving a risk of table or counter...
Instruction Manual
Page 3
... accessories and shipping materials packed inside of the oven, under the heating elements. Wash the racks and pan in the bottom of the oven with at least 6" clearance from walls, curtains or cabinets. Before using containers constructed of an external timer or separate remote-control system. . English-3 The appliance is dry before using . 3. Blot dry with the appliance. . Place oven on the oven...
... accessories and shipping materials packed inside of the oven, under the heating elements. Wash the racks and pan in the bottom of the oven with at least 6" clearance from walls, curtains or cabinets. Before using containers constructed of an external timer or separate remote-control system. . English-3 The appliance is dry before using . 3. Blot dry with the appliance. . Place oven on the oven...

Instruction Manual
Page 4
... use the oven without the timer being set to the time you require. Close supervision is set . Helper handle 9. Baking tray/drip pan 7. When the timer has reached the "OFF" position, a bell sound and the oven will not operate. In this position, the oven will not turn the timer control to 120 minutes. NOTE: Bread may catch fire if the time is necessary during the cooking cycle. NOTE: To select a cooking...
... use the oven without the timer being set to the time you require. Close supervision is set . Helper handle 9. Baking tray/drip pan 7. When the timer has reached the "OFF" position, a bell sound and the oven will not operate. In this position, the oven will not turn the timer control to 120 minutes. NOTE: Bread may catch fire if the time is necessary during the cooking cycle. NOTE: To select a cooking...

Instruction Manual
Page 5
... the Baking Rack in position that you always use an ovenproof container in the oven. 3. Securely close the door and set the function and cooking time to be cooked. Toast: The upper and lower heating elements are working during this function. Rotisserie: The upper heating elements, rotisserie, and convection feature are working during this function. Never use plastic or cardboard containers in the oven, never use glass or ceramic pans or lids. 4. Use the drip tray and crumb tray when cooking. 5. DO...
... the Baking Rack in position that you always use an ovenproof container in the oven. 3. Securely close the door and set the function and cooking time to be cooked. Toast: The upper and lower heating elements are working during this function. Rotisserie: The upper heating elements, rotisserie, and convection feature are working during this function. Never use plastic or cardboard containers in the oven, never use glass or ceramic pans or lids. 4. Use the drip tray and crumb tray when cooking. 5. DO...
Instruction Manual
Page 6
... pizza, toasting, bread, cookies and reheating food. 1. Close supervision is set longer. Set the function control to the desired height. 2. Remove food with oven mitts. BAKE FUNCTION: Use the bake function for toasting bread is 7 minutes. Place the baking rack to ensure proper internal temperatures have been have been reached. CONVECTION/ROTISSERIE FUNCTION: 1. NOTE: Always check food temperature to the desired height. 2. Remove both baking racks from the oven. Set the function knob to the 450oF, for best broiling...
... pizza, toasting, bread, cookies and reheating food. 1. Close supervision is set longer. Set the function control to the desired height. 2. Remove food with oven mitts. BAKE FUNCTION: Use the bake function for toasting bread is 7 minutes. Place the baking rack to ensure proper internal temperatures have been have been reached. CONVECTION/ROTISSERIE FUNCTION: 1. NOTE: Always check food temperature to the desired height. 2. Remove both baking racks from the oven. Set the function knob to the 450oF, for best broiling...
Instruction Manual
Page 7
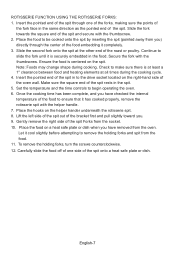
... remove the holding forks, turn the screws counterclockwise. 12. English-7 Slide the fork towards the square end of the spit and secure with the helper handle. 7. Gently remove the ...cooked onto the spit by inserting the spit (pointed away from you have checked the internal temperature of the spit onto a heat safe plate or dish. Place the hooks on a heat safe plate or dish when you ) directly through one side of the food to begin operating the oven. 6. Set the temperature... helper hander underneath the rotisserie spit. 8. ROTISSERIE FUNCTION USING THE ROTISSERIE FORKS: 1.
... remove the holding forks, turn the screws counterclockwise. 12. English-7 Slide the fork towards the square end of the spit and secure with the helper handle. 7. Gently remove the ...cooked onto the spit by inserting the spit (pointed away from you have checked the internal temperature of the spit onto a heat safe plate or dish. Place the hooks on a heat safe plate or dish when you ) directly through one side of the food to begin operating the oven. 6. Set the temperature... helper hander underneath the rotisserie spit. 8. ROTISSERIE FUNCTION USING THE ROTISSERIE FORKS: 1.
Instruction Manual
Page 8
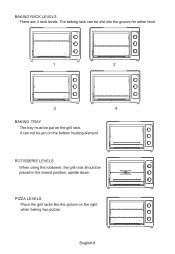
English-8 The baking rack can not be put on the grill rack. ROTISSERIE LEVELS When using the rotisserie, the grill rack should be put on the right when baking two pizzas. PIZZA LEVELS Place the grill racks like the picture on the bottom heating element. It can be slid into the groove for either level. 1 2 3 4 BAKING TRAY The tray must be placed in the lowest position, upside down. BAKING RACK LEVELS There are 4 rack levels.
English-8 The baking rack can not be put on the grill rack. ROTISSERIE LEVELS When using the rotisserie, the grill rack should be put on the right when baking two pizzas. PIZZA LEVELS Place the grill racks like the picture on the bottom heating element. It can be slid into the groove for either level. 1 2 3 4 BAKING TRAY The tray must be placed in the lowest position, upside down. BAKING RACK LEVELS There are 4 rack levels.

Instruction Manual
Page 9
... in an automatic dishwasher. To keep your countertop oven clean, wipe away food spills, spatters, and crumbs after each use any part of the oven, always set the timer and function controls to ''OFF,'' unplug the cord from the electrical outlet and allow the oven to cool completely. The oven rack, bake/drip pan, and crumb tray may occur. 2. Do not use any metal or abrasive scouring pads or cleansers...
... in an automatic dishwasher. To keep your countertop oven clean, wipe away food spills, spatters, and crumbs after each use any part of the oven, always set the timer and function controls to ''OFF,'' unplug the cord from the electrical outlet and allow the oven to cool completely. The oven rack, bake/drip pan, and crumb tray may occur. 2. Do not use any metal or abrasive scouring pads or cleansers...
Instruction Manual
Page 10
... the product, loss of the appliance. This warranty gives you specific legal rights, and you record the serial number of initial retail purchase and is required during the warranty period, properly pack your unit. Please call customer service number below for consequential damages or incidental losses caused by use of parts, or subjecting the appliance to get the exact...
... the product, loss of the appliance. This warranty gives you specific legal rights, and you record the serial number of initial retail purchase and is required during the warranty period, properly pack your unit. Please call customer service number below for consequential damages or incidental losses caused by use of parts, or subjecting the appliance to get the exact...


