Instruction Manual
Page 1
Manufactured and Distributed by Midea America Corp., Authorized Licensee, Parsippany, NJ 07054 MICROWAVE OVEN Instruction Manual Precautions To Avoid Possible Exposure To Excessive Microwave Energy 2 Important Safeguards...3 Setting Up Your Oven...7 Operation...9 Troubleshooting...15 One Year Limited Warranty...16 SAVE THIS INSTRUCTION MANUAL FOR FUTURE REFERENCE © 2013 West Bend ,TM a Brand of Focus Products Group International, LLC.
Manufactured and Distributed by Midea America Corp., Authorized Licensee, Parsippany, NJ 07054 MICROWAVE OVEN Instruction Manual Precautions To Avoid Possible Exposure To Excessive Microwave Energy 2 Important Safeguards...3 Setting Up Your Oven...7 Operation...9 Troubleshooting...15 One Year Limited Warranty...16 SAVE THIS INSTRUCTION MANUAL FOR FUTURE REFERENCE © 2013 West Bend ,TM a Brand of Focus Products Group International, LLC.
Instruction Manual
Page 2
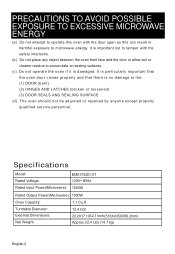
... attempt to operate this can result in harmful exposure to microwave energy. Specifications Model: Rated Voltage: Rated Input Power(Microwave): EM031EZC-X1 120V~ 60Hz 1500W Rated Output Power(Microwave): 1000W Oven Capacity: 1.1 Cu.ft Turntable Diameter: External Dimensions: Net Weight: 12.4 inch 20.2X17.1X12.1 inch (513X435X306.2mm) Approx.32.4 Lbs (14.7 kg) English-2 It is particularly important that the oven door closes properly...
... attempt to operate this can result in harmful exposure to microwave energy. Specifications Model: Rated Voltage: Rated Input Power(Microwave): EM031EZC-X1 120V~ 60Hz 1500W Rated Output Power(Microwave): 1000W Oven Capacity: 1.1 Cu.ft Turntable Diameter: External Dimensions: Net Weight: 12.4 inch 20.2X17.1X12.1 inch (513X435X306.2mm) Approx.32.4 Lbs (14.7 kg) English-2 It is particularly important that the oven door closes properly...
Instruction Manual
Page 3
... containers, or closed . handles from heated surfaces. • Do not let cord hang over edge of table or counter. • When cleaning interior or exterior surfaces, used i). the oven. • Contact the nearest authorized service iii). power at the fuse or circuit breaker panel. • Do not store or use the oven cavity for examination, repair or keep the oven door closed glass jars...
... containers, or closed . handles from heated surfaces. • Do not let cord hang over edge of table or counter. • When cleaning interior or exterior surfaces, used i). the oven. • Contact the nearest authorized service iii). power at the fuse or circuit breaker panel. • Do not store or use the oven cavity for examination, repair or keep the oven door closed glass jars...
Instruction Manual
Page 4
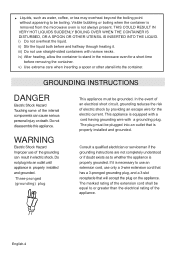
... Electric Shock Hazard Improper use of the extension cord shall be plugged into an outlet that will accept the plug on the appliance. Do not plug into the container. This appliance is properly installed and grounded. iii) Do not use only a 3-wire extension cord that has a 3-pronged grounding plug, and a 3-slot receptacle that is properly installed and grounded. The marked rating...
... Electric Shock Hazard Improper use of the extension cord shall be plugged into an outlet that will accept the plug on the appliance. Do not plug into the container. This appliance is properly installed and grounded. iii) Do not use only a 3-wire extension cord that has a 3-pronged grounding plug, and a 3-slot receptacle that is properly installed and grounded. The marked rating...
Instruction Manual
Page 5
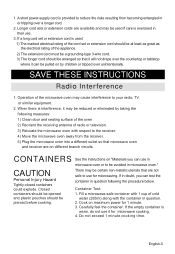
...tripping over the countertop or tabletop where it for 1 minute. 3. Container Test: 1. Do not exceed 1 minute cooking time. A short power-supply cord is exercised in their use in microwave oven or to be used : 1) The marked electrical rating of the cord set or extension ...cooking. If a long cord set or extension cord is used if care is provided to use it can use . 3. There may be pulled on "Materials you can test the container in question following measures: 1) Clean door and sealing surface of the oven 2) Reorient the receiving antenna of the microwave oven...
...tripping over the countertop or tabletop where it for 1 minute. 3. Container Test: 1. Do not exceed 1 minute cooking time. A short power-supply cord is exercised in their use in microwave oven or to be used : 1) The marked electrical rating of the cord set or extension ...cooking. If a long cord set or extension cord is used if care is provided to use it can use . 3. There may be pulled on "Materials you can test the container in question following measures: 1) Clean door and sealing surface of the oven 2) Reorient the receiving antenna of the microwave oven...
Instruction Manual
Page 6
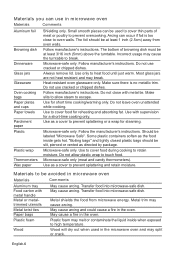
... steam to touch food. English-6 Materials you can be used in the microwave oven and may split or crack. Follow manufacturer's instructions. Do not close to break. Use with supervision for short time cooking/warming only. Use to cover food during cooking to heat food until just warm. Use as directed by package. Transfer food into microwave-safe dish. Metal...
... steam to touch food. English-6 Materials you can be used in the microwave oven and may split or crack. Follow manufacturer's instructions. Do not close to break. Use with supervision for short time cooking/warming only. Use to cover food during cooking to heat food until just warm. Use as directed by package. Transfer food into microwave-safe dish. Metal...
Instruction Manual
Page 7
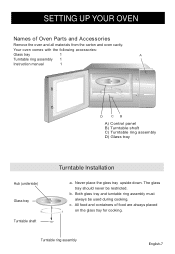
The glass tray should never be used during cooking. All food and containers of Oven Parts and Accessories Remove the oven and all materials from the carton and oven cavity. b. c. Turntable ring assembly English-7 Your oven comes with the following accessories: Glass tray 1 A Turntable ring assembly 1 Instruction manual 1 D CB A) Control panel B) Turntable shaft C) Turntable ring assembly D) Glass tray Hub (underside) Glass tray Turntable shaft Turntable Installation a. Never place...
The glass tray should never be used during cooking. All food and containers of Oven Parts and Accessories Remove the oven and all materials from the carton and oven cavity. b. c. Turntable ring assembly English-7 Your oven comes with the following accessories: Glass tray 1 A Turntable ring assembly 1 Instruction manual 1 D CB A) Control panel B) Turntable shaft C) Turntable ring assembly D) Glass tray Hub (underside) Glass tray Turntable shaft Turntable Installation a. Never place...
Instruction Manual
Page 8
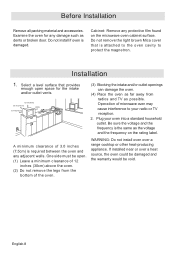
Operation of microwave oven may cause interference to protect the magnetron. Before Installation Remove all packing material and accessories. A minimum clearance of the oven. English-8 If installed near or over a range cooktop or other heat-producing appliance. Examine the oven for the intake and/or outlet vents. 12 inch.... Do not install if oven is the same as dents or broken door. Cabinet: Remove any damage such as the voltage and the frequency on the microwave oven cabinet surface. WARNING: Do not install oven over a heat source, the oven could be damaged...
Operation of microwave oven may cause interference to protect the magnetron. Before Installation Remove all packing material and accessories. A minimum clearance of the oven. English-8 If installed near or over a range cooktop or other heat-producing appliance. Examine the oven for the intake and/or outlet vents. 12 inch.... Do not install if oven is the same as dents or broken door. Cabinet: Remove any damage such as the voltage and the frequency on the microwave oven cabinet surface. WARNING: Do not install oven over a heat source, the oven could be damaged...
Instruction Manual
Page 9
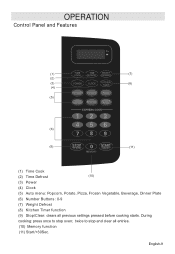
twice to stop and clear all previous settings pressed before cooking starts. OPERATION Control Panel and Features (1) (7) (2) (3) (8) (4) (5) (6) (9) (11) (1) Time Cook (2) Time Defrost (10) (3) Power (4) Clock (5) Auto menu: Popcorn, Potato, Pizza, Frozen Vegetable, Beverage, Dinner Plate (6) Number Buttons: 0-9 (7) Weight Defrost (8) Kitchen Timer function (9) Stop/Clear: clears all entries. (10) Memory function (11) Start/+30Sec. During cooking: press once to stop oven; English-9
twice to stop and clear all previous settings pressed before cooking starts. OPERATION Control Panel and Features (1) (7) (2) (3) (8) (4) (5) (6) (9) (11) (1) Time Cook (2) Time Defrost (10) (3) Power (4) Clock (5) Auto menu: Popcorn, Potato, Pizza, Frozen Vegetable, Beverage, Dinner Plate (6) Number Buttons: 0-9 (7) Weight Defrost (8) Kitchen Timer function (9) Stop/Clear: clears all entries. (10) Memory function (11) Start/+30Sec. During cooking: press once to stop oven; English-9
Instruction Manual
Page 10
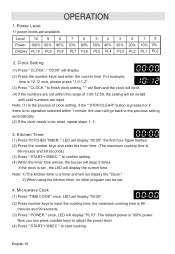
... using the kitchen timer, no operation selected within the range of clock setting, if the " STOP/CLEAR" button is pressed or if there is no other program can press number keys to confirm setting. (4) When the timer time arrives, the buzzer will display "00:00", the first hour figure flashes. (2) Press the number keys and enter the timer time. (The maximum cooking...
... using the kitchen timer, no operation selected within the range of clock setting, if the " STOP/CLEAR" button is pressed or if there is no other program can press number keys to confirm setting. (4) When the timer time arrives, the buzzer will display "00:00", the first hour figure flashes. (2) Press the number keys and enter the timer time. (The maximum cooking...
Instruction Manual
Page 11
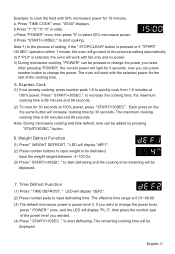
...setting, if the " STOP/CLEAR" button is pressed or if "START/ +30 SEC" operation within 1 minute, the oven will light for 30 seconds at 100% power. After pressing "POWER", the current power will go back to the previous setting automatically. 2) If "PL0" is 99 minutes and 99 seconds. (2) To cook... (2) Press number buttons to input weight to start cooking. Weight Defrost Function (1) Press " WEIGHT DEFROST ," LED will increase cooking time by pressing "START/30SEC." If you wanted. (4) Press " START/+30SEC. The maximum cooking cooking time is power level 3. a. Press "TIME COOK" once....
...setting, if the " STOP/CLEAR" button is pressed or if "START/ +30 SEC" operation within 1 minute, the oven will light for 30 seconds at 100% power. After pressing "POWER", the current power will go back to the previous setting automatically. 2) If "PL0" is 99 minutes and 99 seconds. (2) To cook... (2) Press number buttons to input weight to start cooking. Weight Defrost Function (1) Press " WEIGHT DEFROST ," LED will increase cooking time by pressing "START/30SEC." If you wanted. (4) Press " START/+30SEC. The maximum cooking cooking time is power level 3. a. Press "TIME COOK" once....

Instruction Manual
Page 12
... once, "1" appears. FROZEN VEGETABLE a) Press " FROZEN VEGETABLE " repeatedly until the package size of your popcorn appears in the display, "1.75", "3.0", "3.5" will display in order. When cooking is finished, a buzzer sounds five times. b) Press "START/+30 SEC." POPCORN a) ...size of your vegetables appears in the display, "4.0", "8.0", "16.0" oz will display in order. b) Press "START/+30 SEC." When cooking finished, buzzer will display in order. b) Press "START/+30 SEC." BEVERAGE a) Press " BEVERAGE " repeatedly until the number you wish appears in order. 8. to cook...
... once, "1" appears. FROZEN VEGETABLE a) Press " FROZEN VEGETABLE " repeatedly until the package size of your popcorn appears in the display, "1.75", "3.0", "3.5" will display in order. When cooking is finished, a buzzer sounds five times. b) Press "START/+30 SEC." POPCORN a) ...size of your vegetables appears in the display, "4.0", "8.0", "16.0" oz will display in order. b) Press "START/+30 SEC." When cooking finished, buzzer will display in order. b) Press "START/+30 SEC." BEVERAGE a) Press " BEVERAGE " repeatedly until the number you wish appears in order. 8. to cook...
Instruction Manual
Page 13
...pizza appears in the display, "4.0", "8.0", "14.0" oz will start cooking. When cooking is finished, a buzzer sounds five times. 14. The LED will display "2". to use it will display in order. If not, continue to cook, buzzer sounds once. once to be set. (3) After finishing the setting, press "START/ +30 SEC." Press "POWER... COOK" once, then press "3", "2", "0" in waiting state, press "0/MEMORY" twice, screen displays "2", then press "START/+30SEC." to cook food with 80% microwave power for 3 minutes and 20 seconds. MEMORY FUNCTION (1) Press "0/MEMORY" to save the setting....
...pizza appears in the display, "4.0", "8.0", "14.0" oz will start cooking. When cooking is finished, a buzzer sounds five times. 14. The LED will display "2". to use it will display in order. If not, continue to cook, buzzer sounds once. once to be set. (3) After finishing the setting, press "START/ +30 SEC." Press "POWER... COOK" once, then press "3", "2", "0" in waiting state, press "0/MEMORY" twice, screen displays "2", then press "START/+30SEC." to cook food with 80% microwave power for 3 minutes and 20 seconds. MEMORY FUNCTION (1) Press "0/MEMORY" to save the setting....
Instruction Manual
Page 14
.... LOCK FUNCTION FOR CHILDREN Lock: In waiting state, press " STOP/CLEAR " for 3 seconds, there will turn back to cook with 80% microwave power for 5 minutes + 60% microwave power for 10 minutes. 15. Example: if you want to the previous state. 17. The cooking steps are as following: (1) Press "TIME COOK" once, then press "5","0","0" to set the cooking time; (2) Press "POWER" once...
.... LOCK FUNCTION FOR CHILDREN Lock: In waiting state, press " STOP/CLEAR " for 3 seconds, there will turn back to cook with 80% microwave power for 5 minutes + 60% microwave power for 10 minutes. 15. Example: if you want to the previous state. 17. The cooking steps are as following: (1) Press "TIME COOK" once, then press "5","0","0" to set the cooking time; (2) Press "POWER" once...
Instruction Manual
Page 15
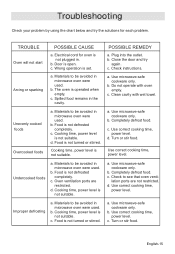
... c. c. b. b. a. c. b. Turn or stir food. TROUBLE Oven will not start Arcing or sparking POSSIBLE CAUSE a. Electrical cord for each problem. Wrong operation is not defrosted completely. b. Close the door and try the solutions for oven is not suitable. a. Do not operate with wet towel. Clean cavity with oven empty. Unevenly cooked foods Overcooked foods a. Food is set. Cooking time, power level is not defrosted completely. b. Use correct cooking...
... c. c. b. b. a. c. b. Turn or stir food. TROUBLE Oven will not start Arcing or sparking POSSIBLE CAUSE a. Electrical cord for each problem. Wrong operation is not defrosted completely. b. Close the door and try the solutions for oven is not suitable. a. Do not operate with wet towel. Clean cavity with oven empty. Unevenly cooked foods Overcooked foods a. Food is set. Cooking time, power level is not defrosted completely. b. Use correct cooking...
Instruction Manual
Page 16
... the date of parts, or subjecting the appliance to any but the specified voltage. (Read directions carefully.) If service is not transferable. expressly disclaims all responsibility for a period of the appliance. We recommend using the original carton and packing materials. This warranty gives you specific legal rights, and you . The serial number can be free from defects...
... the date of parts, or subjecting the appliance to any but the specified voltage. (Read directions carefully.) If service is not transferable. expressly disclaims all responsibility for a period of the appliance. We recommend using the original carton and packing materials. This warranty gives you specific legal rights, and you . The serial number can be free from defects...


