
Instruction Manual
Page 1
www.westbend.com COCOA GRANDE™ Instruction Manual Register this and other Focus Electrics products through our website: www.registerfocus.com Important Safeguards 2 Assembling Your Cocoa Grande 3 Using Your Cocoa Grande 4 Cleaning Your Cocoa Grande 5 Hints and Tips ...6 Recipes ...7 Warranty...10 SAVE THIS INSTRUCTION MANUAL FOR FUTURE REFERENCE © 2012 West Bend®, a Brand of Focus Electrics, LLC.
www.westbend.com COCOA GRANDE™ Instruction Manual Register this and other Focus Electrics products through our website: www.registerfocus.com Important Safeguards 2 Assembling Your Cocoa Grande 3 Using Your Cocoa Grande 4 Cleaning Your Cocoa Grande 5 Hints and Tips ...6 Recipes ...7 Warranty...10 SAVE THIS INSTRUCTION MANUAL FOR FUTURE REFERENCE © 2012 West Bend®, a Brand of Focus Electrics, LLC.
Instruction Manual
Page 2
... when not in their use appliance for other liquids. • Close supervision is necessary when this appliance is used if care is removed during the brewing cycle. • Do not touch hot surfaces. To reduce the risk of the detachable power-supply cord or extension cord should be followed including the following: • Read all instructions and warnings.
... when not in their use appliance for other liquids. • Close supervision is necessary when this appliance is used if care is removed during the brewing cycle. • Do not touch hot surfaces. To reduce the risk of the detachable power-supply cord or extension cord should be followed including the following: • Read all instructions and warnings.
Instruction Manual
Page 3
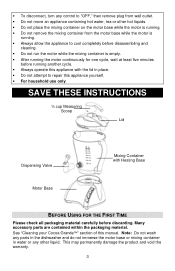
SAVE THESE INSTRUCTIONS cup Measuring Scoop Lid Dispensing Valve Motor Base Mixing Container with Heating Base BEFORE USING FOR THE FIRST TIME Please check all packaging material carefully before running another cycle. • Always operate this appliance with the lid in water or any other liquid. This may permanently damage the product and void the warranty. 3 • To disconnect, turn any control to "OFF," then remove plug...
SAVE THESE INSTRUCTIONS cup Measuring Scoop Lid Dispensing Valve Motor Base Mixing Container with Heating Base BEFORE USING FOR THE FIRST TIME Please check all packaging material carefully before running another cycle. • Always operate this appliance with the lid in water or any other liquid. This may permanently damage the product and void the warranty. 3 • To disconnect, turn any control to "OFF," then remove plug...
Instruction Manual
Page 4
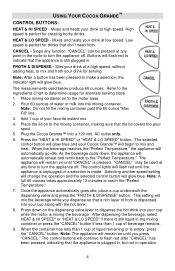
... lid covers the pour spout. 5. Note: A full 60 ounces takes approximately 13 minutes to the "Perfect Temperature." Once the appliance automatically goes idle, place a cup underneath the dispensing valve and press the "FROTH & DISPENSE" button. This setting will flash red until the appliance is unplugged or a selection is still liquid in operation. 4 After dispensing the beverage, select HEAT & HI SPEED" or "HEAT...
... lid covers the pour spout. 5. Note: A full 60 ounces takes approximately 13 minutes to the "Perfect Temperature." Once the appliance automatically goes idle, place a cup underneath the dispensing valve and press the "FROTH & DISPENSE" button. This setting will flash red until the appliance is unplugged or a selection is still liquid in operation. 4 After dispensing the beverage, select HEAT & HI SPEED" or "HEAT...

Instruction Manual
Page 5
... the motor will stop running and the mixing paddle will stop mixing, but still on "HEAT & HI SPEED." As the beverage cools down, the appliance will still be cleaned after every use a nylon scrub pad. this is now idle but the blue indicator light will automatically reheat and remix... control buttons can use the corner of water and ¼ tsp. Put lid with scoop on mixing container, and run the appliance through the dispensing valve and let air dry. 5 Pour out any time to let hot, soapy water sit inside the mixing container for exact measurements, or adjust to remove build-up...
... the motor will stop running and the mixing paddle will stop mixing, but still on "HEAT & HI SPEED." As the beverage cools down, the appliance will still be cleaned after every use a nylon scrub pad. this is now idle but the blue indicator light will automatically reheat and remix... control buttons can use the corner of water and ¼ tsp. Put lid with scoop on mixing container, and run the appliance through the dispensing valve and let air dry. 5 Pour out any time to let hot, soapy water sit inside the mixing container for exact measurements, or adjust to remove build-up...

Instruction Manual
Page 6
... get as hot. Remove the cap by unscrewing the entire valve body counter-clockwise. 2. Compress the cap and stopper together to the cocoa grande. HELPFUL HINTS • Skim milk and milks with a small amount of froth. • Use "HEAT & HI SPEED" for cleaning: 1. When this happens, the heating plate is an ... it counter-clockwise. 3. Remove the stopper/stopper pin, spring, cap, and lever from the container by unscrewing it provides lots of boiling water and mixing to make a paste before adding to remove the lever and cap. 5. Or, chocolate syrup can be used in place of cocoa powder...
... get as hot. Remove the cap by unscrewing the entire valve body counter-clockwise. 2. Compress the cap and stopper together to the cocoa grande. HELPFUL HINTS • Skim milk and milks with a small amount of froth. • Use "HEAT & HI SPEED" for cleaning: 1. When this happens, the heating plate is an ... it counter-clockwise. 3. Remove the stopper/stopper pin, spring, cap, and lever from the container by unscrewing it provides lots of boiling water and mixing to make a paste before adding to remove the lever and cap. 5. Or, chocolate syrup can be used in place of cocoa powder...
Instruction Manual
Page 7
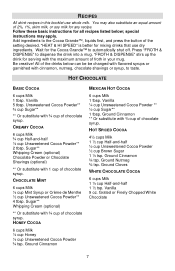
"HEAT & HI SPEED" is better for all recipes listed below can be be changed with flavored syrups or garnished with the maximum amount of froth in this booklet use dry ingredients. CREAMY COCOA 6 cups Milk ¾ cup Half-and-half ½ cup Unsweetened Cocoa Powder** 2 tbsp. Vanilla ¼ cup Unsweetened Cocoa Powder ** ½ cup Sugar** 1 tbsp. HOT SPICED COCOA 4½ cups Milk 1 ½ cup Half-and...
"HEAT & HI SPEED" is better for all recipes listed below can be be changed with flavored syrups or garnished with the maximum amount of froth in this booklet use dry ingredients. CREAMY COCOA 6 cups Milk ¾ cup Half-and-half ½ cup Unsweetened Cocoa Powder** 2 tbsp. Vanilla ¼ cup Unsweetened Cocoa Powder ** ½ cup Sugar** 1 tbsp. HOT SPICED COCOA 4½ cups Milk 1 ½ cup Half-and...
Instruction Manual
Page 8
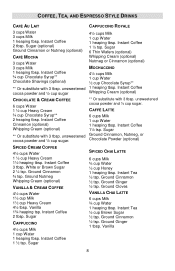
... (optional) SPICED CREAM COFFEE 4½ cups Water 1 ½ cup Heavy Cream 1½ heaping tbsp. Instant Coffee 3 tbsp. White or Brown Sugar 2 ¼ tsp. Sugar SPICED CHAI LATTE 6 cups Milk ¾ cup Water ½ cup Honey 1 heaping tbsp. COFFEE, TEA, AND ESPRESSO STYLE DRINKS CAFÉ AU LAIT CAPPUCCINO ROYALE 3 cups Water 3 cups Milk 1 heaping tbsp. Instant Coffee 2 tbsp. Ground Ginger ½ tsp. Vanilla 8 Instant Coffee ¾ cup Chocolate Syrup** Chocolate...
... (optional) SPICED CREAM COFFEE 4½ cups Water 1 ½ cup Heavy Cream 1½ heaping tbsp. Instant Coffee 3 tbsp. White or Brown Sugar 2 ¼ tsp. Sugar SPICED CHAI LATTE 6 cups Milk ¾ cup Water ½ cup Honey 1 heaping tbsp. COFFEE, TEA, AND ESPRESSO STYLE DRINKS CAFÉ AU LAIT CAPPUCCINO ROYALE 3 cups Water 3 cups Milk 1 heaping tbsp. Instant Coffee 2 tbsp. Ground Ginger ½ tsp. Vanilla 8 Instant Coffee ¾ cup Chocolate Syrup** Chocolate...
Instruction Manual
Page 9
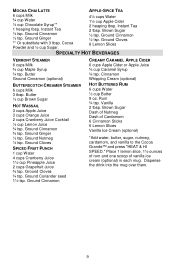
... and one scoop of Cardamom 6 Cinnamon Sticks 6 Lemon Slices Vanilla Ice Cream (optional) *Add water, butter, sugar, nutmeg, cardamom, and vanilla to the Cocoa Grande™ and press "HEAT & HI SPEED." Ground Cloves 6 Lemon Slices SPECIALTY HOT BEVERAGES VERMONT STEAMER 6 cups Milk ¾ cup Maple Syrup ¾ tsp. Cocoa Powder and ½ cup Sugar. 4½ cups Water 1½ cup Apple Cider...
... and one scoop of Cardamom 6 Cinnamon Sticks 6 Lemon Slices Vanilla Ice Cream (optional) *Add water, butter, sugar, nutmeg, cardamom, and vanilla to the Cocoa Grande™ and press "HEAT & HI SPEED." Ground Cloves 6 Lemon Slices SPECIALTY HOT BEVERAGES VERMONT STEAMER 6 cups Milk ¾ cup Maple Syrup ¾ tsp. Cocoa Powder and ½ cup Sugar. 4½ cups Water 1½ cup Apple Cider...
Instruction Manual
Page 10
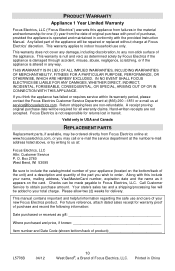
... conformity with the provided Instruction Manual. Checks can be added to your total charge. Please allow two (2) weeks for all warranty claims. Hand-written receipts are non-refundable. A receipt proving original purchase date will be repaired or replaced without charge at : Focus Electrics, LLC Attn: Customer Service P. O. Printed in any way. Focus Electrics is operated and maintained in transit...
... conformity with the provided Instruction Manual. Checks can be added to your total charge. Please allow two (2) weeks for all warranty claims. Hand-written receipts are non-refundable. A receipt proving original purchase date will be repaired or replaced without charge at : Focus Electrics, LLC Attn: Customer Service P. O. Printed in any way. Focus Electrics is operated and maintained in transit...


