Instruction Manual
Page 1
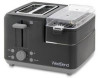
Important Safeguards 2 Before Using for the First Time 3 Using Your 2-Slice Breakfast Station 4 Helpful Hints ...6 Cleaning Your 2-Slice Breakfast Station 7 Recipes ...8 Warranty...9 SAVE THIS INSTRUCTION MANUAL FOR FUTURE REFERENCE 2018 West Bend® www.westbend.com 2-SLICE BREAKFAST STATION™ Instruction Manual Register this and other West Bend products through our website: http://registerproducts.online Product registration is not required to activate warranty.
Important Safeguards 2 Before Using for the First Time 3 Using Your 2-Slice Breakfast Station 4 Helpful Hints ...6 Cleaning Your 2-Slice Breakfast Station 7 Recipes ...8 Warranty...9 SAVE THIS INSTRUCTION MANUAL FOR FUTURE REFERENCE 2018 West Bend® www.westbend.com 2-SLICE BREAKFAST STATION™ Instruction Manual Register this and other West Bend products through our website: http://registerproducts.online Product registration is not required to activate warranty.
Instruction Manual
Page 2
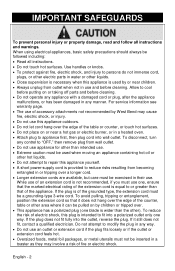
... injury or property damage, read and follow all instructions. • Do not touch hot surfaces. Use handles or knobs. • To protect against fire, electric shock, and injury to persons do not immerse cord, plugs, or other electric parts in water or other liquids. • Close supervision...use. • Extreme caution must be used by or near a hot gas or electric burner, or in a heated oven. • Attach plug to reduce risks resulting from outlet when not in use and before cleaning. • Do not operate any control to "OFF," then remove plug from wall outlet. • Do not use...
... injury or property damage, read and follow all instructions. • Do not touch hot surfaces. Use handles or knobs. • To protect against fire, electric shock, and injury to persons do not immerse cord, plugs, or other electric parts in water or other liquids. • Close supervision...use. • Extreme caution must be used by or near a hot gas or electric burner, or in a heated oven. • Attach plug to reduce risks resulting from outlet when not in use and before cleaning. • Do not operate any control to "OFF," then remove plug from wall outlet. • Do not use...
Instruction Manual
Page 3
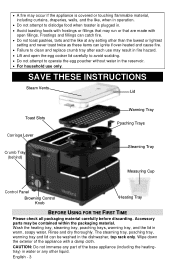
... setting and never toast twice as these items can ignite if over-heated and cause fire. • Failure to operate the egg poacher without water in water or any part of the appliance with open the egg cooker lid carefully to avoid scalding. • Do not attempt to clean and replace crumb tray after each use only. The steaming tray, poaching tray...
... setting and never toast twice as these items can ignite if over-heated and cause fire. • Failure to operate the egg poacher without water in water or any part of the appliance with open the egg cooker lid carefully to avoid scalding. • Do not attempt to clean and replace crumb tray after each use only. The steaming tray, poaching tray...
Instruction Manual
Page 4
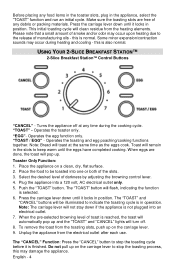
...; 2-Slice Breakfast Station™ Control Buttons "CANCEL" - this is normal. Operates the toaster only. Operates the toasting and egg poaching/cooking functions together. Toaster Only Function: 1. Place the food to be illuminated to stop the toasting process, this is also normal. Unplug the appliance from the heating elements. Make sure the toasting slots are done, the toast will pop up and the "TOAST" and "CANCEL" lights will...
...; 2-Slice Breakfast Station™ Control Buttons "CANCEL" - this is normal. Operates the toaster only. Operates the toasting and egg poaching/cooking functions together. Toaster Only Function: 1. Place the food to be illuminated to stop the toasting process, this is also normal. Unplug the appliance from the heating elements. Make sure the toasting slots are done, the toast will pop up and the "TOAST" and "CANCEL" lights will...

Instruction Manual
Page 5
... a time. Plug the appliance into a 120 volt, AC electrical outlet only. 6. Push the "EGG" button on the heating tray. Place the steaming tray on the touch pad. Place the lid on a clean, dry, flat surface and remove the lid and trays from the heating tray. Select the cooked consistency and number of the steaming tray. 5. Note: To get the best results, use . These...
... a time. Plug the appliance into a 120 volt, AC electrical outlet only. 6. Push the "EGG" button on the heating tray. Place the steaming tray on the touch pad. Place the lid on a clean, dry, flat surface and remove the lid and trays from the heating tray. Select the cooked consistency and number of the steaming tray. 5. Note: To get the best results, use . These...
Instruction Manual
Page 6
... pour into the heating tray, or add 2 to the color set by adjusting the browning control dial. 4. CAUTION: Use extreme caution when removing parts to be scrambled. 7. When both of the warming tray. 9. Place the lid on the measuring cup; Push the "EGG/TOAST" button. Place the food to avoid scalding. 15. Egg & Toast Function (for breakfast sandwich): 1. Use the soft boiled...
... pour into the heating tray, or add 2 to the color set by adjusting the browning control dial. 4. CAUTION: Use extreme caution when removing parts to be scrambled. 7. When both of the warming tray. 9. Place the lid on the measuring cup; Push the "EGG/TOAST" button. Place the food to avoid scalding. 15. Egg & Toast Function (for breakfast sandwich): 1. Use the soft boiled...
Instruction Manual
Page 7
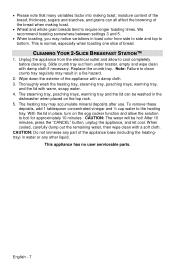
... longer toasting times. Slide crumb tray out from side to side and top to clean crumb tray regularly may accumulate mineral deposits after use. Replace the crumb tray. Wipe down the exterior of the bread when making toast; After 10 minutes, press the "CANCEL" button, unplug the appliance, and let cool. This appliance has no user serviceable parts. Thoroughly wash the heating tray, steaming tray, poaching trays, warming tray, and...
... longer toasting times. Slide crumb tray out from side to side and top to clean crumb tray regularly may accumulate mineral deposits after use. Replace the crumb tray. Wipe down the exterior of the bread when making toast; After 10 minutes, press the "CANCEL" button, unplug the appliance, and let cool. This appliance has no user serviceable parts. Thoroughly wash the heating tray, steaming tray, poaching trays, warming tray, and...
Instruction Manual
Page 8
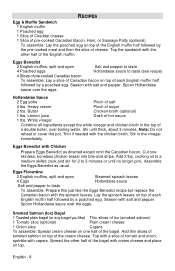
...top of each English muffin half followed by the pre-cooked meat and then the slice of cheese. Spoon Hollandaise sauce over boiling water. Season with the chicken broth. White vinegar Combine all ingredients except the white vinegar and chicken broth in the vinegar immediately. Stir...thick, about 3 minutes. Smoked Salmon (lox) Bagel 1 Toasted plain bagel (or any bagel you like the Eggs Benedict recipe but replace the Canadian bacon with cream cheese and place on one skinless, boneless chicken breast into bite-size strips. Spread the other half of hot sauce 1 tbs.
...top of each English muffin half followed by the pre-cooked meat and then the slice of cheese. Spoon Hollandaise sauce over boiling water. Season with the chicken broth. White vinegar Combine all ingredients except the white vinegar and chicken broth in the vinegar immediately. Stir...thick, about 3 minutes. Smoked Salmon (lox) Bagel 1 Toasted plain bagel (or any bagel you like the Eggs Benedict recipe but replace the Canadian bacon with cream cheese and place on one skinless, boneless chicken breast into bite-size strips. Spread the other half of hot sauce 1 tbs.
Instruction Manual
Page 9
... and price, if known Item number and Date Code (shown bottom/back of purchase, provided that the appliance is operated and ...USA and Canada REPLACEMENT PARTS Replacement parts, if available, may also be repaired or replaced without charge at www.westbend.com, e-mail customercare@westbend.com, over...use only. Box 53 West Bend, WI 53095 To order with the Instruction Manual. Your state/province's sales tax and a shipping fee will be added to any way. Order online at the Company's discretion. This warranty does not cover any damage, including discoloration, to your product...
... and price, if known Item number and Date Code (shown bottom/back of purchase, provided that the appliance is operated and ...USA and Canada REPLACEMENT PARTS Replacement parts, if available, may also be repaired or replaced without charge at www.westbend.com, e-mail customercare@westbend.com, over...use only. Box 53 West Bend, WI 53095 To order with the Instruction Manual. Your state/province's sales tax and a shipping fee will be added to any way. Order online at the Company's discretion. This warranty does not cover any damage, including discoloration, to your product...


