
Instruction Manual
Page 1
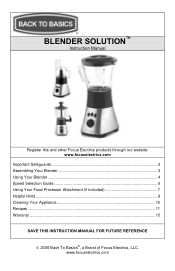
www.focuselectrics.com BLENDER SOLUTION™ Instruction Manual Register this and other Focus Electrics products through our website: www.focuselectrics.com Important Safeguards 2 Assembling Your Blender 3 Using Your Blender 4 Speed Selection Guide 5 Using Your Food Processor Attachment (if included 7 Helpful Hints...8 Cleaning Your Appliance 10 Recipes ...11 Warranty ...15 SAVE THIS INSTRUCTION MANUAL FOR FUTURE REFERENCE © 2008 Back To Basics®, a Brand of Focus Electrics, LLC.
www.focuselectrics.com BLENDER SOLUTION™ Instruction Manual Register this and other Focus Electrics products through our website: www.focuselectrics.com Important Safeguards 2 Assembling Your Blender 3 Using Your Blender 4 Speed Selection Guide 5 Using Your Food Processor Attachment (if included 7 Helpful Hints...8 Cleaning Your Appliance 10 Recipes ...11 Warranty ...15 SAVE THIS INSTRUCTION MANUAL FOR FUTURE REFERENCE © 2008 Back To Basics®, a Brand of Focus Electrics, LLC.
Instruction Manual
Page 2
... the care and use instructions in this manual. • To protect against electrical shock, do not put the cord, plug or the motor assembly in water or other liquid. • Close supervision is necessary when this appliance is dropped or damaged in any problems with the lid in use, before putting on or taking off the machine before removing the blending jar from...
... the care and use instructions in this manual. • To protect against electrical shock, do not put the cord, plug or the motor assembly in water or other liquid. • Close supervision is necessary when this appliance is dropped or damaged in any problems with the lid in use, before putting on or taking off the machine before removing the blending jar from...
Instruction Manual
Page 3
... the risk of the detachable power-supply cord or extension cord should be arranged so that the rubber gasket is properly compressed between the blending jar and the blade base. 3 If the plug does not fit fully into a polarized outlet only one way. SAVE THESE INSTRUCTIONS ASSEMBLING YOUR BLENDER Before assembling your appliance, do not wash parts in their use one blade is wider than the other...
... the risk of the detachable power-supply cord or extension cord should be arranged so that the rubber gasket is properly compressed between the blending jar and the blade base. 3 If the plug does not fit fully into a polarized outlet only one way. SAVE THESE INSTRUCTIONS ASSEMBLING YOUR BLENDER Before assembling your appliance, do not wash parts in their use one blade is wider than the other...

Instruction Manual
Page 4
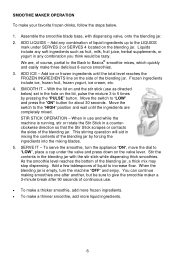
... of mixing. HIGH - MED - Use this speed for dispensing. turns the appliance off. 4 Plug in the center of the lid or place the stir stick through the center of blending tasks. Use "PULSE" to use this speed for dispensing. Use this speed for the final stages of the blending jar. Do not use . runs the appliance at low speed. Stir Stick Lid Cap Lid Blending Jar Dispensing Valve Motor Base Rubber Gasket Blender Blade Base Smoothie Blade Base USING YOUR BLENDER CONTROL BUTTONS: PULSE - runs the appliance at...
... of mixing. HIGH - MED - Use this speed for dispensing. turns the appliance off. 4 Plug in the center of the lid or place the stir stick through the center of blending tasks. Use "PULSE" to use this speed for dispensing. Use this speed for the final stages of the blending jar. Do not use . runs the appliance at low speed. Stir Stick Lid Cap Lid Blending Jar Dispensing Valve Motor Base Rubber Gasket Blender Blade Base Smoothie Blade Base USING YOUR BLENDER CONTROL BUTTONS: PULSE - runs the appliance at...
Instruction Manual
Page 5
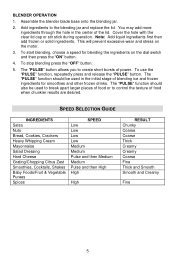
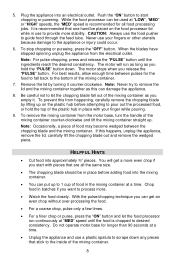
... 5 Cover the hole with the clear lid cap or stir stick during operation. The "PULSE" function should also be used to break apart larger pieces of food or to the blending jar and replace the lid. Add ingredients to control the texture of blending ice and frozen ingredients for blending the ingredients on the motor. 3. The "PULSE" function should be used in the center of power. Assemble the blender blade base onto the blending jar. 2. To start blending...
... 5 Cover the hole with the clear lid cap or stir stick during operation. The "PULSE" function should also be used to break apart larger pieces of food or to the blending jar and replace the lid. Add ingredients to control the texture of blending ice and frozen ingredients for blending the ingredients on the motor. 3. The "PULSE" function should be used in the center of power. Assemble the blender blade base onto the blending jar. 2. To start blending...
Instruction Manual
Page 6
... forcing the ingredients into the mixing blades. 5. Stir the contents in any soft ingredients such as directed below . 1. Assemble the smoothie blade base, with the stir stick while dispensing thick smoothies. STIR STICK OPERATION - When in a counterclockwise direction so that the Stir Stick scrapes or contacts the sides of the blending jar by pressing the "PULSE" button. Add a few tablespoons of the blending jar, a thick mix may stop dispensing.
... forcing the ingredients into the mixing blades. 5. Stir the contents in any soft ingredients such as directed below . 1. Assemble the smoothie blade base, with the stir stick while dispensing thick smoothies. STIR STICK OPERATION - When in a counterclockwise direction so that the Stir Stick scrapes or contacts the sides of the blending jar by pressing the "PULSE" button. Add a few tablespoons of the blending jar, a thick mix may stop dispensing.

Instruction Manual
Page 7
... trouble fitting the lid onto the mixing container, turn until it fits into place. The chopping blade should slide easily to be locked into place. The lower blade will not turn the chopping blade slightly and replace the lid. 7 Note: The chopping blade will almost touch the bottom. 4. Twist the mixing container clockwise onto the gear base. 2. The lid lock must be processed into the locked position prior to use your Food Processor Attachment, the mixing container...
... trouble fitting the lid onto the mixing container, turn until it fits into place. The chopping blade should slide easily to be locked into place. The lower blade will not turn the chopping blade slightly and replace the lid. 7 Note: The chopping blade will almost touch the bottom. 4. Twist the mixing container clockwise onto the gear base. 2. The lid lock must be processed into the locked position prior to use your Food Processor Attachment, the mixing container...
Instruction Manual
Page 8
... the blades have stopped spinning unplug the appliance from happening, carefully remove the chopping blade by turning it . For best results, allow enough time between the chopping blade and the mixing container. To prevent this happens, unplug the appliance, remove the lid, carefully lift the chopping blade out and remove the wedged piece. It is chopped to guide food through the feed tube. Push the "ON" button to provide more even chop if...
... the blades have stopped spinning unplug the appliance from happening, carefully remove the chopping blade by turning it . For best results, allow enough time between the chopping blade and the mixing container. To prevent this happens, unplug the appliance, remove the lid, carefully lift the chopping blade out and remove the wedged piece. It is chopped to guide food through the feed tube. Push the "ON" button to provide more even chop if...

Instruction Manual
Page 9
... liquids to the blending jar or mixing container. Most ingredients should be operated in short bursts. First, cut with a knife, don't try to chop it may damage the chopping blade. (Do not attempt to chop parmesan cheese in the food processor). Check texture every 2 or 3 seconds to avoid over -blend foods. Whip up to 2 cups at a time. • If the motor stalls, turn off and unplug...
... liquids to the blending jar or mixing container. Most ingredients should be operated in short bursts. First, cut with a knife, don't try to chop it may damage the chopping blade. (Do not attempt to chop parmesan cheese in the food processor). Check texture every 2 or 3 seconds to avoid over -blend foods. Whip up to 2 cups at a time. • If the motor stalls, turn off and unplug...
Instruction Manual
Page 10
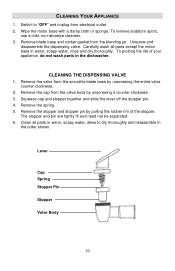
... fit and need not be separated. 6. Remove blade base and rubber gasket from the valve body by unscrewing the entire valve counter-clockwise. 2. Unscrew and disassemble the dispensing valve. Switch to dry thoroughly and reassemble in the order shown. CLEANING THE DISPENSING VALVE 1. Remove the cap from the blending jar. Remove the stopper and stopper pin by pulling the rubber rim of your appliance, do not wash parts...
... fit and need not be separated. 6. Remove blade base and rubber gasket from the valve body by unscrewing the entire valve counter-clockwise. 2. Unscrew and disassemble the dispensing valve. Switch to dry thoroughly and reassemble in the order shown. CLEANING THE DISPENSING VALVE 1. Remove the cap from the blending jar. Remove the stopper and stopper pin by pulling the rubber rim of your appliance, do not wash parts...
Instruction Manual
Page 11
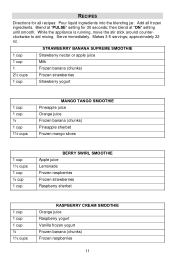
... mango slices 1 cup 1½ cups 1 cup ½ cup 1 cup BERRY SWIRL SMOOTHIE Apple juice Lemonade Frozen raspberries Frozen strawberries Raspberry sherbet 1 cup 1 cup 1 cup ½ 1½ cups RASPBERRY CREAM SMOOTHIE Orange juice Raspberry yogurt Vanilla frozen yogurt Frozen banana (chunks) Frozen raspberries 11 Serve immediately. Add all recipes: Pour liquid ingredients into the blending jar. then blend at "PULSE" setting for all frozen ingredients. RECIPES Directions for 30...
... mango slices 1 cup 1½ cups 1 cup ½ cup 1 cup BERRY SWIRL SMOOTHIE Apple juice Lemonade Frozen raspberries Frozen strawberries Raspberry sherbet 1 cup 1 cup 1 cup ½ 1½ cups RASPBERRY CREAM SMOOTHIE Orange juice Raspberry yogurt Vanilla frozen yogurt Frozen banana (chunks) Frozen raspberries 11 Serve immediately. Add all recipes: Pour liquid ingredients into the blending jar. then blend at "PULSE" setting for all frozen ingredients. RECIPES Directions for 30...

Instruction Manual
Page 12
... Vanilla Frozen banana (chunks) Vanilla frozen yogurt Orange yogurt Orange juice concentrate 2½ cups 1½ cups 1 cup 1 cup RASPBERRY SUNRISE SMOOTHIE Orange juice Frozen raspberries Raspberry sherbet Ice 2 cups 1 cup 1½ cups 1 cup 1 cup LEMON LOUIE SMOOTHIE Lemonade Lemon yogurt Frozen pineapple chunks Pineapple sherbet Ice 2 cups 1 cup ½ 1 cup 1½ cups PEACH REFRESHER SMOOTHIE Peach nectar or apple juice Vanilla frozen yogurt Banana Peach...
... Vanilla Frozen banana (chunks) Vanilla frozen yogurt Orange yogurt Orange juice concentrate 2½ cups 1½ cups 1 cup 1 cup RASPBERRY SUNRISE SMOOTHIE Orange juice Frozen raspberries Raspberry sherbet Ice 2 cups 1 cup 1½ cups 1 cup 1 cup LEMON LOUIE SMOOTHIE Lemonade Lemon yogurt Frozen pineapple chunks Pineapple sherbet Ice 2 cups 1 cup ½ 1 cup 1½ cups PEACH REFRESHER SMOOTHIE Peach nectar or apple juice Vanilla frozen yogurt Banana Peach...

Instruction Manual
Page 14
can) Lemon/lime soda Grenadine syrup Ice, to desired consistency 3.5 oz. 1½ cups 1½ cups 1 CHOCOLATE TREAT Package of a 6 oz. 2 cups ½ cup 1 cup 1 cup 1 cup LOW-FAT STRAWBERRY ORANGE SMOOTHIE Strawberries Orange juice Skim milk Plain nonfat yogurt Ice 2 cups 3 oz. 1 cup 1 tsp. 1-2 cups *Add water if necessary LEMONADE WATERMELON SOOTHER Watermelon (pulp, not rind) Frozen lemonade concentrate (½ of instant chocolate pudding mix Milk Ice Banana 14
can) Lemon/lime soda Grenadine syrup Ice, to desired consistency 3.5 oz. 1½ cups 1½ cups 1 CHOCOLATE TREAT Package of a 6 oz. 2 cups ½ cup 1 cup 1 cup 1 cup LOW-FAT STRAWBERRY ORANGE SMOOTHIE Strawberries Orange juice Skim milk Plain nonfat yogurt Ice 2 cups 3 oz. 1 cup 1 tsp. 1-2 cups *Add water if necessary LEMONADE WATERMELON SOOTHER Watermelon (pulp, not rind) Frozen lemonade concentrate (½ of instant chocolate pudding mix Milk Ice Banana 14

Instruction Manual
Page 15
... or requires service within its warranty period, please contact the Focus Electrics Customer Service Department at (866) 290 -1851 or e-mail us at Focus Electrics' discretion. This manual contains important and helpful information regarding the safe use only. Along with the provided Instruction Manual. A receipt proving original purchase date will be ordered directly from failures in transit. O. For future reference, attach dated...
... or requires service within its warranty period, please contact the Focus Electrics Customer Service Department at (866) 290 -1851 or e-mail us at Focus Electrics' discretion. This manual contains important and helpful information regarding the safe use only. Along with the provided Instruction Manual. A receipt proving original purchase date will be ordered directly from failures in transit. O. For future reference, attach dated...