
Uk Manual
Page 1
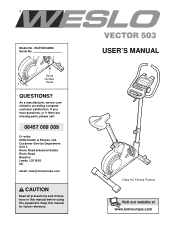
Model No. Customer Service Department Unit 4 Revie Road Industrial Estate Revie Road Beeston Leeds, LS118JG UK email: [email protected] CAUTION Read all precautions and instructions in this manual before using this manual for future reference. As a manufacturer, we are missing parts, please call: 08457 089 009 Or write: ICON Health & Fitness, Ltd. USER'S MANUAL Class HC Fitness Product WLEVEX34830 Serial No. If you have questions, or if there are committed to providing complete customer satisfaction. Keep this equipment. Serial Number Decal QUESTIONS?
Model No. Customer Service Department Unit 4 Revie Road Industrial Estate Revie Road Beeston Leeds, LS118JG UK email: [email protected] CAUTION Read all precautions and instructions in this manual before using this manual for future reference. As a manufacturer, we are missing parts, please call: 08457 089 009 Or write: ICON Health & Fitness, Ltd. USER'S MANUAL Class HC Fitness Product WLEVEX34830 Serial No. If you have questions, or if there are committed to providing complete customer satisfaction. Keep this equipment. Serial Number Decal QUESTIONS?
Uk Manual
Page 2
TABLE OF CONTENTS IMPORTANT PRECAUTIONS 3 BEFORE YOU BEGIN 4 ASSEMBLY 5 HOW TO USE THE CHEST PULSE SENSOR 9 HOW TO OPERATE THE EXERCISE CYCLE 11 MAINTENANCE AND TROUBLESHOOTING 15 CONDITIONING GUIDELINES 16 PART LIST 18 EXPLODED DRAWING 19 ORDERING REPLACEMENT PARTS Back Cover WESLO is a registered trademark of ICON Health & Fitness, Inc. 2
TABLE OF CONTENTS IMPORTANT PRECAUTIONS 3 BEFORE YOU BEGIN 4 ASSEMBLY 5 HOW TO USE THE CHEST PULSE SENSOR 9 HOW TO OPERATE THE EXERCISE CYCLE 11 MAINTENANCE AND TROUBLESHOOTING 15 CONDITIONING GUIDELINES 16 PART LIST 18 EXPLODED DRAWING 19 ORDERING REPLACEMENT PARTS Back Cover WESLO is a registered trademark of ICON Health & Fitness, Inc. 2
Uk Manual
Page 3
... in general. 11. ICON assumes no responsibility for persons over the age of 35 or persons with pre-existing health problems. Read all precautions. 3. tions before using the exercise cycle; The pulse sensor is missing or illegible, call 08457 089 009 and order a free replacement decal. do not wear loose clothing that all parts regularly. Use the exercise cycle indoors on the...
... in general. 11. ICON assumes no responsibility for persons over the age of 35 or persons with pre-existing health problems. Read all precautions. 3. tions before using the exercise cycle; The pulse sensor is missing or illegible, call 08457 089 009 and order a free replacement decal. do not wear loose clothing that all parts regularly. Use the exercise cycle indoors on the...
Uk Manual
Page 4
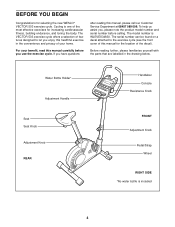
... with the parts that are labelled in the convenience and privacy of your benefit, read this manual, please call our Customer Service Department at 08457 089 009. Water Bottle Holder* Adjustment Handle Seat Seat Knob Adjustment Knob REAR Handlebar Console Resistance Knob FRONT Adjustment Knob Pedal/Strap Wheel RIGHT SIDE *No water bottle is WLEVEX34830. If you , please note the product model number and serial number before you use the exercise cycle. To...
... with the parts that are labelled in the convenience and privacy of your benefit, read this manual, please call our Customer Service Department at 08457 089 009. Water Bottle Holder* Adjustment Handle Seat Seat Knob Adjustment Knob REAR Handlebar Console Resistance Knob FRONT Adjustment Knob Pedal/Strap Wheel RIGHT SIDE *No water bottle is WLEVEX34830. If you , please note the product model number and serial number before you use the exercise cycle. To...

Uk Manual
Page 5
... and remove the packing materials. Orient the Front Stabiliser (2) so the Wheels (23) are on page 18. Do not dispose of the exercise cycle in assembly. The number in the parts bag, check to the key number of the part, from the PART LIST on the side shown. Whilst another person lifts the front of the Frame (1) slightly, attach the Rear Stabiliser...
... and remove the packing materials. Orient the Front Stabiliser (2) so the Wheels (23) are on page 18. Do not dispose of the exercise cycle in assembly. The number in the parts bag, check to the key number of the part, from the PART LIST on the side shown. Whilst another person lifts the front of the Frame (1) slightly, attach the Rear Stabiliser...

Uk Manual
Page 6
... the Adjustment Handle (53) into the Handlebar Clamp (42) and tighten the Adjustment Handle into the Console. Note: The Adjustment Handle works like a spanner. Attach the earth wire to avoid pinching the wires. 6 Insert three batteries into the Upright (13). Be careful to avoid pinching the wires. 5 Earth Wire 27 49 Hole 49 16 Console Wire Console Cable 13 Be careful to the Upright with four M5 x 12mm Screws...
... the Adjustment Handle (53) into the Handlebar Clamp (42) and tighten the Adjustment Handle into the Console. Note: The Adjustment Handle works like a spanner. Attach the earth wire to avoid pinching the wires. 6 Insert three batteries into the Upright (13). Be careful to avoid pinching the wires. 5 Earth Wire 27 49 Hole 49 16 Console Wire Console Cable 13 Be careful to the Upright with four M5 x 12mm Screws...

Uk Manual
Page 7
... the Seat Knob (36) into the indicated slot in the Upright. 7. Attach the Seat (12) to the Lower Cable (45) in the position shown, connect the console wire to avoid pinching the wires and cables. Whilst another person holds the Upright (13) in the following way: • See inset drawing A. Be careful to the Reed Switch Wire (43). Make sure that the Knob is tight. 6 13 Console Cable 45...
... the Seat Knob (36) into the indicated slot in the Upright. 7. Attach the Seat (12) to the Lower Cable (45) in the position shown, connect the console wire to avoid pinching the wires and cables. Whilst another person holds the Upright (13) in the following way: • See inset drawing A. Be careful to the Reed Switch Wire (43). Make sure that the Knob is tight. 6 13 Console Cable 45...

Uk Manual
Page 8
... best performance, the Pedals must be left arm of the Crank. Adjust the right Pedal Strap (not shown) in the Frame. 8. Tighten the Right Pedal (not shown) clock- wise into the left over. Turn the indicated Adjustment Knob (9) counterclock- 8 wise and remove it is inserted through one week, retighten the Pedals. Make sure that all parts are properly tightened before you use the exercise cycle. Make sure...
... best performance, the Pedals must be left arm of the Crank. Adjust the right Pedal Strap (not shown) in the Frame. 8. Tighten the Right Pedal (not shown) clock- wise into the left over. Turn the indicated Adjustment Knob (9) counterclock- 8 wise and remove it is inserted through one week, retighten the Pedals. Make sure that all parts are properly tightened before you use the exercise cycle. Make sure...
Uk Manual
Page 9
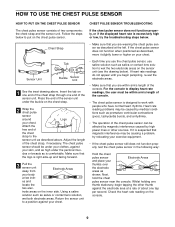
... comfortable. Attach the free end of the console. The chest pulse sensor should be within arm's length of the chest strap to work with people who have normal heart rhythms. Heart rate reading problems may be affected by magnetic interference caused by high power lines or other thumb against the electrode area at the left. Using a saline solution such as is suspected that you use the chest pulse sensor, use saline...
... comfortable. Attach the free end of the console. The chest pulse sensor should be within arm's length of the chest strap to work with people who have normal heart rhythms. Heart rate reading problems may be affected by magnetic interference caused by high power lines or other thumb against the electrode area at the left. Using a saline solution such as is suspected that you use the chest pulse sensor, use saline...

Uk Manual
Page 10
... cover, turn it clockwise to close it may remain activated longer than necessary, draining the battery prematurely. • Store the chest pulse sensor in the following way: Locate the battery cover on top. CR 2032 Battery CHEST PULSE SENSOR CARE • Thoroughly dry the chest pulse sensor after each use alcohol, abrasives, or chemicals. The chest strap may trap moisture. • Do not expose the chest pulse sensor to temperatures above instructions, the battery...
... cover, turn it clockwise to close it may remain activated longer than necessary, draining the battery prematurely. • Store the chest pulse sensor in the following way: Locate the battery cover on top. CR 2032 Battery CHEST PULSE SENSOR CARE • Thoroughly dry the chest pulse sensor after each use alcohol, abrasives, or chemicals. The chest strap may trap moisture. • Do not expose the chest pulse sensor to temperatures above instructions, the battery...

Uk Manual
Page 11
... one of the pedals, turn the indicated knob counterclockwise Upright and remove it is tight. Note: The adjustment handle works like a span- Next, slide the upright up or down and align one of the adjustment holes in the upright with the indicated hole in the seat post. HOW TO OPERATE THE EXERCISE CYCLE HOW TO ADJUST THE SEAT POST HOW TO ADJUST THE PEDALLING RESISTANCE For effective...
... one of the pedals, turn the indicated knob counterclockwise Upright and remove it is tight. Note: The adjustment handle works like a span- Next, slide the upright up or down and align one of the adjustment holes in the upright with the indicated hole in the seat post. HOW TO OPERATE THE EXERCISE CYCLE HOW TO ADJUST THE SEAT POST HOW TO ADJUST THE PEDALLING RESISTANCE For effective...
Uk Manual
Page 12
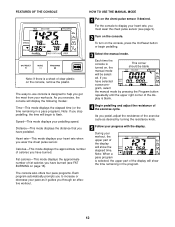
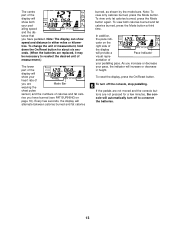
... turn on the chest pulse sensor if desired. Speed-This mode displays your workouts. FEATURES OF THE CONSOLE HOW TO USE THE MANUAL MODE 1 Put on the console, press the On/Reset button or begin to increase or decrease your workout, the upper part of clear plastic on the console. Distance-This mode displays the distance that you have pedalled. gram, select the manual mode by turning the resistance knob. 5 Follow your heart rate, you have burned (see page 9). 2 Turn on the console, remove...
... turn on the chest pulse sensor if desired. Speed-This mode displays your workouts. FEATURES OF THE CONSOLE HOW TO USE THE MANUAL MODE 1 Put on the console, press the On/Reset button or begin to increase or decrease your workout, the upper part of clear plastic on the console. Distance-This mode displays the distance that you have pedalled. gram, select the manual mode by turning the resistance knob. 5 Follow your heart rate, you have burned (see page 9). 2 Turn on the console, remove...
Uk Manual
Page 13
... moved and the console buttons are not pressed for about six seconds. (When the batteries are Mode Bar wearing the chest pulse sensor) and the numbers of the display will show speed and distance in height. To view both your pedalling speed and the distance that you are replaced, it may be necessary to conserve the batteries. 13 To reset the display, press the On/Reset button. 6 To turn off the console, stop pedalling. The centre part of your pedalling...
... moved and the console buttons are not pressed for about six seconds. (When the batteries are Mode Bar wearing the chest pulse sensor) and the numbers of the display will show speed and distance in height. To view both your pedalling speed and the distance that you are replaced, it may be necessary to conserve the batteries. 13 To reset the display, press the On/Reset button. 6 To turn off the console, stop pedalling. The centre part of your pedalling...
Uk Manual
Page 14
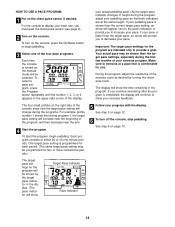
... decrease your exercise program. The display will show how the target pace setting will change during the programs. For example, profile number 1 shows that is turned on the console, press the On/Reset button or begin pedalling. See step 6 on the chest pulse sensor if desired. One target pace setting is slower than the target pace settings, especially during program 1, the target pace setting will be shown by turning the resistance knob. Your actual...
... decrease your exercise program. The display will show how the target pace setting will change during the programs. For example, profile number 1 shows that is turned on the console, press the On/Reset button or begin pedalling. See step 6 on the chest pulse sensor if desired. One target pace setting is slower than the target pace settings, especially during program 1, the target pace setting will be shown by turning the resistance knob. Your actual...

Uk Manual
Page 15
... the exercise cycle regularly. HOW TO ADJUST THE REED SWITCH If the console does not display correct feedback, the reed switch should be adjusted. Turn the Crank for a moment. To replace the batteries, see step 4 on page 6 and remove the console from the Magnet, and then retighten the Screw. Slide the Reed Switch slightly closer to pinch the wires. When the Reed Switch is aligned with the Reed Switch. Replace any worn parts immediately. BATTERY REPLACEMENT If the console display...
... the exercise cycle regularly. HOW TO ADJUST THE REED SWITCH If the console does not display correct feedback, the reed switch should be adjusted. Turn the Crank for a moment. To replace the batteries, see step 4 on page 6 and remove the console from the Magnet, and then retighten the Screw. Slide the Reed Switch slightly closer to pinch the wires. When the Reed Switch is aligned with the Reed Switch. Replace any worn parts immediately. BATTERY REPLACEMENT If the console display...
Uk Manual
Page 16
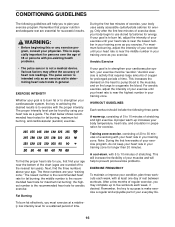
The pulse sensor is intended only as a guide. EXERCISE INTENSITY Whether your goal is to strengthen your cardiovascular system, your exercise must exercise at least one day of exercise does your body begin to strengthen your age. The chart below shows recommended heart rates for fat burning; Note: During the first few minutes of rest between workouts. Next, find the three numbers above your...
The pulse sensor is intended only as a guide. EXERCISE INTENSITY Whether your goal is to strengthen your cardiovascular system, your exercise must exercise at least one day of exercise does your body begin to strengthen your age. The chart below shows recommended heart rates for fat burning; Note: During the first few minutes of rest between workouts. Next, find the three numbers above your...

Uk Manual
Page 17
... 3 times for 15 counts, then relax. Allow your back and shoulders to your toes as far as possible. Hold for each leg. Stretches: Hamstrings, lower back and groin. 3. Hold for 15 counts, then relax. Hold for 15 counts, then relax. Stretches: Quadriceps and hip muscles. 1 2 4... is shown at the right. SUGGESTED STRETCHES The correct form for 15 counts, then relax. Keep your back leg straight and your hands against a wall. Quadriceps Stretch With one leg extended. Bend your front leg, lean forward and move your other , reach forward and place your back foot...
... 3 times for 15 counts, then relax. Allow your back and shoulders to your toes as far as possible. Hold for each leg. Stretches: Hamstrings, lower back and groin. 3. Hold for 15 counts, then relax. Hold for 15 counts, then relax. Stretches: Quadriceps and hip muscles. 1 2 4... is shown at the right. SUGGESTED STRETCHES The correct form for 15 counts, then relax. Keep your back leg straight and your hands against a wall. Quadriceps Stretch With one leg extended. Bend your front leg, lean forward and move your other , reach forward and place your back foot...

Uk Manual
Page 18
... 1 Reed Switch/Wire 44 1 Crank Bearing Set 45 1 Lower Cable 46 1 M4 x 12mm Screw 47 1 Return Spring 48 1 Belt 49 4 M5 x 12mm Screw 50 1 Seat Bracket 51 4 M8 Flat Washer 52 6 M4 x 25mm Screw 53 1 Adjustment Handle 54 6 M4 x 19mm Screw 55 1 M6 x 15mm Screw 56 2 Frame Collar 57 2 Knob Collar # 1 User's Manual # 2 Assembly Wrench Note: "#" indicates a non-illustrated part. WLEVEX34830 R0903A No. See the back cover of this manual for information about...
... 1 Reed Switch/Wire 44 1 Crank Bearing Set 45 1 Lower Cable 46 1 M4 x 12mm Screw 47 1 Return Spring 48 1 Belt 49 4 M5 x 12mm Screw 50 1 Seat Bracket 51 4 M8 Flat Washer 52 6 M4 x 25mm Screw 53 1 Adjustment Handle 54 6 M4 x 19mm Screw 55 1 M6 x 15mm Screw 56 2 Frame Collar 57 2 Knob Collar # 1 User's Manual # 2 Assembly Wrench Note: "#" indicates a non-illustrated part. WLEVEX34830 R0903A No. See the back cover of this manual for information about...
Uk Manual
Page 19
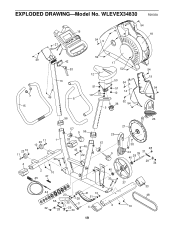
WLEVEX34830 R0903A 16 54 27 54 18 49 42 53 13 7 49 8 15 52 12 51 10 51 5 17 52 50 54 51 10 14 52 36 54 54 19 54 25 56 23 10 11 4 11 1 23 10 30 2 10 45 47 57 9 56 33 46 43 22 25 57 9 40 30 44 20 41 10 51 28 55 35 3 32 28 31 29 34 4 6 19 26 21 38 28 24 31 39 40 28 29 34 37 33 48 10 EXPLODED DRAWING-Model No.
WLEVEX34830 R0903A 16 54 27 54 18 49 42 53 13 7 49 8 15 52 12 51 10 51 5 17 52 50 54 51 10 14 52 36 54 54 19 54 25 56 23 10 11 4 11 1 23 10 30 2 10 45 47 57 9 56 33 46 43 22 25 57 9 40 30 44 20 41 10 51 28 55 35 3 32 28 31 29 34 4 6 19 26 21 38 28 24 31 39 40 28 29 34 37 33 48 10 EXPLODED DRAWING-Model No.
Uk Manual
Page 20
... the following information: • the MODEL NUMBER of the product (WLEVEX34830) • the NAME of the product (WESLO® VECTOR 503 exercise cycle) • the SERIAL NUMBER of the product (see the front cover of this manual) • the KEY NUMBER and DESCRIPTION of the part(s) (see page 18) Part No. 201764 R0903A Printed in China © 2003 ICON Health & Fitness, Inc. ORDERING REPLACEMENT PARTS To order replacement parts, contact the ICON Health & Fitness, Ltd.
... the following information: • the MODEL NUMBER of the product (WLEVEX34830) • the NAME of the product (WESLO® VECTOR 503 exercise cycle) • the SERIAL NUMBER of the product (see the front cover of this manual) • the KEY NUMBER and DESCRIPTION of the part(s) (see page 18) Part No. 201764 R0903A Printed in China © 2003 ICON Health & Fitness, Inc. ORDERING REPLACEMENT PARTS To order replacement parts, contact the ICON Health & Fitness, Ltd.


