

Owners Manual
Page 1
Serial No. Serial Number Decal 0 o_ I OWNER'S MANUAL calorie monitor it. Save this equipment. to ( A Subsidiary of Welder Health andFitness, Inc. Part No. 102692 9/90 CAUTION: Read all safety precautions and instructions in the space above. Record the serial number in this owner's manual carefully before using this manual for your future reference. t Model No.
Serial No. Serial Number Decal 0 o_ I OWNER'S MANUAL calorie monitor it. Save this equipment. to ( A Subsidiary of Welder Health andFitness, Inc. Part No. 102692 9/90 CAUTION: Read all safety precautions and instructions in the space above. Record the serial number in this owner's manual carefully before using this manual for your future reference. t Model No.

Owners Manual
Page 2
... Weslo at one of its authorized service centers. Pre-authorization may also have other warranty beyond that specifically set forth above is limited to be received by Weslo. ACCORDINGLY, THE ABOVE LIMITATION MAY NOT APPLY TO YOU. THE WARRANTY EXTENDED HEREUNDER IS IN LIEU OF ANY AND ALL OTHER WARRANTIES AND ANY IMPLIED WARRANTIES OF MERCHANTABILITY OR FITNESS FOR A PARTICULAR PURPOSE IS LIMITED...
... Weslo at one of its authorized service centers. Pre-authorization may also have other warranty beyond that specifically set forth above is limited to be received by Weslo. ACCORDINGLY, THE ABOVE LIMITATION MAY NOT APPLY TO YOU. THE WARRANTY EXTENDED HEREUNDER IS IN LIEU OF ANY AND ALL OTHER WARRANTIES AND ANY IMPLIED WARRANTIES OF MERCHANTABILITY OR FITNESS FOR A PARTICULAR PURPOSE IS LIMITED...

Owners Manual
Page 3
... the stepper during use . 6. Use the stepper only as described in this or any exercise program consult your physician. The electronic monitor must be damaged. 2. SIIMIA11171" calorie monitor TABLE OF CONTENTS Warranty Important Safety Precautions Before You Begin Assembly Operation and Adjustment Maintenance and Trouble-Shooting Conditioning Guidelines Part List Exploded Drawing Ordering Replacement Parts 2 3 4 5 7 7 8 10 11 Back Cover IMPORTANT SAFETY PRECAUTIONS 1. The cylinders may be out of direct...
... the stepper during use . 6. Use the stepper only as described in this or any exercise program consult your physician. The electronic monitor must be damaged. 2. SIIMIA11171" calorie monitor TABLE OF CONTENTS Warranty Important Safety Precautions Before You Begin Assembly Operation and Adjustment Maintenance and Trouble-Shooting Conditioning Guidelines Part List Exploded Drawing Ordering Replacement Parts 2 3 4 5 7 7 8 10 11 Back Cover IMPORTANT SAFETY PRECAUTIONS 1. The cylinders may be out of direct...

Owners Manual
Page 4
... the front cover for selecting the Weslo SUMMIT ST65 Calorie Monitor stepper. Electronic Monitor Resistance Cylinders LEFT SIDE Handrails BACK 111 Pedals RIGHT SIDE FRONT Cylinder Brackets 4 The SUMMIT ST65 blends advanced engineering with innovative design to provide you with the parts labeled. Friday, 6 a.m. - 6 p.m. Mountain time. The model number is recorded on the front cover of this equipment. For your exercise more enjoyable, the ST65 gives you...
... the front cover for selecting the Weslo SUMMIT ST65 Calorie Monitor stepper. Electronic Monitor Resistance Cylinders LEFT SIDE Handrails BACK 111 Pedals RIGHT SIDE FRONT Cylinder Brackets 4 The SUMMIT ST65 blends advanced engineering with innovative design to provide you with the parts labeled. Friday, 6 a.m. - 6 p.m. Mountain time. The model number is recorded on the front cover of this equipment. For your exercise more enjoyable, the ST65 gives you...

Owners Manual
Page 5
... the Cable onto the hooks on the Base (10). Read the instructions below carefully before beginning. Assembly can be turned as shown. 9 4 10 27 27 33 3. Stand the assembly upright on the insides of the packing materials until the stepper is fully assembled and all parts in the Stabilizer must be completed using the tools included and your own hammer. 1. Attach...
... the Cable onto the hooks on the Base (10). Read the instructions below carefully before beginning. Assembly can be turned as shown. 9 4 10 27 27 33 3. Stand the assembly upright on the insides of the packing materials until the stepper is fully assembled and all parts in the Stabilizer must be completed using the tools included and your own hammer. 1. Attach...

Owners Manual
Page 6
... the Handrail to the lower end of the Spacer must be toward the Frame, with a Curved Washer (38) and a Handrail Bolt (8). Connect the Sensor Wire (3) to the wire protruding from the Frame. Attach a Cylinder Bracket (30) to the Frame (9) with the flat side away from the Electronic Monitor (2). Attach the Monitor to the Cylinder Bracket. Attach the other Resistance Cylinder to the...
... the Handrail to the lower end of the Spacer must be toward the Frame, with a Curved Washer (38) and a Handrail Bolt (8). Connect the Sensor Wire (3) to the wire protruding from the Frame. Attach a Cylinder Bracket (30) to the Frame (9) with the flat side away from the Electronic Monitor (2). Attach the Monitor to the Cylinder Bracket. Attach the other Resistance Cylinder to the...

Owners Manual
Page 7
To change the resistance, first remove the bracket knobs from the brackets. Always turn off the monitor after exercising. You can emphasize the muscles of resistance will be virtually maintenance-free. For the best aerobic workout, exercise physiologists recommend taking relatively short, rapid steps at low resistance (see ADJUSTING STEPPER RESISTANCE below). Move the brackets to come in contact with the electronic monitor. To exercise, alternately press the right and left pedals down...
To change the resistance, first remove the bracket knobs from the brackets. Always turn off the monitor after exercising. You can emphasize the muscles of resistance will be virtually maintenance-free. For the best aerobic workout, exercise physiologists recommend taking relatively short, rapid steps at low resistance (see ADJUSTING STEPPER RESISTANCE below). Move the brackets to come in contact with the electronic monitor. To exercise, alternately press the right and left pedals down...

Owners Manual
Page 8
... your exercise program, you stop exercising and place two fingers on your wrist where you feel a pulse. Carefully take a six-second heart beat count. (A six-second count is too high, decrease your maximum heart rate. At Rest, 2. Cooling down, 5. Warming up, 3. Use the column that adequate rest and good nutrition are listed for you to measure your heart rate is your heart rate. TRAINING ZONE TRAINING...
... your exercise program, you stop exercising and place two fingers on your wrist where you feel a pulse. Carefully take a six-second heart beat count. (A six-second count is too high, decrease your maximum heart rate. At Rest, 2. Cooling down, 5. Warming up, 3. Use the column that adequate rest and good nutrition are listed for you to measure your heart rate is your heart rate. TRAINING ZONE TRAINING...

Owners Manual
Page 9
... , resting it against the extended leg's inner \ thigh. A day of rest between workouts is an important part of stretching or light exercise will allow the body to a successful program is REGULAR exercise. Bring the sole of workouts can be increased to your toes. Repeat three times. Then increase the ) intensity to raise your heart rate to 4-5 per week folloWing the...
... , resting it against the extended leg's inner \ thigh. A day of rest between workouts is an important part of stretching or light exercise will allow the body to a successful program is REGULAR exercise. Bring the sole of workouts can be increased to your toes. Repeat three times. Then increase the ) intensity to raise your heart rate to 4-5 per week folloWing the...
Owners Manual
Page 10
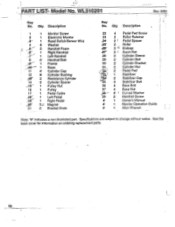
Description 1 2 4 As` 8 11 12 )9" 14 16 17 ht 21 1 Monitor Screw 1 Electronic Monitor 1 Reed Switch/Sensor Wire 6 Washer 2 Handrail Foam 1 Right Handrail 1 Left Handrail 2 Handrail Bolt 1 Frame 1 Base 2 Cylinder Cap 8 Cylinder Bushing 2 Resistance Cylinder 2 Cylinder Spacer 1 Pulley Nut 1 Pulley 1 Pedal Cable 1 Left Pedal 1 Right Pedal 3 Magnet 2 Bracket Knob Key No. Description 22 4 Pedal Pad Screw 23 2 Roller Retainer ,24- 2 Pedal Spacer -25- 2 Roller (26- 3 Endcap 27 2 f Acorn Nut 28 2 Cylinder Sleeve 29 2 Cylinder...
Description 1 2 4 As` 8 11 12 )9" 14 16 17 ht 21 1 Monitor Screw 1 Electronic Monitor 1 Reed Switch/Sensor Wire 6 Washer 2 Handrail Foam 1 Right Handrail 1 Left Handrail 2 Handrail Bolt 1 Frame 1 Base 2 Cylinder Cap 8 Cylinder Bushing 2 Resistance Cylinder 2 Cylinder Spacer 1 Pulley Nut 1 Pulley 1 Pedal Cable 1 Left Pedal 1 Right Pedal 3 Magnet 2 Bracket Knob Key No. Description 22 4 Pedal Pad Screw 23 2 Roller Retainer ,24- 2 Pedal Spacer -25- 2 Roller (26- 3 Endcap 27 2 f Acorn Nut 28 2 Cylinder Sleeve 29 2 Cylinder...

Owners Manual
Page 11
WL510201 8 38 2 5 8 5 3 38 Rev 9/90 ; 14 9 14 12 kgro 6 20 0 OZ 11 i 7 I; 15 16 13 28 26 17 3 13 19 21 32 12 26 24 k31 '37 29 a 10 ti 2 25 !30 18 4 :01 4 39 Igo 36 32 21 22 * Specifications are subject to change without notice. 27 33 34 39 L 34! 11 Model No. EXPLODED DRAWING-
WL510201 8 38 2 5 8 5 3 38 Rev 9/90 ; 14 9 14 12 kgro 6 20 0 OZ 11 i 7 I; 15 16 13 28 26 17 3 13 19 21 32 12 26 24 k31 '37 29 a 10 ti 2 25 !30 18 4 :01 4 39 Igo 36 32 21 22 * Specifications are subject to change without notice. 27 33 34 39 L 34! 11 Model No. EXPLODED DRAWING-

Owners Manual
Page 12
... MODEL NUMBER of the product (SUMMIT ST65). 3. The SERIAL NUMBER of the product (see the front cover of this manual). 4. Part No. 1026-92 9/90 Printed in TAIWAN R.O.C.. The KEY NUMBER of the part(s) from page 10 of this manual. If possible, place the stepper near your telephone for easy reference when calling. When ordering parts, please be ordered by calling our Customer Service Department toll-free...
... MODEL NUMBER of the product (SUMMIT ST65). 3. The SERIAL NUMBER of the product (see the front cover of this manual). 4. Part No. 1026-92 9/90 Printed in TAIWAN R.O.C.. The KEY NUMBER of the part(s) from page 10 of this manual. If possible, place the stepper near your telephone for easy reference when calling. When ordering parts, please be ordered by calling our Customer Service Department toll-free...


