

English Manual
Page 1
... DIRECT TO OUR TOLL-FREE CUSTOMER HOT LINE. Read all safety precautions and instructions in this manual carefully before using this manual for future reference. ( OWNER'S MANUAL Save this equipment. If you have questions, or find there are committed to you. WESLO® Model No. WL200521 Serial No. \ Serial Number Decal ASCENT MOTIVATIONAL CLUB STEPPER INDEPENDENT STEPPING ACTION • SELF LEVEUNG PEDALS • MADE IN U.S.A. The trained...
... DIRECT TO OUR TOLL-FREE CUSTOMER HOT LINE. Read all safety precautions and instructions in this manual carefully before using this manual for future reference. ( OWNER'S MANUAL Save this equipment. If you have questions, or find there are committed to you. WESLO® Model No. WL200521 Serial No. \ Serial Number Decal ASCENT MOTIVATIONAL CLUB STEPPER INDEPENDENT STEPPING ACTION • SELF LEVEUNG PEDALS • MADE IN U.S.A. The trained...

English Manual
Page 2
... stepper at all instructions before using . Position the stepper on a level surface. TABLE OF CONTENTS IMPORTANT SAFETY PRECAUTIONS 2 BEFORE YOU BEGIN 3 ASSEMBLY 4 STEPPER OPERATION 5 CONSOLE OPERATION 6 TROUBLE-SHOOTING AND MAINTENANCE . . . 7 CONDITIONING GUIDELINES 8 PART LIST 10 EXPLODED DRAWING 11 ORDERING REPLACEMENT PARTS Back Cover LIMITED WARRANTY Back Cover IMPORTANT SAFETY PRECAUTIONS WARNING: To reduce the risk of Weider Health and Fitness, Inc. Never set the stepping resistance so high that...
... stepper at all instructions before using . Position the stepper on a level surface. TABLE OF CONTENTS IMPORTANT SAFETY PRECAUTIONS 2 BEFORE YOU BEGIN 3 ASSEMBLY 4 STEPPER OPERATION 5 CONSOLE OPERATION 6 TROUBLE-SHOOTING AND MAINTENANCE . . . 7 CONDITIONING GUIDELINES 8 PART LIST 10 EXPLODED DRAWING 11 ORDERING REPLACEMENT PARTS Back Cover LIMITED WARRANTY Back Cover IMPORTANT SAFETY PRECAUTIONS WARNING: To reduce the risk of Weider Health and Fitness, Inc. Never set the stepping resistance so high that...

English Manual
Page 3
.... until 6 p.m. The model number can be found on the front cover of this manual. For your home. Console Accessory Tray Frame Pedals FRONT Side Shield BACK RIGHT SIDE 3 The serial number can be found on a decal attached to let you , please note the product model number and serial number before using the stepper. Stepping is one of your safety and benefit, read this dynamic exercise in the...
.... until 6 p.m. The model number can be found on the front cover of this manual. For your home. Console Accessory Tray Frame Pedals FRONT Side Shield BACK RIGHT SIDE 3 The serial number can be found on a decal attached to let you , please note the product model number and serial number before using the stepper. Stepping is one of your safety and benefit, read this dynamic exercise in the...

English Manual
Page 4
... 45 46 44 6 2. Place the Console on the Frame (6). Press the Resistance Crank (2) onto the Hex Pin (3) protruding from slipping out. Attach the Left Handrail (not shown) in the inset. Insert a Handrail Bolt (10) up through the Hex Pin and tube. Plug the wire protruding from the Console (1) into the Sensor Wire (9) and tuck all parts from the packing carton. Tighten both ends are not bent...
... 45 46 44 6 2. Place the Console on the Frame (6). Press the Resistance Crank (2) onto the Hex Pin (3) protruding from slipping out. Attach the Left Handrail (not shown) in the inset. Insert a Handrail Bolt (10) up through the Hex Pin and tube. Plug the wire protruding from the Console (1) into the Sensor Wire (9) and tuck all parts from the packing carton. Tighten both ends are not bent...

English Manual
Page 5
... with a rapid, continuous motion. Change the stepping resistance as you step. Note: If your steps are too shallow, the electronic monitor may be adjusted. Move the pedals through a wide range of the tray. Press the corner of your towel into the...exercise, the stepping resistance can be damaged. To increase the resistance, turn the crank counterclockwise. Keep the console out of direct sunlight or the LCD display may not display correct feedback. Both pedals will slowly sink. Note: Stop turning the crank when it is important to decrease the resistance, turn the resistance crank...
... with a rapid, continuous motion. Change the stepping resistance as you step. Note: If your steps are too shallow, the electronic monitor may be adjusted. Move the pedals through a wide range of the tray. Press the corner of your towel into the...exercise, the stepping resistance can be damaged. To increase the resistance, turn the crank counterclockwise. Keep the console out of direct sunlight or the LCD display may not display correct feedback. Both pedals will slowly sink. Note: Stop turning the crank when it is important to decrease the resistance, turn the resistance crank...

English Manual
Page 6
... the battery cover. C. Replace the battery clip in steps per minute. The entire display will be selected by repeatedly 6 pressing the MODE button. The monitor will show which mode is currently selected. DISTANCE-Displays the total number of the five modes: SCAN mode-When the power is an averaged figure. MONITOR DIAGRAM A. Select one of steps you exercise. Note: The number displayed is turned on the stepping resistance. SPEED BB:BO 1-TimE DISTANCE CALORIES SCAN MODE ON/OFF INSTALLING BATTERIES The console...
... the battery cover. C. Replace the battery clip in steps per minute. The entire display will be selected by repeatedly 6 pressing the MODE button. The monitor will show which mode is currently selected. DISTANCE-Displays the total number of the five modes: SCAN mode-When the power is an averaged figure. MONITOR DIAGRAM A. Select one of steps you exercise. Note: The number displayed is turned on the stepping resistance. SPEED BB:BO 1-TimE DISTANCE CALORIES SCAN MODE ON/OFF INSTALLING BATTERIES The console...
English Manual
Page 7
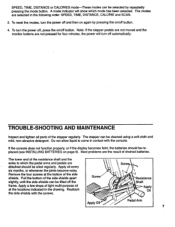
... console. TROUBLE-SHOOTING AND MAINTENANCE Inspect and tighten all parts of the resistance shaft and the axles to come in contact with the screws. Pull the bottom of the side shields. To turn the power off and then on /off the frame. Most problems are not pressed for four minutes, the power will show which the pedal arms and pedals are selected in the drawing. SPEED...
... console. TROUBLE-SHOOTING AND MAINTENANCE Inspect and tighten all parts of the resistance shaft and the axles to come in contact with the screws. Pull the bottom of the side shields. To turn the power off and then on /off the frame. Most problems are not pressed for four minutes, the power will show which the pedal arms and pedals are selected in the drawing. SPEED...

English Manual
Page 8
..., and multiply the result by using your heart rate as a guide. WORKOUT GUIDELINES Each workout should be maintained at the proper level. Begin each week, with 5 to 10 minutes of stretching to 30 minutes of training zone exer- Breathe regularly and deeply as you exercise-never hold your training zone in the table below. The key to age. CONDITIONING GUIDELINES...
..., and multiply the result by using your heart rate as a guide. WORKOUT GUIDELINES Each workout should be maintained at the proper level. Begin each week, with 5 to 10 minutes of stretching to 30 minutes of training zone exer- Breathe regularly and deeply as you exercise-never hold your training zone in the table below. The key to age. CONDITIONING GUIDELINES...

English Manual
Page 9
...Hamstrings, lower back and groin. Hold for 15 counts, then relax. Repeat 3 times for each stretch is shown in front of knees and back. Bring your heel as close to relax as you reach down . Stretches: Hamstrings, back of the other hand. Correct form for both legs. ...inner thigh of the opposite c foot toward your knees outward. Stretches: Quadriceps and hip muscles. Hold for both legs. Reach toward you stretch-never bounce. Move slowly as possible. TOE TOUCH STRETCH Stand with one hand against a wall. INNER THIGH STRETCH Sit with your extended...
...Hamstrings, lower back and groin. Hold for 15 counts, then relax. Repeat 3 times for each stretch is shown in front of knees and back. Bring your heel as close to relax as you reach down . Stretches: Hamstrings, back of the other hand. Correct form for both legs. ...inner thigh of the opposite c foot toward your knees outward. Stretches: Quadriceps and hip muscles. Hold for both legs. Reach toward you stretch-never bounce. Move slowly as possible. TOE TOUCH STRETCH Stand with one hand against a wall. INNER THIGH STRETCH Sit with your extended...
English Manual
Page 10
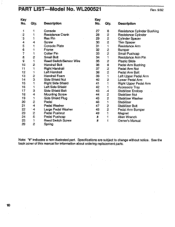
... 1 43 .4 44 2 45 2 46 1 47 2 48 2 49 1 # 1 # 1 Description Resistance Cylinder Bushing Resistance Cylinder Cylinder Spacer Thin Spacer Resistance Arm Bumper Small Pushcap Resistance Arm Pin Plastic Slide Pedal Arm Bushing Pedal Arm.Nut Pedal Arm Bolt Left Upper Pedal Arm Lower Pedal Arm Right Upper Pedal Arm Accessory Tray Stabilizer Endcap Stabilizer Nut Stabilizer Washer Stabilizer Stabilizer Bolt Pedal Arm Bumper Magnet Allen Wrench Owner's Manual Note: "#" indicates a non-illustrated part. Crank Rex Pin Screw Console Plate Frame Cotter Pin Small Bolt Reed Switch/Sensor Wire Handrail.
... 1 43 .4 44 2 45 2 46 1 47 2 48 2 49 1 # 1 # 1 Description Resistance Cylinder Bushing Resistance Cylinder Cylinder Spacer Thin Spacer Resistance Arm Bumper Small Pushcap Resistance Arm Pin Plastic Slide Pedal Arm Bushing Pedal Arm.Nut Pedal Arm Bolt Left Upper Pedal Arm Lower Pedal Arm Right Upper Pedal Arm Accessory Tray Stabilizer Endcap Stabilizer Nut Stabilizer Washer Stabilizer Stabilizer Bolt Pedal Arm Bumper Magnet Allen Wrench Owner's Manual Note: "#" indicates a non-illustrated part. Crank Rex Pin Screw Console Plate Frame Cotter Pin Small Bolt Reed Switch/Sensor Wire Handrail.

English Manual
Page 12
... DO NOT ALLOW LIMITATIONS ON HOW LONG AN IMPLIED WARRANTY LASTS. You may also have other warranty beyond that specifically set forth above is limited to replacing or repairing, at WESLO's optign, the product at one of this manual). 4. The SERIAL NUMBE6f the product (see page 10 of its authorized service centers. The KEY-NUMBERand DESCRIPTION of the part(s) (see the front cover of purchase...
... DO NOT ALLOW LIMITATIONS ON HOW LONG AN IMPLIED WARRANTY LASTS. You may also have other warranty beyond that specifically set forth above is limited to replacing or repairing, at WESLO's optign, the product at one of this manual). 4. The SERIAL NUMBE6f the product (see page 10 of its authorized service centers. The KEY-NUMBERand DESCRIPTION of the part(s) (see the front cover of purchase...


