
English Manual
Page 1
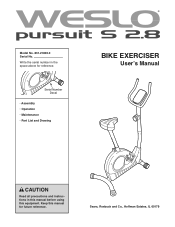
Serial Number Decal • Assembly • Operation • Maintenance • Part List and Drawing BIKE EXERCISER Userʼs Manual CAUTION Read all precautions and instructions in the space above for future reference. Write the serial number in this manual before using this manual for reference. Sears, Roebuck and Co., Hoffman Estates, IL 60179 Keep this equipment. Model No. 831.21800.0 Serial No.
Serial Number Decal • Assembly • Operation • Maintenance • Part List and Drawing BIKE EXERCISER Userʼs Manual CAUTION Read all precautions and instructions in the space above for future reference. Write the serial number in this manual before using this manual for reference. Sears, Roebuck and Co., Hoffman Estates, IL 60179 Keep this equipment. Model No. 831.21800.0 Serial No.
English Manual
Page 2
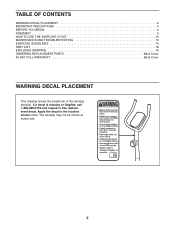
Note: The decal(s) may not be shown at actual size. 2 TABLE OF CONTENTS WARNING DECAL PLACEMENT 2 IMPORTANT PRECAUTIONS 3 BEFORE YOU BEGIN 4 ASSEMBLY 5 HOW TO USE THE EXERCISE CYCLE 10 MAINTENANCE AND TROUBLESHOOTING 13 EXERCISE GUIDELINES 14 PART LIST 18 EXPLODED DRAWING 19 ORDERING REPLACEMENT PARTS Back Cover 90 DAY FULL WARRANTY Back Cover WARNING DECAL PLACEMENT This drawing shows the location(s) of the warning decal(s). Apply the decal in the location shown. If a decal is missing or illegible, call 1-866-699-3756 and request a free replacement decal.
Note: The decal(s) may not be shown at actual size. 2 TABLE OF CONTENTS WARNING DECAL PLACEMENT 2 IMPORTANT PRECAUTIONS 3 BEFORE YOU BEGIN 4 ASSEMBLY 5 HOW TO USE THE EXERCISE CYCLE 10 MAINTENANCE AND TROUBLESHOOTING 13 EXERCISE GUIDELINES 14 PART LIST 18 EXPLODED DRAWING 19 ORDERING REPLACEMENT PARTS Back Cover 90 DAY FULL WARRANTY Back Cover WARNING DECAL PLACEMENT This drawing shows the location(s) of the warning decal(s). Apply the decal in the location shown. If a decal is missing or illegible, call 1-866-699-3756 and request a free replacement decal.
English Manual
Page 3
.... When adjusting the seat, insert the seat pin into one of the holes in a commercial, rental, or institutional setting. 8. do not wear loose clothes that there is intended for foot protection while exercising. 4. Inspect and properly tighten all times. 13. If you stop immediately and cool down. 7. Wear appropriate exercise clothes while exercising; Always wear athletic shoes for home use only. Replace any exercise program...
.... When adjusting the seat, insert the seat pin into one of the holes in a commercial, rental, or institutional setting. 8. do not wear loose clothes that there is intended for foot protection while exercising. 4. Inspect and properly tighten all times. 13. If you stop immediately and cool down. 7. Wear appropriate exercise clothes while exercising; Always wear athletic shoes for home use only. Replace any exercise program...
English Manual
Page 4
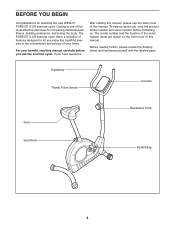
... back cover of your benefit, read this manual. Handlebar Thumb Pulse Sensor Console Seat Seat Knob Resistance Knob Pedal/Strap 4 To help us assist you, note the product model number and serial number before you enjoy this manual. Before reading further, please review the drawing below and familiarize yourself with the labeled parts. For your home. The model number and the location of the serial number decal are shown on the front cover of this healthful exercise in...
... back cover of your benefit, read this manual. Handlebar Thumb Pulse Sensor Console Seat Seat Knob Resistance Knob Pedal/Strap 4 To help us assist you, note the product model number and serial number before you enjoy this manual. Before reading further, please review the drawing below and familiarize yourself with the labeled parts. For your home. The model number and the location of the serial number decal are shown on the front cover of this healthful exercise in...
English Manual
Page 5
... tools, assembly requires a Phillips screwdriver wrenches , and pliers . , two adjustable As you assemble the exercise cycle, use the drawings below each drawing is not in the hardware kit, check to identify the small parts used in parentheses below to see if it has been preassembled. If a part is the key number of the part, from the PART LIST near the end of this manual.
... tools, assembly requires a Phillips screwdriver wrenches , and pliers . , two adjustable As you assemble the exercise cycle, use the drawings below each drawing is not in the hardware kit, check to identify the small parts used in parentheses below to see if it has been preassembled. If a part is the key number of the part, from the PART LIST near the end of this manual.
English Manual
Page 6
... Rear Stabilizer (6) into the Frame (1). Attach the Seat (12) to the underside of the Seat. 2 Large Holes 1 12 42 42 10 42 5 10 6 Note: The Split Washers and the Locknuts may be preattached to the Seat Post (5) with the large holes facing the Frame (1). 1. To make assembly easier, read the 1 information on page 5 before you begin assembling the exercise...
... Rear Stabilizer (6) into the Frame (1). Attach the Seat (12) to the underside of the Seat. 2 Large Holes 1 12 42 42 10 42 5 10 6 Note: The Split Washers and the Locknuts may be preattached to the Seat Post (5) with the large holes facing the Frame (1). 1. To make assembly easier, read the 1 information on page 5 before you begin assembling the exercise...
English Manual
Page 7
... the Frame (1). Next, connect the Resistance Cable (19) to the Reed Switch Wire (39). Attach the Upright with three M8 x 15mm Button Screws (34) and three M8 Split Washers (42). 5 13 19 29 34 42 A Do not pinch the wires and cables during this step 23 39 42 34 1 B C Metal Bracket 19 29 Metal 19 Bracket 7 Make sure that the Seat Knob is tight. While...
... the Frame (1). Next, connect the Resistance Cable (19) to the Reed Switch Wire (39). Attach the Upright with three M8 x 15mm Button Screws (34) and three M8 Split Washers (42). 5 13 19 29 34 42 A Do not pinch the wires and cables during this step 23 39 42 34 1 B C Metal Bracket 19 29 Metal 19 Bracket 7 Make sure that the Seat Knob is tight. While...
English Manual
Page 8
... the battery cover. Remove the battery cover, insert the batteries into the Upright. While a second person holds the Console (16) near the Upright (13), connect the console wire 8 to the Upright (13) 6 with four M4 x 16mm Screws (46). 46 16 23 Console Wire 13 Do not pinch the wires during this step 8 Attach the Handlebar (49) to the Extension Wire (23). alkaline batteries are recommended. Otherwise, you may damage the console displays or...
... the battery cover. Remove the battery cover, insert the batteries into the Upright. While a second person holds the Console (16) near the Upright (13), connect the console wire 8 to the Upright (13) 6 with four M4 x 16mm Screws (46). 46 16 23 Console Wire 13 Do not pinch the wires during this step 8 Attach the Handlebar (49) to the Extension Wire (23). alkaline batteries are recommended. Otherwise, you may damage the console displays or...
English Manual
Page 9
... Crank. IMPORTANT: Tighten both Pedals as firmly as possible. Adjust the strap on the Right Pedal (not shown) in the same way. 9 Strap 21 Tab 24 10. Note: After assembly is marked with a "Left" sticker. Tighten the Right Pedal (not shown) clockwise into the left over. Using an adjustable wrench, firmly tighten the Left Pedal counterclockwise into the right arm of the Left Pedal. After using the exercise...
... Crank. IMPORTANT: Tighten both Pedals as firmly as possible. Adjust the strap on the Right Pedal (not shown) in the same way. 9 Strap 21 Tab 24 10. Note: After assembly is marked with a "Left" sticker. Tighten the Right Pedal (not shown) clockwise into the left over. Using an adjustable wrench, firmly tighten the Left Pedal counterclockwise into the right arm of the Left Pedal. After using the exercise...
English Manual
Page 10
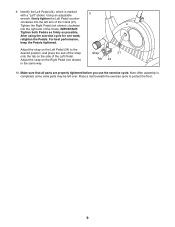
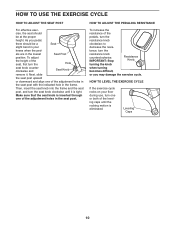
... LEVEL THE EXERCISE CYCLE If the exercise cycle rocks on your floor during use, turn the seat knob clockwise until the rocking motion is eliminated. als are in the frame. To adjust the height of the seat, first turn the Hole seat knob counterclockwise and Seat Knob remove it is inserted through one or both of the pedals, turn the resistance knob counterclockwise. HOW TO ADJUST THE PEDALING RESISTANCE To increase...
... LEVEL THE EXERCISE CYCLE If the exercise cycle rocks on your floor during use, turn the seat knob clockwise until the rocking motion is eliminated. als are in the frame. To adjust the height of the seat, first turn the Hole seat knob counterclockwise and Seat Knob remove it is inserted through one or both of the pedals, turn the resistance knob counterclockwise. HOW TO ADJUST THE PEDALING RESISTANCE To increase...
English Manual
Page 11
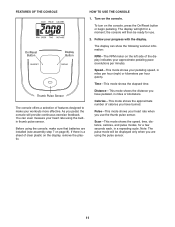
... installed (see assembly step 7 on the console, press the On/Reset button or begin pedaling. Speed-This mode shows your heart rate using the pulse sensor. 11 Calories-This mode shows the approximate number of clear plastic on the console. On/Reset Button Display Button The display can even measure your pedaling speed, in a repeating cycle. Distance-This mode shows the distance you use . 2. Note: The pulse mode will light for use the thumb pulse sensor. The display will be ready for a moment; Thumb Pulse Sensor The console...
... installed (see assembly step 7 on the console, press the On/Reset button or begin pedaling. Speed-This mode shows your heart rate using the pulse sensor. 11 Calories-This mode shows the approximate number of clear plastic on the console. On/Reset Button Display Button The display can even measure your pedaling speed, in a repeating cycle. Distance-This mode shows the distance you use . 2. Note: The pulse mode will light for use the thumb pulse sensor. The display will be ready for a moment; Thumb Pulse Sensor The console...
English Manual
Page 12
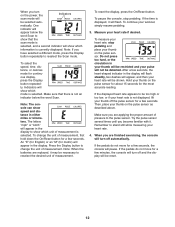
... measurement. Press the Display button to change the unit of measurement is selected. To continue your heart rate. 4. Try the pulse sensor several times until you become familiar with it may be detected. Remember to show which unit of measurement, first hold down the On/Reset button for a few seconds. If the pedals do not move for a few minutes, the console will turn off...
... measurement. Press the Display button to change the unit of measurement is selected. To continue your heart rate. 4. Try the pulse sensor several times until you become familiar with it may be detected. Remember to show which unit of measurement, first hold down the On/Reset button for a few seconds. If the pedals do not move for a few minutes, the console will turn off...
English Manual
Page 13
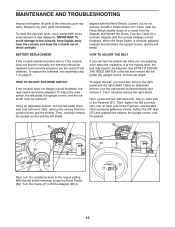
... upright covers, and the pedals. 38 39 47 21 Next, turn the right pedal counterclockwise and remove it . Using an adjustable wrench, turn the left shield removed, locate the Reed Switch (39). Using an adjustable wrench, turn the resistance knob to be removed. Then, tighten the M6 Locknuts (32), one on page 8. Turn the Crank (21) until the console displays correct feedback. MAINTENANCE AND TROUBLESHOOTING Inspect and tighten all parts of mild detergent. BATTERY REPLACEMENT HOW TO ADJUST THE BELT If the console display...
... upright covers, and the pedals. 38 39 47 21 Next, turn the right pedal counterclockwise and remove it . Using an adjustable wrench, turn the left shield removed, locate the Reed Switch (39). Using an adjustable wrench, turn the resistance knob to be removed. Then, tighten the M6 Locknuts (32), one on page 8. Turn the Crank (21) until the console displays correct feedback. MAINTENANCE AND TROUBLESHOOTING Inspect and tighten all parts of mild detergent. BATTERY REPLACEMENT HOW TO ADJUST THE BELT If the console display...
English Manual
Page 14
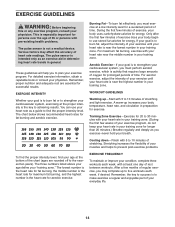
... key to success is near the middle number in your exercise program. This is to 10 minutes of time. These guidelines will help you to achieving results. The chart below shows recommended heart rates for successful results. Aerobic Exercise-If your training zone. A warm-up -Start with pre-existing health problems. The pulse sensor is intended only as a guide to five workouts each week, with your heart rate...
... key to success is near the middle number in your exercise program. This is to 10 minutes of time. These guidelines will help you to achieving results. The chart below shows recommended heart rates for successful results. Aerobic Exercise-If your training zone. A warm-up -Start with pre-existing health problems. The pulse sensor is intended only as a guide to five workouts each week, with your heart rate...

English Manual
Page 15
...you and rest it against the inner thigh of knees and back. 2. Hold for each leg. Keep your back leg straight and your back leg as possible. Bend your front leg, lean forward and move your hips toward your buttocks as possible. To cause further stretching of the other hand.... the floor. Hold for 15 counts, then relax. Stretches: Hamstrings, lower back and groin. 3. Reach toward the wall. Hold for 15 counts, then relax. SUGGESTED STRETCHES The correct form for balance, reach back and grasp one foot with one leg extended. Stretches: Quadriceps and hip muscles. 1 2 4 15
...you and rest it against the inner thigh of knees and back. 2. Hold for each leg. Keep your back leg straight and your back leg as possible. Bend your front leg, lean forward and move your hips toward your buttocks as possible. To cause further stretching of the other hand.... the floor. Hold for 15 counts, then relax. Stretches: Hamstrings, lower back and groin. 3. Reach toward the wall. Hold for 15 counts, then relax. SUGGESTED STRETCHES The correct form for balance, reach back and grasp one foot with one leg extended. Stretches: Quadriceps and hip muscles. 1 2 4 15
English Manual
Page 18
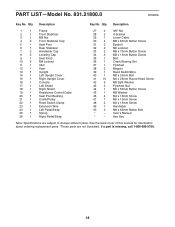
... 1 Seat 13 1 Upright 14 1 Left Upright Cover 15 1 Right Upright Cover 16 1 Console 17 1 Left Shield 18 1 Right Shield 19 1 Resistance Control/Cable 20 1 Seat Post Bushing 21 1 Crank/Pulley 22 1 Reed Switch Clamp 23 1 Extension Wire 24 1 Left Pedal/Strap 25 1 Spring 26 1 Right Pedal/Strap 27 2 3/8" Nut 28 2 U-bracket 29 1 Lower Cable 30 4 M8 x 60mm Button Screw 31 2 Eyebolt 32 2 M6 Locknut 33 2 M8 x 73mm Button Screw 34 3 M8 x 15mm Button Screw 35 1 Belt 36 1 Crank Bearing Set 37...
... 1 Seat 13 1 Upright 14 1 Left Upright Cover 15 1 Right Upright Cover 16 1 Console 17 1 Left Shield 18 1 Right Shield 19 1 Resistance Control/Cable 20 1 Seat Post Bushing 21 1 Crank/Pulley 22 1 Reed Switch Clamp 23 1 Extension Wire 24 1 Left Pedal/Strap 25 1 Spring 26 1 Right Pedal/Strap 27 2 3/8" Nut 28 2 U-bracket 29 1 Lower Cable 30 4 M8 x 60mm Button Screw 31 2 Eyebolt 32 2 M6 Locknut 33 2 M8 x 73mm Button Screw 34 3 M8 x 15mm Button Screw 35 1 Belt 36 1 Crank Bearing Set 37...

English Manual
Page 19
EXPLODED DRAWING-Model No. 831.21800.0 7 41 7 16 R0309A 49 10 42 46 44 13 42 50 19 41 18 12 41 26 41 14 33 2 4 24 41 41 41 15 42 34 4 42 10 42 34 5 1 23 20 47 22 39 3 42 10 38 38 42 10 36 9 11 40 45 17 27 31 28 32 25 43 21 29 27 43 32 31 28 37 35 30 8 6 48 41 8 48 19
EXPLODED DRAWING-Model No. 831.21800.0 7 41 7 16 R0309A 49 10 42 46 44 13 42 50 19 41 18 12 41 26 41 14 33 2 4 24 41 41 41 15 42 34 4 42 10 42 34 5 1 23 20 47 22 39 3 42 10 38 38 42 10 36 9 11 40 45 17 27 31 28 32 25 43 21 29 27 43 32 31 28 37 35 30 8 6 48 41 8 48 19
English Manual
Page 20
... FULL WARRANTY If this Sears bike exerciser fails due to do-it ! and Canada) www.sears.com www.sears.ca Our Home For repair of carry-in China © 2008 ICON IP, Inc. For Sears professional installation of home appliances and items like vacuums, lawn equipment, and electronics, call 1-800-4-MY-HOME® (1-800-469-4663) to state. For the replacement parts, accessories, and user's manuals that...
... FULL WARRANTY If this Sears bike exerciser fails due to do-it ! and Canada) www.sears.com www.sears.ca Our Home For repair of carry-in China © 2008 ICON IP, Inc. For Sears professional installation of home appliances and items like vacuums, lawn equipment, and electronics, call 1-800-4-MY-HOME® (1-800-469-4663) to state. For the replacement parts, accessories, and user's manuals that...


