
German Manual
Page 15
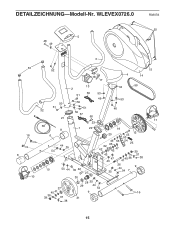
WLEVEX0726.0 R0207A 55 5 48 49 3 33 52 18 17 15 4 14 13 2 34 59 51 56 53 46 53 50 50 51 32 51 50 46 57 21 60 11 23 16 8 58 8 1 22 19 6 20 12 45 53 44 35 54 46 53 63 62 24 25 42 47 43 61 43 39 37 47 43 4140 36 38 19 54 44 35 42 27 26 9 35 44 54 7 10 30 28 35 29 44 27 54 40 41 9 16 36 39 37 31 38 15 DETAILZEICHNUNG-Modell-Nr.
WLEVEX0726.0 R0207A 55 5 48 49 3 33 52 18 17 15 4 14 13 2 34 59 51 56 53 46 53 50 50 51 32 51 50 46 57 21 60 11 23 16 8 58 8 1 22 19 6 20 12 45 53 44 35 54 46 53 63 62 24 25 42 47 43 61 43 39 37 47 43 4140 36 38 19 54 44 35 42 27 26 9 35 44 54 7 10 30 28 35 29 44 27 54 40 41 9 16 36 39 37 31 38 15 DETAILZEICHNUNG-Modell-Nr.

Uk Manual
Page 1
Model No. USER'S MANUAL Visit our website at www.iconeurope.com Serial Number Decal QUESTIONS? Keep this equipment. WLEVEX0726.0 Serial No. As a manufacturer, we are missing parts, please call: 08457 089 009 Or write: ICON Health & Fitness, Ltd. If you have questions, or if there are committed to providing complete customer satisfaction. Customer Service Department Unit 4 Revie Road Industrial Estate Revie Road Beeston Leeds, LS118JG UK email: [email protected] CAUTION Read all precautions and instructions in this manual before using this manual for future reference.
Model No. USER'S MANUAL Visit our website at www.iconeurope.com Serial Number Decal QUESTIONS? Keep this equipment. WLEVEX0726.0 Serial No. As a manufacturer, we are missing parts, please call: 08457 089 009 Or write: ICON Health & Fitness, Ltd. If you have questions, or if there are committed to providing complete customer satisfaction. Customer Service Department Unit 4 Revie Road Industrial Estate Revie Road Beeston Leeds, LS118JG UK email: [email protected] CAUTION Read all precautions and instructions in this manual before using this manual for future reference.
Uk Manual
Page 2
... exercising, stop immediately and cool down. 12. Read all instructions in this manual and all parts regularly. Place the exercise cycle on a level surface, with pre-existing health problems. Read all precautions. 7. Replace any exercise program, consult your back straight while using the exercise cycle. 2. Apply the decal in a commercial, rental, or institutional setting. 5. Always wear athletic shoes for home use of this product. 2 Keep the exercise...
... exercising, stop immediately and cool down. 12. Read all instructions in this manual and all parts regularly. Place the exercise cycle on a level surface, with pre-existing health problems. Read all precautions. 7. Replace any exercise program, consult your back straight while using the exercise cycle. 2. Apply the decal in a commercial, rental, or institutional setting. 5. Always wear athletic shoes for home use of this product. 2 Keep the exercise...
Uk Manual
Page 3
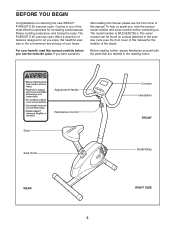
... designed to the exercise cycle (see the front cover of the most effective exercises for the location of your benefit, read this manual carefully before you , note the product model number and serial number before contacting us assist you use the exercise cycle. The serial number can be found on selecting the new WESLO® PURSUIT S 25 exercise cycle. For your home. Adjustment Handle Seat Resistance Control Seat Knob Console Handlebar FRONT Pedal/Strap REAR RIGHT SIDE 3 Cycling...
... designed to the exercise cycle (see the front cover of the most effective exercises for the location of your benefit, read this manual carefully before you , note the product model number and serial number before contacting us assist you use the exercise cycle. The serial number can be found on selecting the new WESLO® PURSUIT S 25 exercise cycle. For your home. Adjustment Handle Seat Resistance Control Seat Knob Console Handlebar FRONT Pedal/Strap REAR RIGHT SIDE 3 Cycling...
Uk Manual
Page 4
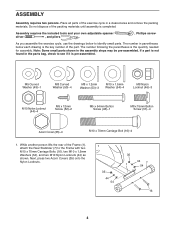
... (1), attach the Rear Stabilizer (7) to identify small parts. M5 Curved Washer (49)-1 M8 Curved Washer (50)-4 M8 x 1.2mm Washer (53)-3 M10 x 1.5mm Washer (54)-4 M8 Nylon Locknut (46)-3 M10 Nylon Locknut (44)-4 M5 x 12mm Screw (52)-2 M5 x 54mm Button Screw (48)-1 M8 x 15mm Button Screw (51)-4 Acorn Cover (35)-4 M10 x 70mm Carriage Bolt (16)-4 1. If a part is the quantity needed for assembly. The number...
... (1), attach the Rear Stabilizer (7) to identify small parts. M5 Curved Washer (49)-1 M8 Curved Washer (50)-4 M8 x 1.2mm Washer (53)-3 M10 x 1.5mm Washer (54)-4 M8 Nylon Locknut (46)-3 M10 Nylon Locknut (44)-4 M5 x 12mm Screw (52)-2 M5 x 54mm Button Screw (48)-1 M8 x 15mm Button Screw (51)-4 Acorn Cover (35)-4 M10 x 70mm Carriage Bolt (16)-4 1. If a part is the quantity needed for assembly. The number...

Uk Manual
Page 5
... of the Seat. Turn the Seat Knob (20) counterclockwise and remove it is inserted into one of the Frame (1), 2 attach the Front Stabilizer (6) with the indicated hole in the Seat Post. 6 54 44 35 1 54 44 35 4 34 53 46 53 46 20 Hole 1 5 Attach the Seat (4) to the underside of the adjustment holes in the Frame. Insert the Seat Knob into...
... of the Seat. Turn the Seat Knob (20) counterclockwise and remove it is inserted into one of the Frame (1), 2 attach the Front Stabilizer (6) with the indicated hole in the Seat Post. 6 54 44 35 1 54 44 35 4 34 53 46 53 46 20 Hole 1 5 Attach the Seat (4) to the underside of the adjustment holes in the Frame. Insert the Seat Knob into...

Uk Manual
Page 6
... battery cover from the Console. 4. A B A A 13 58 5 Batteries C 13 A 58 Battery Cover 5 6 Next, attach the Upright with four M8 x 15mm Button Screws (51) and four M8 Curved Washers (50). 4 Be careful to avoid pinching the Wires and Cables. Insert two batteries into the Frame (1), and slide the Upright onto the Frame. alkaline batteries are oriented as shown. • See drawing C. Next, connect the Resistance Cable (13) to the Reed Switch Wire...
... battery cover from the Console. 4. A B A A 13 58 5 Batteries C 13 A 58 Battery Cover 5 6 Next, attach the Upright with four M8 x 15mm Button Screws (51) and four M8 Curved Washers (50). 4 Be careful to avoid pinching the Wires and Cables. Insert two batteries into the Frame (1), and slide the Upright onto the Frame. alkaline batteries are oriented as shown. • See drawing C. Next, connect the Resistance Cable (13) to the Reed Switch Wire...
Uk Manual
Page 7
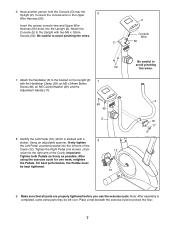
... 6 Upright (2). Insert the excess console wire and Upper Wire Harness (56) down into the right arm of the Crank (12). Attach the Console (5) to the bracket on the Upright (2) 7 with two M5 x 12mm Screws (52). Identify the Left Pedal (10), which is completed, some extra parts may be kept tightened. 12 10 Be careful to avoid pinching the wires. 2 5 Console Wire 56 52 7. After using the exercise cycle...
... 6 Upright (2). Insert the excess console wire and Upper Wire Harness (56) down into the right arm of the Crank (12). Attach the Console (5) to the bracket on the Upright (2) 7 with two M5 x 12mm Screws (52). Identify the Left Pedal (10), which is completed, some extra parts may be kept tightened. 12 10 Be careful to avoid pinching the wires. 2 5 Console Wire 56 52 7. After using the exercise cycle...
Uk Manual
Page 8
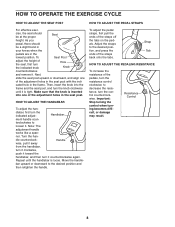
...- Move the handle- Important: Stop turning the control when turning becomes difficult, or damage may result. dlebar, first turn the knob clockwise until the handlebar is tight. dle counterclock- Repeat until it . To Seat Post adjust the height of the pedals, turn the indicated knob Hole Knob counterclockwise and remove it is loose. ner. Strap Tab HOW TO ADJUST THE PEDALING RESISTANCE To increase the resistance of the seat, first turn...
...- Move the handle- Important: Stop turning the control when turning becomes difficult, or damage may result. dlebar, first turn the knob clockwise until the handlebar is tight. dle counterclock- Repeat until it . To Seat Post adjust the height of the pedals, turn the indicated knob Hole Knob counterclockwise and remove it is loose. ner. Strap Tab HOW TO ADJUST THE PEDALING RESISTANCE To increase the resistance of the seat, first turn...
Uk Manual
Page 9
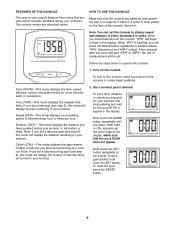
... batteries into the console, "KPH" will display the distance remaining in kilometers or miles. To set a calorie-burning goal (see step 2), this mode will begin pedaling. Make sure that the console has batteries (see step 2), this mode will display the number of measurement will display the time remaining in succession. Scan (SCAN)-This mode displays the time, speed, distance, calorie, and pulse modes for the word STOP to display speed and distance in your workout. Next, press the MODE button...
... batteries into the console, "KPH" will display the distance remaining in kilometers or miles. To set a calorie-burning goal (see step 2), this mode will begin pedaling. Make sure that the console has batteries (see step 2), this mode will display the number of measurement will display the time remaining in succession. Scan (SCAN)-This mode displays the time, speed, distance, calorie, and pulse modes for the word STOP to display speed and distance in your workout. Next, press the MODE button...
Uk Manual
Page 10
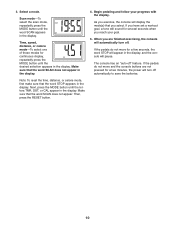
..., press the RESET button. 4. Time, speed, distance, or calorie mode-To select one of these modes for continuous display, repeatedly press the MODE button until the word SCAN appears in the display. If you have set a workout goal, a tone will sound for several seconds when you are not pressed for a few minutes, the power will automatically turn off automatically to save the batteries. 10 If the pedals do not move...
..., press the RESET button. 4. Time, speed, distance, or calorie mode-To select one of these modes for continuous display, repeatedly press the MODE button until the word SCAN appears in the display. If you have set a workout goal, a tone will sound for several seconds when you are not pressed for a few minutes, the power will automatically turn off automatically to save the batteries. 10 If the pedals do not move...

Uk Manual
Page 11
Important: To avoid damaging the console, keep liquids away from the console and keep the console out of the exercise cycle regularly. Replace any worn parts immediately. To replace the batteries, see step 5 on page 6. 11 MAINTENANCE AND TROUBLESHOOTING Inspect and tighten all parts of direct sunlight. To clean the exercise cycle, use a damp cloth and a small amount of low batteries. BATTERY REPLACEMENT If the console display becomes dim, the batteries should be replaced; most console problems are the result of mild detergent.
Important: To avoid damaging the console, keep liquids away from the console and keep the console out of the exercise cycle regularly. Replace any worn parts immediately. To replace the batteries, see step 5 on page 6. 11 MAINTENANCE AND TROUBLESHOOTING Inspect and tighten all parts of direct sunlight. To clean the exercise cycle, use a damp cloth and a small amount of low batteries. BATTERY REPLACEMENT If the console display becomes dim, the batteries should be replaced; most console problems are the result of mild detergent.

Uk Manual
Page 12
...-exercise problems. 12 HOW TO MEASURE YOUR HEART RATE To measure your "training zone." Then, stop exercising.) WORKOUT GUIDELINES Each workout should include the following guidelines will help to the muscles, and on your wrist as a guide. A proper warm-up , consisting of 5 to use stored fat calories for maximum fat burning; CONDITIONING GUIDELINES The following three parts: A warm-up increases your body temperature, heart rate...
...-exercise problems. 12 HOW TO MEASURE YOUR HEART RATE To measure your "training zone." Then, stop exercising.) WORKOUT GUIDELINES Each workout should include the following guidelines will help to the muscles, and on your wrist as a guide. A proper warm-up , consisting of 5 to use stored fat calories for maximum fat burning; CONDITIONING GUIDELINES The following three parts: A warm-up increases your body temperature, heart rate...
Uk Manual
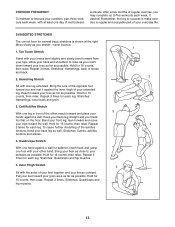
Page 13
... counts, then relax. Bend your front leg, lean forward and move your hips toward your toes as far as well. Repeat 3 times for several basic stretches is make exercise a regular and enjoyable part of the achilles tendons, bend your back leg as possible. Inner Thigh Stretch 5 Sit...your feet together and your knees outward. Hold for each leg. SUGGESTED STRETCHES The correct form for each leg. EXERCISE FREQUENCY To maintain or improve your condition, plan three workouts each week, with at the right. Remember, the key to relax as possible. Allow your everyday life. To cause...
... counts, then relax. Bend your front leg, lean forward and move your hips toward your toes as far as well. Repeat 3 times for several basic stretches is make exercise a regular and enjoyable part of the achilles tendons, bend your back leg as possible. Inner Thigh Stretch 5 Sit...your feet together and your knees outward. Hold for each leg. SUGGESTED STRETCHES The correct form for each leg. EXERCISE FREQUENCY To maintain or improve your condition, plan three workouts each week, with at the right. Remember, the key to relax as possible. Allow your everyday life. To cause...
Uk Manual
Page 14
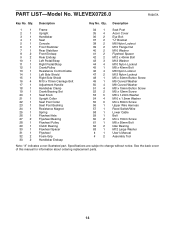
... information about ordering replacement parts. 14 Description 1 1 2 1 3 1 4 1 5 1 6 1 7 1 8 2 9 2 10 1 11 1 12 1 13 1 14 1 15 1 16 4 17 1 18 1 19 1 20 1 21 1 22 1 23 1 24 1 25 1 26 1 27 2 28 1 29 1 30 1 31 1 32 2 33 2 Frame Upright Handlebar Seat Console Front Stabilizer Rear Stabilizer Front Endcap Rear Endcap Left Pedal/Strap Right Pedal/Strap Crank/Pulley Resistance Control/Cable Left Side Shield Right Side Shield M10 x 70mm Carriage Bolt Adjustment Handle Handlebar Clamp Crank Bearing Set Seat Knob Upright...
... information about ordering replacement parts. 14 Description 1 1 2 1 3 1 4 1 5 1 6 1 7 1 8 2 9 2 10 1 11 1 12 1 13 1 14 1 15 1 16 4 17 1 18 1 19 1 20 1 21 1 22 1 23 1 24 1 25 1 26 1 27 2 28 1 29 1 30 1 31 1 32 2 33 2 Frame Upright Handlebar Seat Console Front Stabilizer Rear Stabilizer Front Endcap Rear Endcap Left Pedal/Strap Right Pedal/Strap Crank/Pulley Resistance Control/Cable Left Side Shield Right Side Shield M10 x 70mm Carriage Bolt Adjustment Handle Handlebar Clamp Crank Bearing Set Seat Knob Upright...
Uk Manual
Page 15
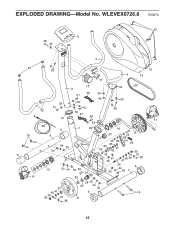
EXPLODED DRAWING-Model No. WLEVEX0726.0 R0207A 55 5 48 49 3 33 52 18 17 15 4 14 13 2 34 59 51 56 53 46 53 50 50 51 32 51 50 46 57 21 60 11 23 16 8 58 8 1 22 19 6 20 12 45 53 44 35 54 46 53 63 62 24 25 42 47 43 61 43 39 37 47 43 4140 36 38 19 54 44 35 42 27 26 9 35 44 54 7 10 30 28 35 29 44 27 54 40 41 9 16 36 39 37 31 38 15
EXPLODED DRAWING-Model No. WLEVEX0726.0 R0207A 55 5 48 49 3 33 52 18 17 15 4 14 13 2 34 59 51 56 53 46 53 50 50 51 32 51 50 46 57 21 60 11 23 16 8 58 8 1 22 19 6 20 12 45 53 44 35 54 46 53 63 62 24 25 42 47 43 61 43 39 37 47 43 4140 36 38 19 54 44 35 42 27 26 9 35 44 54 7 10 30 28 35 29 44 27 54 40 41 9 16 36 39 37 31 38 15

Uk Manual
Page 16
ORDERING REPLACEMENT PARTS To order replacement parts, contact the ICON Health & Fitness, Ltd. office, or write: ICON Health & Fitness, Ltd. Part No. 239588 R0207A Printed in China © 2007 ICON IP, Inc. Customer Service Department Unit 4 Revie Road Industrial Estate ...information: • the MODEL NUMBER of the product (WLEVEX0726.0) • the NAME of the product (WESLO PURSUIT S 25 exercise cycle) • the SERIAL NUMBER of the product (see the front cover of this manual) • the KEY NUMBER and DESCRIPTION of the part(s) (see page 14) WESLO is a registered trademark of ICON...
ORDERING REPLACEMENT PARTS To order replacement parts, contact the ICON Health & Fitness, Ltd. office, or write: ICON Health & Fitness, Ltd. Part No. 239588 R0207A Printed in China © 2007 ICON IP, Inc. Customer Service Department Unit 4 Revie Road Industrial Estate ...information: • the MODEL NUMBER of the product (WLEVEX0726.0) • the NAME of the product (WESLO PURSUIT S 25 exercise cycle) • the SERIAL NUMBER of the product (see the front cover of this manual) • the KEY NUMBER and DESCRIPTION of the part(s) (see page 14) WESLO is a registered trademark of ICON...


