

English Manual
Page 2
WESLO is missing or illegible, see the front cover of this manual and request a free replacement decal. If a decal is a registered trademark of the warning decal(s). ... decal in the location shown. TABLE OF CONTENTS WARNING DECAL PLACEMENT 2 IMPORTANT PRECAUTIONS 3 BEFORE YOU BEGIN 4 PART IDENTIFICATION CHART 5 ASSEMBLY 6 HOW TO USE THE EXERCISE BIKE 13 MAINTENANCE AND TROUBLESHOOTING 18 FCC INFORMATION 20 EXERCISE GUIDELINES 21 PART LIST 22 EXPLODED DRAWING 23 ORDERING REPLACEMENT PARTS Back Cover LIMITED WARRANTY Back...
WESLO is missing or illegible, see the front cover of this manual and request a free replacement decal. If a decal is a registered trademark of the warning decal(s). ... decal in the location shown. TABLE OF CONTENTS WARNING DECAL PLACEMENT 2 IMPORTANT PRECAUTIONS 3 BEFORE YOU BEGIN 4 PART IDENTIFICATION CHART 5 ASSEMBLY 6 HOW TO USE THE EXERCISE BIKE 13 MAINTENANCE AND TROUBLESHOOTING 18 FCC INFORMATION 20 EXERCISE GUIDELINES 21 PART LIST 22 EXPLODED DRAWING 23 ORDERING REPLACEMENT PARTS Back Cover LIMITED WARRANTY Back...
English Manual
Page 3
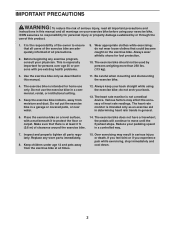
...rate monitor is at all parts regularly. do not wear loose clothes that could become caught on the exercise bike. Place the exercise bike on your exercise bike before using the exercise bike; If you feel faint or if you experience pain while exercising, stop immediately and cool down. 3 ... only as described in this manual and all warnings on a level surface, with pre-existing health problems. 9. do not arch your exercise bike. Do not use of this product. 1. the pedals will continue to protect the floor or carpet. IMPORTANT PRECAUTIONS WARNING: To reduce the ...
...rate monitor is at all parts regularly. do not wear loose clothes that could become caught on the exercise bike. Place the exercise bike on your exercise bike before using the exercise bike; If you feel faint or if you experience pain while exercising, stop immediately and cool down. 3 ... only as described in this manual and all warnings on a level surface, with pre-existing health problems. 9. do not arch your exercise bike. Do not use of this product. 1. the pedals will continue to protect the floor or carpet. IMPORTANT PRECAUTIONS WARNING: To reduce the ...
English Manual
Page 4
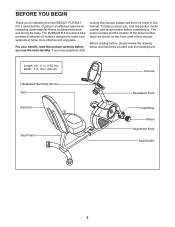
The PURSUIT R 3.2 exercise bike provides a selection of features designed to make your benefit, read this manual carefully before contacting us assist you, note the product model number and serial number before you use the exercise bike. Before reading further, please review the drawing below and familiarize yourself with the labeled parts. BEFORE YOU BEGIN... Handle 4 To help us . If you for increasing cardiovascular fitness, building endurance, and toning the body. Cycling is an effective exercise for selecting the new WESLO® PURSUIT R 3.2 exercise bike.
The PURSUIT R 3.2 exercise bike provides a selection of features designed to make your benefit, read this manual carefully before contacting us assist you, note the product model number and serial number before you use the exercise bike. Before reading further, please review the drawing below and familiarize yourself with the labeled parts. BEFORE YOU BEGIN... Handle 4 To help us . If you for increasing cardiovascular fitness, building endurance, and toning the body. Cycling is an effective exercise for selecting the new WESLO® PURSUIT R 3.2 exercise bike.

English Manual
Page 7
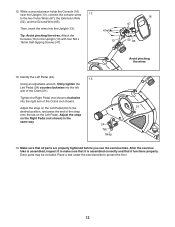
Insert the end of the Seat Frame (5) into the Frame (1). Firmly press the Frame Bushing (56) into the Frame (1). Carefully tip the exercise bike onto its side. Tip the exercise bike upright. 3 40 57 9 1 40 56 5 23 63 7 Attach the Rear Stabilizer (6) to the Seat Frame (5) with two M4 x 5mm Self-tapping Screws...
Insert the end of the Seat Frame (5) into the Frame (1). Firmly press the Frame Bushing (56) into the Frame (1). Carefully tip the exercise bike onto its side. Tip the exercise bike upright. 3 40 57 9 1 40 56 5 23 63 7 Attach the Rear Stabilizer (6) to the Seat Frame (5) with two M4 x 5mm Self-tapping Screws...
English Manual
Page 12
... parts may be included. Make sure that it to protect the floor. 12 Adjust the strap on the Left Pedal. Place a mat under the exercise bike to make sure that it is assembled correctly and that all parts are properly tightened before you use the exercise...). 13 Using an adjustable wrench, firmly tighten the Left Pedal (24) counterclockwise into the Upright (13). 47 Tip: Avoid pinching the wires. After the exercise bike is assembled, inspect it functions properly. Attach the Console (16) to the 21 desired position, and press the end of the Crank (not shown).
... parts may be included. Make sure that it to protect the floor. 12 Adjust the strap on the Left Pedal. Place a mat under the exercise bike to make sure that it is assembled correctly and that all parts are properly tightened before you use the exercise...). 13 Using an adjustable wrench, firmly tighten the Left Pedal (24) counterclockwise into the Upright (13). 47 Tip: Avoid pinching the wires. After the exercise bike is assembled, inspect it functions properly. Attach the Console (16) to the 21 desired position, and press the end of the Crank (not shown).
English Manual
Page 13
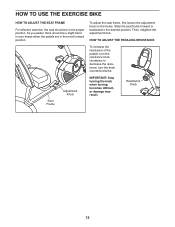
... the proper position. HOW TO ADJUST THE PEDALING RESISTANCE To increase the resistance of the pedals, turn the knob counterclockwise. HOW TO USE THE EXERCISE BIKE HOW TO ADJUST THE SEAT FRAME For effective exercise, the seat should be in the most forward position. Seat Frame Adjustment Knob To adjust the...
... the proper position. HOW TO ADJUST THE PEDALING RESISTANCE To increase the resistance of the pedals, turn the knob counterclockwise. HOW TO USE THE EXERCISE BIKE HOW TO ADJUST THE SEAT FRAME For effective exercise, the seat should be in the most forward position. Seat Frame Adjustment Knob To adjust the...
English Manual
Page 18
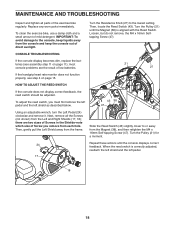
... page 15. IMPORTANT: To avoid damage to or away from the Left and Right Shields (17, 18); To clean the exercise bike, use a damp cloth and a small amount of the exercise bike regularly. Turn the Resistance Knob (27) to the lowest setting. Turn the Pulley (21) for a moment. 24 Repeat these actions...
... page 15. IMPORTANT: To avoid damage to or away from the Left and Right Shields (17, 18); To clean the exercise bike, use a damp cloth and a small amount of the exercise bike regularly. Turn the Resistance Knob (27) to the lowest setting. Turn the Pulley (21) for a moment. 24 Repeat these actions...


