
English Manual
Page 1
... manual for reference. Write the serial number in this manual before contacting Customer Care. If you have questions, or if parts are damaged or missing, DO NOT CONTACT THE STORE; www.weslo.com Model No. MT ON THE WEB: www.wesloservice.com CAUTION Read all precautions and instructions in the space above...
... manual for reference. Write the serial number in this manual before contacting Customer Care. If you have questions, or if parts are damaged or missing, DO NOT CONTACT THE STORE; www.weslo.com Model No. MT ON THE WEB: www.wesloservice.com CAUTION Read all precautions and instructions in the space above...
English Manual
Page 2
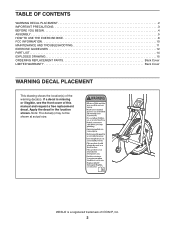
...: The decal(s) may not be shown at actual size. If a decal is a registered trademark of ICON IP, Inc. 2 WESLO is missing or illegible, see the front cover of the warning decal(s). Apply the decal in the location shown. TABLE OF CONTENTS ... PLACEMENT 2 IMPORTANT PRECAUTIONS 3 BEFORE YOU BEGIN 4 ASSEMBLY 5 HOW TO USE THE EXERCISE BIKE 8 FCC INFORMATION 10 MAINTENANCE AND TROUBLESHOOTING 11 EXERCISE GUIDELINES 12 PART LIST 14 EXPLODED DRAWING 15 ORDERING REPLACEMENT PARTS Back Cover LIMITED WARRANTY Back Cover WARNING DECAL PLACEMENT This drawing shows the location(s) of this...
...: The decal(s) may not be shown at actual size. If a decal is a registered trademark of ICON IP, Inc. 2 WESLO is missing or illegible, see the front cover of the warning decal(s). Apply the decal in the location shown. TABLE OF CONTENTS ... PLACEMENT 2 IMPORTANT PRECAUTIONS 3 BEFORE YOU BEGIN 4 ASSEMBLY 5 HOW TO USE THE EXERCISE BIKE 8 FCC INFORMATION 10 MAINTENANCE AND TROUBLESHOOTING 11 EXERCISE GUIDELINES 12 PART LIST 14 EXPLODED DRAWING 15 ORDERING REPLACEMENT PARTS Back Cover LIMITED WARRANTY Back Cover WARNING DECAL PLACEMENT This drawing shows the location(s) of this...
English Manual
Page 3
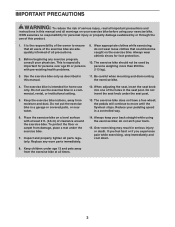
... garage or covered patio, or near water. 13. Before beginning any worn parts immediately. 14. This is especially important for home use the exercise bike in a controlled way. 6. Do not use only. Place the exercise bike on a level surface with pre-existing health problems. 9. IMPORTANT PRECAUTIONS WARNING:... in the seat post. do not wear loose clothes that all parts regularly. Be careful when mounting and dismounting the exercise bike. 4. Do not insert the seat knob under age 12 and pets away from the exercise bike at least 2 ft. (0.6 m) of the holes in this ...
... garage or covered patio, or near water. 13. Before beginning any worn parts immediately. 14. This is especially important for home use the exercise bike in a controlled way. 6. Do not use only. Place the exercise bike on a level surface with pre-existing health problems. 9. IMPORTANT PRECAUTIONS WARNING:... in the seat post. do not wear loose clothes that all parts regularly. Be careful when mounting and dismounting the exercise bike. 4. Do not insert the seat knob under age 12 and pets away from the exercise bike at least 2 ft. (0.6 m) of the holes in this ...
English Manual
Page 4
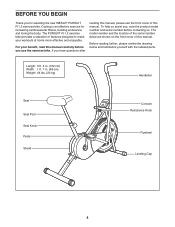
... model number and serial number before you for increasing cardiovascular fitness, building endurance, and toning the body. BEFORE YOU BEGIN Thank you use the exercise bike. To help us . Length: 3 ft. 4 in. (102 cm) Width: 1 ft. 7 in. (48 cm) Weight: 44 lbs. (... to make your benefit, read this manual. Cycling is an effective exercise for selecting the new WESLO® PURSUIT R 1.2 exercise bike. Before reading further, please review the drawing below and familiarize yourself with the labeled parts. The PURSUIT R 1.2 exercise bike provides a selection of this manual.
... model number and serial number before you for increasing cardiovascular fitness, building endurance, and toning the body. BEFORE YOU BEGIN Thank you use the exercise bike. To help us . Length: 3 ft. 4 in. (102 cm) Width: 1 ft. 7 in. (48 cm) Weight: 44 lbs. (... to make your benefit, read this manual. Cycling is an effective exercise for selecting the new WESLO® PURSUIT R 1.2 exercise bike. Before reading further, please review the drawing below and familiarize yourself with the labeled parts. The PURSUIT R 1.2 exercise bike provides a selection of this manual.
English Manual
Page 5
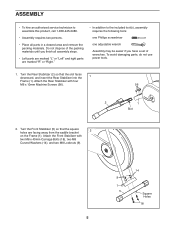
...to the included tool(s), assembly requires the following tools: one Phillips screwdriver one adjustable wrench Assembly may be easier if you nish all parts in a cleared area and remove the packing materials. Turn the Front Stabilizer (5) so that the slot faces downward, and insert the Rear ...Stabilizer into the 1 Frame (1). To avoid damaging parts, do not use power tools. 1. Attach the Rear Stabilizer with two M8 x 40mm Carriage Bolts (18), two M8 Curved Washers (14), and ...
...to the included tool(s), assembly requires the following tools: one Phillips screwdriver one adjustable wrench Assembly may be easier if you nish all parts in a cleared area and remove the packing materials. Turn the Front Stabilizer (5) so that the slot faces downward, and insert the Rear ...Stabilizer into the 1 Frame (1). To avoid damaging parts, do not use power tools. 1. Attach the Rear Stabilizer with two M8 x 40mm Carriage Bolts (18), two M8 Curved Washers (14), and ...
English Manual
Page 6
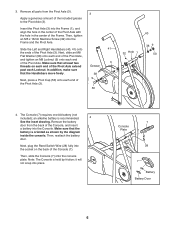
... move freely. 38 9 Next, press a Pivot Cap (50) onto each end of the Console (7). Note: The Console is recommended. 4 See the inset drawing. 3. Remove all parts from the back of the Pivot Axle (3).
... move freely. 38 9 Next, press a Pivot Cap (50) onto each end of the Console (7). Note: The Console is recommended. 4 See the inset drawing. 3. Remove all parts from the back of the Pivot Axle (3).
English Manual
Page 7
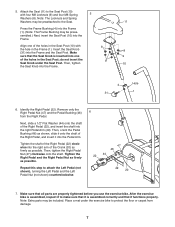
... the Seat Post (10) with the hole in the Seat Post; Insert the Seat Knob (31) into the Frame. 8 8 9 9 10 4 31 Hole 1 6. Note: Extra parts may be included. Then, orient the Pedal Bushing (46) as possible. Tighten the shaft of the Right Pedal (22) clockwise into the right Pedal Arm...that it onto the shaft of the holes in the Seat Post (10) with four M8 Locknuts (9) and four M8 Spring 5 Washers (8). After the exercise bike is assembled, inspect it to attach the Left Pedal (not shown), turning the Left Pedal and the Left Pedal Nut (not shown) counterclockwise. 6 47 ...
... the Seat Post (10) with the hole in the Seat Post; Insert the Seat Knob (31) into the Frame. 8 8 9 9 10 4 31 Hole 1 6. Note: Extra parts may be included. Then, orient the Pedal Bushing (46) as possible. Tighten the shaft of the Right Pedal (22) clockwise into the right Pedal Arm...that it onto the shaft of the holes in the Seat Post (10) with four M8 Locknuts (9) and four M8 Spring 5 Washers (8). After the exercise bike is assembled, inspect it to attach the Left Pedal (not shown), turning the Left Pedal and the Left Pedal Nut (not shown) counterclockwise. 6 47 ...

English Manual
Page 10
... interference in a particular installation. However, there is connected. •• Consult the dealer or an experienced radio/TV technician for a Class B digital device, pursuant to Part 15 of the following measures: •• Reorient or relocate the receiving antenna. •• Increase the separation between the equipment and the receiver. •...
... interference in a particular installation. However, there is connected. •• Consult the dealer or an experienced radio/TV technician for a Class B digital device, pursuant to Part 15 of the following measures: •• Reorient or relocate the receiving antenna. •• Increase the separation between the equipment and the receiver. •...
English Manual
Page 11
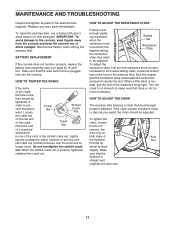
...sides of the crank become loose, they should be adjusted. Grip the longest part the resistance strap underneath the slotted tab and pull it towards the slot. ated, pull the end of the exercise bike regularly. HOW TO ADJUST THE RESISTANCE STRAP If there is not enough pedaling ...resistance when the Slotted Tab resistance knob is straight and retighten the axle nuts. 11 Replace any worn parts immediately. If the chain causes excessive noise or...
...sides of the crank become loose, they should be adjusted. Grip the longest part the resistance strap underneath the slotted tab and pull it towards the slot. ated, pull the end of the exercise bike regularly. HOW TO ADJUST THE RESISTANCE STRAP If there is not enough pedaling ...resistance when the Slotted Tab resistance knob is straight and retighten the axle nuts. 11 Replace any worn parts immediately. If the chain causes excessive noise or...

English Manual
Page 12
... your heart rate in your training zone. Then, stop exercising and place two fingers on your wrist as a guide to make exercise a regular and enjoyable part of your exercise until your heart rate is near the middle number in preparation for exercise. Remember, the key to success is to find your...
... your heart rate in your training zone. Then, stop exercising and place two fingers on your wrist as a guide to make exercise a regular and enjoyable part of your exercise until your heart rate is near the middle number in preparation for exercise. Remember, the key to success is to find your...
English Manual
Page 14
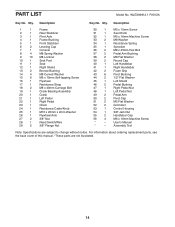
Description Key No. User’'s Manual * –- Assembly Tool Note: Specifications are not illustrated. 14 PART LIST Model No. Qty. Description 1 1 Frame 2 1 Rear Stabilizer 3 1 Pivot Axle 4 1 Frame Bushing 5 1 Front Stabilizer 6 2 Leveling Cap 7 1 Console 8 4 M8 Spring ... 1 Control Housing 54 1 3/8" Jam Nut 55 2 Handlebar Cap 56 4 M6 x 10mm Machine Screw * –- For information about ordering replacement parts, see the back cover of this manual. *These parts are subject to change without notice. WLEX89912.1 R1012A Key No. Qty.
Description Key No. User’'s Manual * –- Assembly Tool Note: Specifications are not illustrated. 14 PART LIST Model No. Qty. Description 1 1 Frame 2 1 Rear Stabilizer 3 1 Pivot Axle 4 1 Frame Bushing 5 1 Front Stabilizer 6 2 Leveling Cap 7 1 Console 8 4 M8 Spring ... 1 Control Housing 54 1 3/8" Jam Nut 55 2 Handlebar Cap 56 4 M6 x 10mm Machine Screw * –- For information about ordering replacement parts, see the back cover of this manual. *These parts are subject to change without notice. WLEX89912.1 R1012A Key No. Qty.
English Manual
Page 16
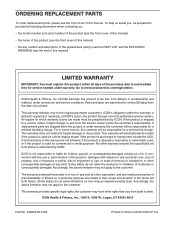
...not allow limitations on how long an implied warranty lasts. This warranty provides specic legal rights; ORDERING REPLACEMENT PARTS To order replacement parts, please see the PART LIST and the EXPLODED DRAWING near the end of this manual) LIMITED WARRANTY IMPORTANT: You must be preauthorized by...by ICON. damages with the use , or costs of this manual) •• the key number and description of the replacement part(s) (see the front cover of removal or installation; This warranty extends only to provide the following information when contacting us assist you...
...not allow limitations on how long an implied warranty lasts. This warranty provides specic legal rights; ORDERING REPLACEMENT PARTS To order replacement parts, please see the PART LIST and the EXPLODED DRAWING near the end of this manual) LIMITED WARRANTY IMPORTANT: You must be preauthorized by...by ICON. damages with the use , or costs of this manual) •• the key number and description of the replacement part(s) (see the front cover of removal or installation; This warranty extends only to provide the following information when contacting us assist you...


