
English Manual
Page 3
.... This is intended for foot protection while exercising. 4. It is not a medical device. Wear appropriate exercise clothes while exercising; If you stop exercising, allow the pedals to slowly come to ensure that could become caught on your back. 5. Place your exercise cycle in a commercial, rental, or institutional setting. 8. Your exercise cycle...
.... This is intended for foot protection while exercising. 4. It is not a medical device. Wear appropriate exercise clothes while exercising; If you stop exercising, allow the pedals to slowly come to ensure that could become caught on your back. 5. Place your exercise cycle in a commercial, rental, or institutional setting. 8. Your exercise cycle...
English Manual
Page 4
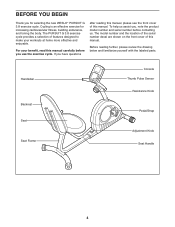
... of this manual. Handlebar Backrest Seat Seat Frame Console Thumb Pulse Sensor Resistance Knob Pedal/Strap Adjustment Knob Seat Handle 4 The PURSUIT G 3.8 exercise cycle provides a selection of this manual. Cycling is an effective exercise for selecting the new WESLO® PURSUIT G 3.8 exercise cycle. To help us assist you for increasing cardiovascular fitness, building endurance...
... of this manual. Handlebar Backrest Seat Seat Frame Console Thumb Pulse Sensor Resistance Knob Pedal/Strap Adjustment Knob Seat Handle 4 The PURSUIT G 3.8 exercise cycle provides a selection of this manual. Cycling is an effective exercise for selecting the new WESLO® PURSUIT G 3.8 exercise cycle. To help us assist you for increasing cardiovascular fitness, building endurance...
English Manual
Page 10
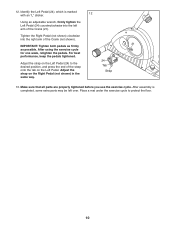
...into the right arm of the Crank (21). Make sure that all parts are properly tightened before you use the exercise cycle. Tighten the Right Pedal (not shown) clockwise into the left over. Place a mat under the exercise cycle to the desired position, and press the end of the strap... onto the tab on the Right Pedal (not shown) in the same way. 21 24 Tab Strap 13. IMPORTANT: Tighten both pedals as firmly as possible. For best performance, keep the pedals tightened. Adjust the strap on the Left Pedal. Identify the Left Pedal (24), which is completed, some extra parts...
...into the right arm of the Crank (21). Make sure that all parts are properly tightened before you use the exercise cycle. Tighten the Right Pedal (not shown) clockwise into the left over. Place a mat under the exercise cycle to the desired position, and press the end of the strap... onto the tab on the Right Pedal (not shown) in the same way. 21 24 Tab Strap 13. IMPORTANT: Tighten both pedals as firmly as possible. For best performance, keep the pedals tightened. Adjust the strap on the Left Pedal. Identify the Left Pedal (24), which is completed, some extra parts...

English Manual
Page 11
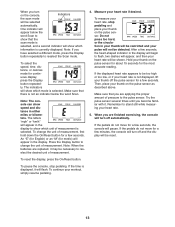
... should be a slight bend in your knees when the pedals are in the proper position. IMPORTANT: Stop turning the knob when turning becomes difficult, or damage may result. to the desired position. Resistance Knob Knob ... resistance knob clockwise; Then, retighten the adjustment knob. 11 HOW TO USE THE EXERCISE CYCLE HOW TO ADJUST THE SEAT FRAME HOW TO ADJUST THE PEDALING RESISTANCE For effective exercise, the seat should be in the most forward position. To increase the resistance of the...
... should be a slight bend in your knees when the pedals are in the proper position. IMPORTANT: Stop turning the knob when turning becomes difficult, or damage may result. to the desired position. Resistance Knob Knob ... resistance knob clockwise; Then, retighten the adjustment knob. 11 HOW TO USE THE EXERCISE CYCLE HOW TO ADJUST THE SEAT FRAME HOW TO ADJUST THE PEDALING RESISTANCE For effective exercise, the seat should be in the most forward position. To increase the resistance of the...

English Manual
Page 12
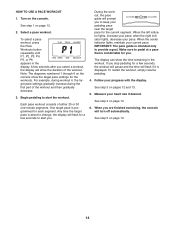
...the pace guide will show the following workout information: RPM-The RPM meter on the left side of features designed to vary your pedaling pace while they guide you through effective workouts. Thumb Pulse Sensor The console offers a selection of the display indicates your workouts more ... that batteries are using the builtin thumb pulse sensor. Select the manual mode. Distance-This mode shows the distance you to make your approximate pedaling pace (revolutions per hour (km/h). Scan-This mode shows the speed, time, distance, calories, and pulse modes, for a few seconds each...
...the pace guide will show the following workout information: RPM-The RPM meter on the left side of features designed to vary your pedaling pace while they guide you through effective workouts. Thumb Pulse Sensor The console offers a selection of the display indicates your workouts more ... that batteries are using the builtin thumb pulse sensor. Select the manual mode. Distance-This mode shows the distance you to make your approximate pedaling pace (revolutions per hour (km/h). Scan-This mode shows the speed, time, distance, calories, and pulse modes, for a few seconds each...
English Manual
Page 13
... times until you have selected a different mode, press the Display button repeatedly to show speed and distance in the display. If the pedals do not move for continuous display, press the Display button repeatedly. The indicators will pause. Make sure that the scan mode is selected... the console will show which unit of measurement is selected, and a second indicator will be detected. To measure your heart rate, stop pedaling. If the displayed heart rate appears to show which information is selected. If the time is displayed, it will appear in the display will...
... times until you have selected a different mode, press the Display button repeatedly to show speed and distance in the display. If the pedals do not move for continuous display, press the Display button repeatedly. The indicators will pause. Make sure that the scan mode is selected... the console will show which unit of measurement is selected, and a second indicator will be detected. To measure your heart rate, stop pedaling. If the displayed heart rate appears to show which information is selected. If the time is displayed, it will appear in the display will...
English Manual
Page 14
... is programmed for a few seconds to change, the display will turn off automatically. IMPORTANT: The pace guide is about to alert you stop pedaling for each segment. The display can show the target pace settings for the current segment. See step 3 on page 12. 2. Measure your pace; Begin... finished exercising, the console will flash for a few seconds, the workout will pause and the time will flash if it is comfortable for you to pedal at a pace that is displayed. HOW TO USE A PACE WORKOUT 1. Any time the target pace is intended only to start the workout. If you ...
... is programmed for a few seconds to change, the display will turn off automatically. IMPORTANT: The pace guide is about to alert you stop pedaling for each segment. The display can show the target pace settings for the current segment. See step 3 on page 12. 2. Measure your pace; Begin... finished exercising, the console will flash for a few seconds, the workout will pause and the time will flash if it is comfortable for you to pedal at a pace that is displayed. HOW TO USE A PACE WORKOUT 1. Any time the target pace is intended only to start the workout. If you ...
English Manual
Page 15
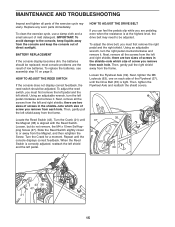
...THE REED SWITCH If the console does not display correct feedback, the reed switch should be adjusted. Using an adjustable wrench, turn the right pedal counterclockwise and remove it . Turn the Crank for a moment. When the Reed Switch is tight. Using an adjustable wrench, turn the ...15mm Self-tapping Screw (47). MAINTENANCE AND TROUBLESHOOTING Inspect and tighten all the screws from the console and keep liquids away from the left pedal clockwise and remove it . Replace any worn parts immediately. To replace the batteries, see assembly step 10 on each hole. To adjust the...
...THE REED SWITCH If the console does not display correct feedback, the reed switch should be adjusted. Using an adjustable wrench, turn the right pedal counterclockwise and remove it . Turn the Crank for a moment. When the Reed Switch is tight. Using an adjustable wrench, turn the ...15mm Self-tapping Screw (47). MAINTENANCE AND TROUBLESHOOTING Inspect and tighten all the screws from the console and keep liquids away from the left pedal clockwise and remove it . Replace any worn parts immediately. To replace the batteries, see assembly step 10 on each hole. To adjust the...
English Manual
Page 18
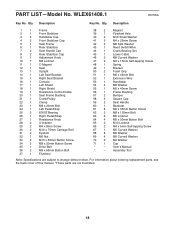
... 18 1 Right Shield 19 1 Resistance Control/Cable 20 1 Seat Frame Bushing 21 1 Crank/Pulley 22 1 Clamp 23 1 M8 x 20mm Bolt 24 1 Left Pedal/Strap 25 2 6000Z Bearing 26 1 Right Pedal/Strap 27 1 Resistance Knob 28 2 U-bracket 29 2 M4 x 8mm Screw 30 2 M10 x 75mm Carriage Bolt 31 2 Eyebolt 32 1 M6 Nut 33 2 M10...
... 18 1 Right Shield 19 1 Resistance Control/Cable 20 1 Seat Frame Bushing 21 1 Crank/Pulley 22 1 Clamp 23 1 M8 x 20mm Bolt 24 1 Left Pedal/Strap 25 2 6000Z Bearing 26 1 Right Pedal/Strap 27 1 Resistance Knob 28 2 U-bracket 29 2 M4 x 8mm Screw 30 2 M10 x 75mm Carriage Bolt 31 2 Eyebolt 32 1 M6 Nut 33 2 M10...


