

Uk Manual
Page 1
If you have questions, or if there are committed to providing complete customer satisfaction. USER'S MANUAL Visit our website at www.iconeurope.com Model No. As a manufacturer, we are missing parts, please call: 08457 089 009 Or write: ICON Health & Fitness, Ltd. Customer Service Department Unit 4 Revie Road Industrial Estate Revie Road Beeston Leeds, LS118JG UK email: [email protected] CAUTION Read all precautions and instructions in this manual before using this manual for future reference. Serial Number Decal QUESTIONS? Keep this equipment. WLEMEX09920 Serial No.
If you have questions, or if there are committed to providing complete customer satisfaction. USER'S MANUAL Visit our website at www.iconeurope.com Model No. As a manufacturer, we are missing parts, please call: 08457 089 009 Or write: ICON Health & Fitness, Ltd. Customer Service Department Unit 4 Revie Road Industrial Estate Revie Road Beeston Leeds, LS118JG UK email: [email protected] CAUTION Read all precautions and instructions in this manual before using this manual for future reference. Serial Number Decal QUESTIONS? Keep this equipment. WLEMEX09920 Serial No.
Uk Manual
Page 2
... or persons with pre-existing health problems. Read all instructions before using. The exercise cycle should not be used by or through the use the exercise cycle in this product. 2 TABLE OF CONTENTS IMPORTANT PRECAUTIONS 2 BEFORE YOU BEGIN 3 ASSEMBLY 4 HOW TO OPERATE THE EXERCISE CYCLE 8 MAINTENANCE AND TROUBLESHOOTING 10 CONDITIONING GUIDELINES 11 PART LIST 14 EXPLODED DRAWING 15 ORDERING REPLACEMENT PARTS Back Cover IMPORTANT PRECAUTIONS WARNING: To...
... or persons with pre-existing health problems. Read all instructions before using. The exercise cycle should not be used by or through the use the exercise cycle in this product. 2 TABLE OF CONTENTS IMPORTANT PRECAUTIONS 2 BEFORE YOU BEGIN 3 ASSEMBLY 4 HOW TO OPERATE THE EXERCISE CYCLE 8 MAINTENANCE AND TROUBLESHOOTING 10 CONDITIONING GUIDELINES 11 PART LIST 14 EXPLODED DRAWING 15 ORDERING REPLACEMENT PARTS Back Cover IMPORTANT PRECAUTIONS WARNING: To...
Uk Manual
Page 3
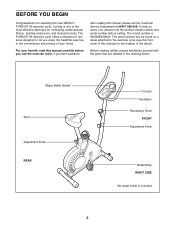
... exercise cycle (see the front cover of your benefit, read this manual for increasing cardiovascular fitness, building endurance, and toning the body. Water Bottle Holder* Seat Adjustment Knob REAR Console Handlebar Resistance Knob FRONT Adjustment Knob Pedal/Strap RIGHT SIDE *No water bottle is WLEMEX09920. For your home. The serial number can be found on a decal attached to let you have questions after reading this healthful exercise in the drawing below. The model number...
... exercise cycle (see the front cover of your benefit, read this manual for increasing cardiovascular fitness, building endurance, and toning the body. Water Bottle Holder* Seat Adjustment Knob REAR Console Handlebar Resistance Knob FRONT Adjustment Knob Pedal/Strap RIGHT SIDE *No water bottle is WLEMEX09920. For your home. The serial number can be found on a decal attached to let you have questions after reading this healthful exercise in the drawing below. The model number...
Uk Manual
Page 4
... (23)-6 M4 x 19mm Screw (49)-4 M8 x 15mm Button Screw (34)-3 3/8" x 68mm Carriage Bolt (30)-4 1. Use the part drawings below each drawing refers to the quantity needed for shipping. Whilst another person lifts the front of the exercise cycle in assembly. If a part is turned so the Wheels are not touching the floor. 2. Whilst another person lifts the rear of the packing materials...
... (23)-6 M4 x 19mm Screw (49)-4 M8 x 15mm Button Screw (34)-3 3/8" x 68mm Carriage Bolt (30)-4 1. Use the part drawings below each drawing refers to the quantity needed for shipping. Whilst another person lifts the front of the exercise cycle in assembly. If a part is turned so the Wheels are not touching the floor. 2. Whilst another person lifts the rear of the packing materials...
Uk Manual
Page 5
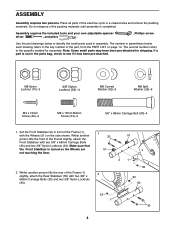
... Adjustment Knob (9) into the connector. 3. Turn the Resistance Cable (19) until it is tight. alkaline batteries are oriented as shown by the markings inside the battery compartment. 3 19 45 1 Be careful to the Frame (1). Next, connect the Resistance Cable (19) to avoid pinching the Wires and Cables. Cut and remove the zip tie holding the Reed Switch Wire to avoid pinching the wires and cables whilst inserting the Upright...
... Adjustment Knob (9) into the connector. 3. Turn the Resistance Cable (19) until it is tight. alkaline batteries are oriented as shown by the markings inside the battery compartment. 3 19 45 1 Be careful to the Frame (1). Next, connect the Resistance Cable (19) to avoid pinching the Wires and Cables. Cut and remove the zip tie holding the Reed Switch Wire to avoid pinching the wires and cables whilst inserting the Upright...

Uk Manual
Page 6
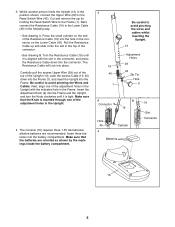
... and Nylon Locknuts may be preattached to the Seat Post (5) with four M4 x 19mm Screws (49). Attach the Handlebar to avoid pinching the wires. Hold the Console (16) near 6 the Upright (13), connect the console wire to avoid pinching the wires. Hole 16 Console Wire 15 49 6. Be careful to the Upright with three M8 x 15mm Button Screws (34), three M8 Split Washers (23) and...
... and Nylon Locknuts may be preattached to the Seat Post (5) with four M4 x 19mm Screws (49). Attach the Handlebar to avoid pinching the wires. Hold the Console (16) near 6 the Upright (13), connect the console wire to avoid pinching the wires. Hole 16 Console Wire 15 49 6. Be careful to the Upright with three M8 x 15mm Button Screws (34), three M8 Split Washers (23) and...
Uk Manual
Page 7
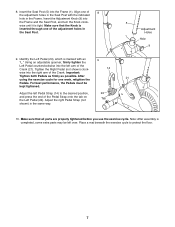
... left arm of 8 the adjustment holes in the Seat Post with an "L." Tighten the Right Pedal (not shown) clockwise into the Frame and the Seat Post, and turn the Knob clock- wise until it is marked with the indicated hole in the same way. 9 14 24 Tab 5 Adjustment Holes 1 Hole 9 21 10. After using the exercise cycle for one of the Crank...
... left arm of 8 the adjustment holes in the Seat Post with an "L." Tighten the Right Pedal (not shown) clockwise into the Frame and the Seat Post, and turn the Knob clock- wise until it is marked with the indicated hole in the same way. 9 14 24 Tab 5 Adjustment Holes 1 Hole 9 21 10. After using the exercise cycle for one of the Crank...

Uk Manual
Page 8
... straps off the tabs on the pedals. Important: Stop turning the knob when turning becomes difficult, or damage may result. Insert the knob into the frame and the upright, and turn the resistance knob clockwise; To adjust the pedal straps, first pull the ends of the seat, first turn the knob clockwise until it . Hole wise and remove it is the most comfortable for you pedal, there Seat should be adjusted...
... straps off the tabs on the pedals. Important: Stop turning the knob when turning becomes difficult, or damage may result. Insert the knob into the frame and the upright, and turn the resistance knob clockwise; To adjust the pedal straps, first pull the ends of the seat, first turn the knob clockwise until it . Hole wise and remove it is the most comfortable for you pedal, there Seat should be adjusted...
Uk Manual
Page 9
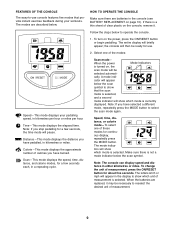
... CONSOLE Make sure there are replaced, it . Follow the steps below . cally. The modes are described below to show which unit of clear plastic on the power, press the ON/RESET button or begin pedalling. Speed-This mode displays your workouts. Calorie-This mode displays the approximate number of measurement, press the ON/RESET button for use console features five modes that provide instant exercise feedback during your pedalling speed, in either kilometres or miles. the console...
... CONSOLE Make sure there are replaced, it . Follow the steps below . cally. The modes are described below to show which unit of clear plastic on the power, press the ON/RESET button or begin pedalling. Speed-This mode displays your workouts. Calorie-This mode displays the approximate number of measurement, press the ON/RESET button for use console features five modes that provide instant exercise feedback during your pedalling speed, in either kilometres or miles. the console...
Uk Manual
Page 10
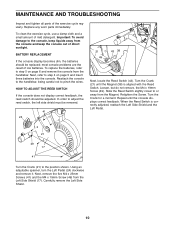
... Reed Switch is aligned with the Reed Switch. Carefully remove the Left Side Shield. 10 Retighten the Screw. Using an adjustable spanner, turn the Left Pedal (24) clockwise and remove it. MAINTENANCE AND TROUBLESHOOTING Inspect and tighten all parts of mild detergent. Replace any worn parts immediately. most console problems are the result of direct sunlight. Important: To avoid damage to adjust the reed switch, the left side shield must be adjusted. To replace the batteries...
... Reed Switch is aligned with the Reed Switch. Carefully remove the Left Side Shield. 10 Retighten the Screw. Using an adjustable spanner, turn the Left Pedal (24) clockwise and remove it. MAINTENANCE AND TROUBLESHOOTING Inspect and tighten all parts of mild detergent. Replace any worn parts immediately. most console problems are the result of direct sunlight. Important: To avoid damage to adjust the reed switch, the left side shield must be adjusted. To replace the batteries...
Uk Manual
Page 11
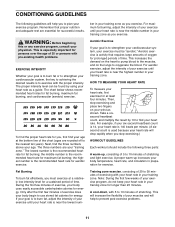
... the chart (ages are your physician. Then, stop exercising.) WORKOUT GUIDELINES Each workout should include the following three parts: A warm-up increases your training zone as shown. Take a sixsecond heartbeat count, and multiply the result by using your training zone as a guide. Fat Burning To burn fat effectively, you exercise. During the first few weeks of your exercise program, do not keep your heart rate...
... the chart (ages are your physician. Then, stop exercising.) WORKOUT GUIDELINES Each workout should include the following three parts: A warm-up increases your training zone as shown. Take a sixsecond heartbeat count, and multiply the result by using your training zone as a guide. Fat Burning To burn fat effectively, you exercise. During the first few weeks of your exercise program, do not keep your heart rate...
Uk Manual
Page 12
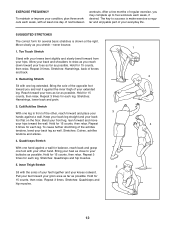
...at least one leg in front of regular exercise, you may complete up to relax as you stretch-never bounce. 1. Stretches: Hamstrings, lower back and groin. 3. Bring your heel as possible. Repeat 3 times for several basic stretches is make exercise a regular and enjoyable part of your feet..., back of the achilles tendons, bend your back leg as possible. EXERCISE FREQUENCY To maintain or improve your condition, plan three workouts each week, with at the right. Reach toward the wall. Bend your front leg, lean forward and move your hips toward your back foot flat on the ...
...at least one leg in front of regular exercise, you may complete up to relax as you stretch-never bounce. 1. Stretches: Hamstrings, lower back and groin. 3. Bring your heel as possible. Repeat 3 times for several basic stretches is make exercise a regular and enjoyable part of your feet..., back of the achilles tendons, bend your back leg as possible. EXERCISE FREQUENCY To maintain or improve your condition, plan three workouts each week, with at the right. Reach toward the wall. Bend your front leg, lean forward and move your hips toward your back foot flat on the ...
Uk Manual
Page 14
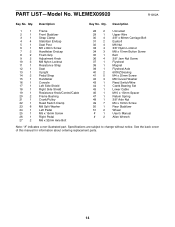
...cover of this manual for information about ordering replacement parts. 14 WLEMEX09920 R1002A Key No. Qty. Qty. Description 1 1 Frame 2 1 Front Stabilizer 3 1 Strap Clamp 4 4 Stabilizer Endcap 5 1 Seat Post 6 1 M5 x 8mm Screw 7 2 Handlebar Endcap 8 2 Foam Grip 9 2 Adjustment Knob 10 3 M8 Nylon Locknut 11 1 Resistance Strap 12 1 Seat 13 1 Upright 14 2 Pedal Strap 15 1 Handlebar 16 1 Console 17 1 Left Side Shield 18 1 Right Side Shield 19 1 Resistance Knob/Control/Cable 20 2 Frame Bushing 21 1 Crank/Pulley 22 1 Reed Switch...
...cover of this manual for information about ordering replacement parts. 14 WLEMEX09920 R1002A Key No. Qty. Qty. Description 1 1 Frame 2 1 Front Stabilizer 3 1 Strap Clamp 4 4 Stabilizer Endcap 5 1 Seat Post 6 1 M5 x 8mm Screw 7 2 Handlebar Endcap 8 2 Foam Grip 9 2 Adjustment Knob 10 3 M8 Nylon Locknut 11 1 Resistance Strap 12 1 Seat 13 1 Upright 14 2 Pedal Strap 15 1 Handlebar 16 1 Console 17 1 Left Side Shield 18 1 Right Side Shield 19 1 Resistance Knob/Control/Cable 20 2 Frame Bushing 21 1 Crank/Pulley 22 1 Reed Switch...
Uk Manual
Page 15
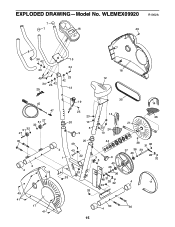
EXPLODED DRAWING-Model No. WLEMEX09920 7 7 16 49 R1002A 8 34 15 42 34 23 49 34 29 23 42 23 42 13 18 12 35 19 45 14 47 25 14 23 26 51 32 27 51 27 32 20 10 21 5 9 23 24 10 30 2 4 49 41 17 41 20 49 4 43 22 1 33 33 33 44 3 9 6 40 46 36 48 31 28 32 33 38 31 36 37 36 39 40 28 32 4 11 50 4 30 15
EXPLODED DRAWING-Model No. WLEMEX09920 7 7 16 49 R1002A 8 34 15 42 34 23 49 34 29 23 42 23 42 13 18 12 35 19 45 14 47 25 14 23 26 51 32 27 51 27 32 20 10 21 5 9 23 24 10 30 2 4 49 41 17 41 20 49 4 43 22 1 33 33 33 44 3 9 6 40 46 36 48 31 28 32 33 38 31 36 37 36 39 40 28 32 4 11 50 4 30 15

Uk Manual
Page 16
...; the NAME of the product (WESLO® PURSUIT 95 exercise cycle) • the SERIAL NUMBER of the product (see the front cover of this manual) • the KEY NUMBER and DESCRIPTION of the part(s) (see page 14) WESLO is a registered trademark of ICON Health & Fitness, Inc. Part No. 190039 R1002A Printed in Taiwan © 2002 ICON Health & Fitness, Inc. ORDERING REPLACEMENT PARTS To order replacement parts, contact the ICON Health & Fitness, Ltd. office, or write: ICON Health & Fitness, Ltd.
...; the NAME of the product (WESLO® PURSUIT 95 exercise cycle) • the SERIAL NUMBER of the product (see the front cover of this manual) • the KEY NUMBER and DESCRIPTION of the part(s) (see page 14) WESLO is a registered trademark of ICON Health & Fitness, Inc. Part No. 190039 R1002A Printed in Taiwan © 2002 ICON Health & Fitness, Inc. ORDERING REPLACEMENT PARTS To order replacement parts, contact the ICON Health & Fitness, Ltd. office, or write: ICON Health & Fitness, Ltd.


