

English Manual
Page 1
... AVOID UNNECESSARY DELAYS, PLEASE CALL DIRECT TO OUR TOLL-FREE CUSTOMER HOT LINE. WLEX14000 Serial No. MST CAUTION Read all precautions and instructions in the space above for future reference. USER'S MANUAL Patent Pending Visit our website at www.weslo.com new products, prizes, fitness tips, and much more! Serial Number Decal QUESTIONS? If you . The trained technicians on our customer hot...
... AVOID UNNECESSARY DELAYS, PLEASE CALL DIRECT TO OUR TOLL-FREE CUSTOMER HOT LINE. WLEX14000 Serial No. MST CAUTION Read all precautions and instructions in the space above for future reference. USER'S MANUAL Patent Pending Visit our website at www.weslo.com new products, prizes, fitness tips, and much more! Serial Number Decal QUESTIONS? If you . The trained technicians on our customer hot...

English Manual
Page 2
TABLE OF CONTENTS IMPORTANT PRECAUTIONS 3 BEFORE YOU BEGIN 4 ASSEMBLY 5 HOW TO USE THE EXERCISE CYCLE 9 MAINTENANCE AND STORAGE 11 CONDITIONING GUIDELINES 12 PART LIST 14 EXPLODED DRAWING 15 ORDERING REPLACEMENT PARTS Back Cover LIMITED WARRANTY Back Cover 2
TABLE OF CONTENTS IMPORTANT PRECAUTIONS 3 BEFORE YOU BEGIN 4 ASSEMBLY 5 HOW TO USE THE EXERCISE CYCLE 9 MAINTENANCE AND STORAGE 11 CONDITIONING GUIDELINES 12 PART LIST 14 EXPLODED DRAWING 15 ORDERING REPLACEMENT PARTS Back Cover LIMITED WARRANTY Back Cover 2

English Manual
Page 3
... described in this manual. 3. Place a mat under the age of heart rate readings. Do not use only. tions before using the exercise cycle. 8. Wear appropriate clothing when exercising; The pulse sensor is the responsibility of the owner to move until the flywheel stops. the pedals will continue to ensure that could become caught on a level surface. Always wear athletic shoes when using the WESLO¨ PURSUIT 719. 1.
... described in this manual. 3. Place a mat under the age of heart rate readings. Do not use only. tions before using the exercise cycle. 8. Wear appropriate clothing when exercising; The pulse sensor is the responsibility of the owner to move until the flywheel stops. the pedals will continue to ensure that could become caught on a level surface. Always wear athletic shoes when using the WESLO¨ PURSUIT 719. 1.

English Manual
Page 4
... product model number and serial number when calling. The PURSUIT 719 offers an effective form of this manual carefully before you use the PURSUIT 719. To help us assist you for you have additional questions, please call our Customer Service Department toll-free at 1-800-999-3756, Monday through Friday, 6 a.m. And the PURSUIT 719 features adjustable resistance to the exercise cycle (see the front cover of low-impact exercise that...
... product model number and serial number when calling. The PURSUIT 719 offers an effective form of this manual carefully before you use the PURSUIT 719. To help us assist you for you have additional questions, please call our Customer Service Department toll-free at 1-800-999-3756, Monday through Friday, 6 a.m. And the PURSUIT 719 features adjustable resistance to the exercise cycle (see the front cover of low-impact exercise that...

English Manual
Page 5
ASSEMBLY Place all parts of the part, from the PART LIST on page 14; The number in parenthesis below to the key number of the exercise cycle in a cleared area and remove the packing materials. Note: Some small parts may have been pre-attached for assembly. the second number refers to see if it has been pre-assembled. M8 Flat Washer (51)Ð8 M10 Split Washer...
ASSEMBLY Place all parts of the part, from the PART LIST on page 14; The number in parenthesis below to the key number of the exercise cycle in a cleared area and remove the packing materials. Note: Some small parts may have been pre-attached for assembly. the second number refers to see if it has been pre-assembled. M8 Flat Washer (51)Ð8 M10 Split Washer...
English Manual
Page 6
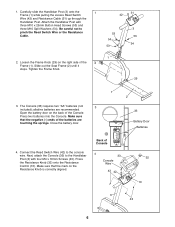
..., attach the Console (33) to the Handlebar Post (3) with three M10 x 25mm Button Head Screws (53) and three M10 Split Washers (54). Press the Resistance Knob (32) onto the Resistance Control (10). Slide out the Seat Frame (2) until it stops. Carefully slide the Handlebar Post (3) onto the 1 Frame (1) while pulling the excess Reed Switch Wire (42) and Resistance Cable (31) up through the Handlebar Post. Press two batteries...
..., attach the Console (33) to the Handlebar Post (3) with three M10 x 25mm Button Head Screws (53) and three M10 Split Washers (54). Press the Resistance Knob (32) onto the Resistance Control (10). Slide out the Seat Frame (2) until it stops. Carefully slide the Handlebar Post (3) onto the 1 Frame (1) while pulling the excess Reed Switch Wire (42) and Resistance Cable (31) up through the Handlebar Post. Press two batteries...
English Manual
Page 7
...four M8 x 65mm Carriage Bolts (52), four M8 Flat Washers (51), and four M8 Nylon Locknuts (55). 2 51 55 51 55 2 26 26 30 27 63 52 64 51 55 51 7 Attach the Seat Upright (64) to attach the Seat Upright. 11 64 11 6. Note: It may be helpful to tip the exercise cycle on its side to... the Seat Frame (2) 5 with four M8 x 54mm Carriage Bolts (11), four M8 Flat Washers (51), and four M8 Nylon Locknuts...
...four M8 x 65mm Carriage Bolts (52), four M8 Flat Washers (51), and four M8 Nylon Locknuts (55). 2 51 55 51 55 2 26 26 30 27 63 52 64 51 55 51 7 Attach the Seat Upright (64) to attach the Seat Upright. 11 64 11 6. Note: It may be helpful to tip the exercise cycle on its side to... the Seat Frame (2) 5 with four M8 x 54mm Carriage Bolts (11), four M8 Flat Washers (51), and four M8 Nylon Locknuts...

English Manual
Page 8
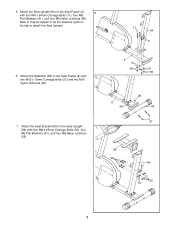
Attach the Backrest (45) to the Seat Upright (64) with 8 four M6 x 16mm Screws (46). 44 63 9. Attach the Seat (44) to the Seat Bracket 9 (63) with two M10 x 97mm Hex Head Bolts (12) and two M10 Nylon Locknuts (26). 46 25 26 10. 8. Attach the Seat Handles (25) to the Seat Bracket (63) with four M6 x 16mm Screws (46). 12 25 10 63 12 45 46 64 8
Attach the Backrest (45) to the Seat Upright (64) with 8 four M6 x 16mm Screws (46). 44 63 9. Attach the Seat (44) to the Seat Bracket 9 (63) with two M10 x 97mm Hex Head Bolts (12) and two M10 Nylon Locknuts (26). 46 25 26 10. 8. Attach the Seat Handles (25) to the Seat Bracket (63) with four M6 x 16mm Screws (46). 12 25 10 63 12 45 46 64 8

English Manual
Page 9
... the left arm of the Crank. Adjust the Left Pedal Strap (68) to the desired position. HOW TO USE THE EXERCISE CYCLE HOW TO ADJUST THE POSITION OF THE SEAT FRAME The Seat Frame (2) can 33 be adjusted to decrease the resistance, turn the Resistance Knob clockwise; Tighten the Frame Knob. 2 29 HOW TO ADJUST THE PEDAL STRAPS To adjust the right Pedal Strap (67), first pull the 67 Pedal Strap off the adjustment tab on...
... the left arm of the Crank. Adjust the Left Pedal Strap (68) to the desired position. HOW TO USE THE EXERCISE CYCLE HOW TO ADJUST THE POSITION OF THE SEAT FRAME The Seat Frame (2) can 33 be adjusted to decrease the resistance, turn the Resistance Knob clockwise; Tighten the Frame Knob. 2 29 HOW TO ADJUST THE PEDAL STRAPS To adjust the right Pedal Strap (67), first pull the 67 Pedal Strap off the adjustment tab on...

English Manual
Page 10
... the lower display and your heart rate when the pulse sensor is turned on the sensor as shown. Heart RateÑThis mode displays your current speed, the elapsed time, the distance you have pedaled, and the numbers of the six modes: Scan modeÑ When the power Mode Arrows is used . tance, fat calo- The lower display will then be selected. ScanÑDisplays the speed, time, distance, fat calories, and calories modes, for battery installation instructions. 1. The console will...
... the lower display and your heart rate when the pulse sensor is turned on the sensor as shown. Heart RateÑThis mode displays your current speed, the elapsed time, the distance you have pedaled, and the numbers of the six modes: Scan modeÑ When the power Mode Arrows is used . tance, fat calo- The lower display will then be selected. ScanÑDisplays the speed, time, distance, fat calories, and calories modes, for battery installation instructions. 1. The console will...
English Manual
Page 11
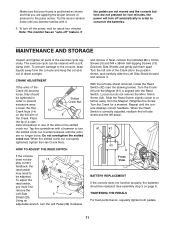
... moved and the console buttons are not pressed for four minutes, the power will turn the Left Pedal (39) clockwise and remove it. CRANK ADJUSTMENT If the arms of pressure to the pulse sensor. Slotted Crank Nut Loosen the Hex Crank Nuts (14) 14 on page 6. HOW TO ADJUST THE REED SWITCH If the console does not display correct 13 39 8 20 feedback, the reed switch may need to be tightened in order to turn...
... moved and the console buttons are not pressed for four minutes, the power will turn the Left Pedal (39) clockwise and remove it. CRANK ADJUSTMENT If the arms of pressure to the pulse sensor. Slotted Crank Nut Loosen the Hex Crank Nuts (14) 14 on page 6. HOW TO ADJUST THE REED SWITCH If the console does not display correct 13 39 8 20 feedback, the reed switch may need to be tightened in order to turn...

English Manual
Page 12
For maximum fat burning, adjust the intensity of your exercise until your heart rate is to strengthen your cardiovascular system, your exercise must exercise at least one day of rest between workouts. The chart below shows recommended heart rates for 20 to strengthen your condition, plan three workouts each week, with pre-existing health problems. The pulse sensor is intended only as a guide. Aerobic Exercise If your goal...
For maximum fat burning, adjust the intensity of your exercise until your heart rate is to strengthen your cardiovascular system, your exercise must exercise at least one day of rest between workouts. The chart below shows recommended heart rates for 20 to strengthen your condition, plan three workouts each week, with pre-existing health problems. The pulse sensor is intended only as a guide. Aerobic Exercise If your goal...

English Manual
Page 13
...counts, then relax. Stretches: Hamstrings, back of the achilles tendons, bend your knees outward. Stretches: Hamstrings, lower back and groin. 3. Bend your front leg, lean forward and move 3 your buttocks as possible. Bring your heel as close to relax as well. Hold for 15 counts, then... relax. Repeat 3 times for each leg. Repeat 3 times for each leg. Inner Thigh Stretch Sit with the soles of the other hand. Repeat 3 times. To cause further stretching of knees and back. 2. SUGGESTED STRETCHES The correct form for balance, reach back and grasp ...
...counts, then relax. Stretches: Hamstrings, back of the achilles tendons, bend your knees outward. Stretches: Hamstrings, lower back and groin. 3. Bend your front leg, lean forward and move 3 your buttocks as possible. Bring your heel as close to relax as well. Hold for 15 counts, then... relax. Repeat 3 times for each leg. Repeat 3 times for each leg. Inner Thigh Stretch Sit with the soles of the other hand. Repeat 3 times. To cause further stretching of knees and back. 2. SUGGESTED STRETCHES The correct form for balance, reach back and grasp ...

English Manual
Page 14
... 24 2 Wheel Assembly 25 2 Seat Handle 26 5 M10 Nylon Locknut 27 2 M10 x 70mm Carriage Bolt 28 4 Foam Grip 29 1 Frame Knob 30 1 Stabilizer 31 1 Resistance Control/Cable 32 1 Resistance Knob 33 1 Console 34 2 Stabilizer Endcap 35 1 Seat Frame Bushing 36 1 Frame Bushing 37 2 M4 x 16mm Black Screw 38 1 Right Pedal 39 1 Left Pedal 40 1 Idler Arm Spring 41 1 Resistance Strap 42 1 Reed Switch w/Wire 43 5 M4 x 16mm Screw 44 1 Seat 45 1 Backrest...
... 24 2 Wheel Assembly 25 2 Seat Handle 26 5 M10 Nylon Locknut 27 2 M10 x 70mm Carriage Bolt 28 4 Foam Grip 29 1 Frame Knob 30 1 Stabilizer 31 1 Resistance Control/Cable 32 1 Resistance Knob 33 1 Console 34 2 Stabilizer Endcap 35 1 Seat Frame Bushing 36 1 Frame Bushing 37 2 M4 x 16mm Black Screw 38 1 Right Pedal 39 1 Left Pedal 40 1 Idler Arm Spring 41 1 Resistance Strap 42 1 Reed Switch w/Wire 43 5 M4 x 16mm Screw 44 1 Seat 45 1 Backrest...

English Manual
Page 16
... information: ¥ The MODEL NUMBER of the product (WLEX14000) ¥ The NAME of the product (WESLO¨ PURSUIT 719 exercise cycle) ¥ The SERIAL NUMBER of the product (see the front cover of this product to be free from state to state. All repairs for commercial or rental purposes, or products used for which vary from defects in China © 2000 ICON Health & Fitness, Inc. This warranty...
... information: ¥ The MODEL NUMBER of the product (WLEX14000) ¥ The NAME of the product (WESLO¨ PURSUIT 719 exercise cycle) ¥ The SERIAL NUMBER of the product (see the front cover of this product to be free from state to state. All repairs for commercial or rental purposes, or products used for which vary from defects in China © 2000 ICON Health & Fitness, Inc. This warranty...


