
English Manual
Page 1
... immediate assistance, free of charge to providing complete customer satisfaction. USER'S MANUAL Visit our website at www.weslo.com new products, prizes, fitness tips, and much more! WLEX13040 Serial No. Model No. MST CAUTION Read all precautions and instructions in this manual before using this manual for future reference. Serial Number Decal QUESTIONS? If you have questions, or if there are missing parts, we...
... immediate assistance, free of charge to providing complete customer satisfaction. USER'S MANUAL Visit our website at www.weslo.com new products, prizes, fitness tips, and much more! WLEX13040 Serial No. Model No. MST CAUTION Read all precautions and instructions in this manual before using this manual for future reference. Serial Number Decal QUESTIONS? If you have questions, or if there are missing parts, we...
English Manual
Page 2
... move until the flywheel stops. 11. Inspect and properly tighten all times. 6. This is intended for foot protection. 7. TABLE OF CONTENTS IMPORTANT PRECAUTIONS 2 BEFORE YOU BEGIN 3 ASSEMBLY 4 HOW TO OPERATE THE EXERCISE CYCLE 8 MAINTENANCE AND TROUBLESHOOTING 10 CONDITIONING GUIDELINES 11 PART LIST 14 EXPLODED DRAWING 15 HOW TO ORDER REPLACEMENT PARTS Back Cover LIMITED WARRANTY Back Cover IMPORTANT PRECAUTIONS WARNING: To reduce the risk of heart rate...
... move until the flywheel stops. 11. Inspect and properly tighten all times. 6. This is intended for foot protection. 7. TABLE OF CONTENTS IMPORTANT PRECAUTIONS 2 BEFORE YOU BEGIN 3 ASSEMBLY 4 HOW TO OPERATE THE EXERCISE CYCLE 8 MAINTENANCE AND TROUBLESHOOTING 10 CONDITIONING GUIDELINES 11 PART LIST 14 EXPLODED DRAWING 15 HOW TO ORDER REPLACEMENT PARTS Back Cover LIMITED WARRANTY Back Cover IMPORTANT PRECAUTIONS WARNING: To reduce the risk of heart rate...
English Manual
Page 3
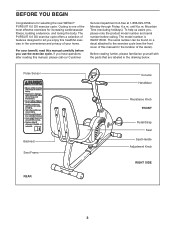
... new WESLO® PURSUIT 6.0 DX exercise cycle. BEFORE YOU BEGIN Congratulations for increasing cardiovascular fitness, building endurance, and toning the body. For your home. Mountain Time (excluding holidays). The model number is one of your benefit, read this manual, please call our Customer Service Department toll-free at 1-866-699-3756, Monday through Friday, 6 a.m. Pulse Sensor Console Handlebar Backrest Seat Frame REAR Resistance Knob FRONT Pedal/Strap Seat Seat Handle Adjustment Knob RIGHT SIDE 3 The PURSUIT 6.0 DX exercise...
... new WESLO® PURSUIT 6.0 DX exercise cycle. BEFORE YOU BEGIN Congratulations for increasing cardiovascular fitness, building endurance, and toning the body. For your home. Mountain Time (excluding holidays). The model number is one of your benefit, read this manual, please call our Customer Service Department toll-free at 1-866-699-3756, Monday through Friday, 6 a.m. Pulse Sensor Console Handlebar Backrest Seat Frame REAR Resistance Knob FRONT Pedal/Strap Seat Seat Handle Adjustment Knob RIGHT SIDE 3 The PURSUIT 6.0 DX exercise...
English Manual
Page 4
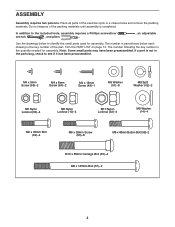
... a Phillips screwdriver wrench , and pliers . , an adjustable Use the drawings below each drawing is the key number of the packing materials until assembly is the quantity needed for assembly. If a part is not in the parts bag, check to identify the small parts used for assembly. The number following the key number is completed. Place all parts of the exercise cycle in parenthesis below to see if...
... a Phillips screwdriver wrench , and pliers . , an adjustable Use the drawings below each drawing is the key number of the packing materials until assembly is the quantity needed for assembly. If a part is not in the parts bag, check to identify the small parts used for assembly. The number following the key number is completed. Place all parts of the exercise cycle in parenthesis below to see if...
English Manual
Page 5
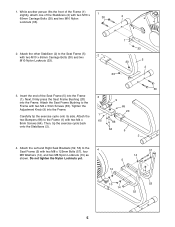
...Screws (65). Tighten the Adjustment Knob (9) into the Frame. Attach the Left and Right Seat Brackets (52, 53) to the Frame (1) with two M8 x 125mm Bolts (57), four M8 Washers (14), and two M8 Nylon Locknuts (10) as shown. Carefully tip the exercise cycle onto its side. Attach the Seat Frame Bushing to the Seat..., attach one of the Seat Frame (5) into the Frame (1). Attach the other Stabilizer (2) to the Frame with two M10 x 65mm Carriage Bolts (30) and two M10 Nylon 1 30 2 Locknuts (33). 2. Next, firmly press the Seat Frame Bushing (20) into the Frame. 1. Do not tighten the...
...Screws (65). Tighten the Adjustment Knob (9) into the Frame. Attach the Left and Right Seat Brackets (52, 53) to the Frame (1) with two M8 x 125mm Bolts (57), four M8 Washers (14), and two M8 Nylon Locknuts (10) as shown. Carefully tip the exercise cycle onto its side. Attach the Seat Frame Bushing to the Seat..., attach one of the Seat Frame (5) into the Frame (1). Attach the other Stabilizer (2) to the Frame with two M10 x 65mm Carriage Bolts (30) and two M10 Nylon 1 30 2 Locknuts (33). 2. Next, firmly press the Seat Frame Bushing (20) into the Frame. 1. Do not tighten the...
English Manual
Page 6
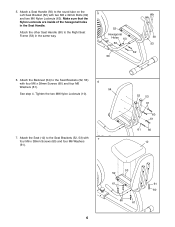
Attach a Seat Handle (50) to the Seat Brackets (52, 53) with two M6 x 32mm Bolts (62) and two M6 Nylon Locknuts (63). Hexagonal Holes 63 50 63 53 62 50 6. Attach the Seat (12) to the round tube on the 5 Left Seat Bracket (52) with 7 four M6 x 38mm Screws (60) and four M6 ...61 6 Tighten the two M8 Nylon Locknuts (10). 7. Make sure that the Nylon Locknuts are inside of the hexagonal holes in the Seat Handle. 52 Attach the other Seat Handle (50) to the Seat Brackets (52, 53) with four M6 x 38mm Screws (60) and four M6 6 Washers (61). 54 See step 4. Attach the ...
Attach a Seat Handle (50) to the Seat Brackets (52, 53) with two M6 x 32mm Bolts (62) and two M6 Nylon Locknuts (63). Hexagonal Holes 63 50 63 53 62 50 6. Attach the Seat (12) to the round tube on the 5 Left Seat Bracket (52) with 7 four M6 x 38mm Screws (60) and four M6 ...61 6 Tighten the two M8 Nylon Locknuts (10). 7. Make sure that the Nylon Locknuts are inside of the hexagonal holes in the Seat Handle. 52 Attach the other Seat Handle (50) to the Seat Brackets (52, 53) with four M6 x 38mm Screws (60) and four M6 6 Washers (61). 54 See step 4. Attach the ...
English Manual
Page 7
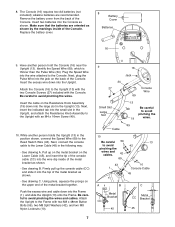
... wire and cable down into the Frame (1), and slide the Upright (13) onto the Frame. Remove the battery cover from the back of the metal bracket together. Replace the battery cover. 8 Battery Cover Batteries 16 9. Next, connect the console cable to the Lower Cable (45) in the position shown, connect the Speed Wire (69) to the Console. Pull up the console cable (CC) and slide it into the wire attached to the Reed Switch Wire (43). Next, plug the Pulse Wire...
... wire and cable down into the Frame (1), and slide the Upright (13) onto the Frame. Remove the battery cover from the back of the metal bracket together. Replace the battery cover. 8 Battery Cover Batteries 16 9. Next, connect the console cable to the Lower Cable (45) in the position shown, connect the Speed Wire (69) to the Console. Pull up the console cable (CC) and slide it into the wire attached to the Reed Switch Wire (43). Next, plug the Pulse Wire...
English Manual
Page 8
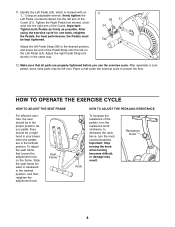
... frame. Resistance Knob 8 Tighten the Right Pedal (not shown) clockwise into the left arm of the Crank. Adjust the left over. Adjust the right Pedal Strap (not shown) in the farthest position. To adjust the seat frame, first loosen the adjustment knob on the Left Pedal (24). Important: Stop turning the knob when turning becomes difficult, or damage may be a slight bend in the proper position. After using the exercise cycle...
... frame. Resistance Knob 8 Tighten the Right Pedal (not shown) clockwise into the left arm of the Crank. Adjust the left over. Adjust the right Pedal Strap (not shown) in the farthest position. To adjust the seat frame, first loosen the adjustment knob on the Left Pedal (24). Important: Stop turning the knob when turning becomes difficult, or damage may be a slight bend in the proper position. After using the exercise cycle...
English Manual
Page 9
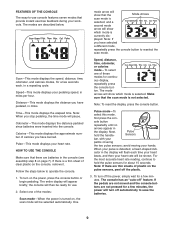
.... 3. Distance-This mode displays the distance you have pedaled, in miles. Odometer-This mode displays the distance pedaled since batteries were inserted into the console. HOW TO USE THE CONSOLE Make sure that provide instant exercise feedback during your workouts. To turn on the console, remove it. Note: To reset the display, press the console button. Pulse Sensors bar, with your heart rate. For the most accurate heart rate reading, continue to hold the handle- If the pedals are not moved and the console buttons...
.... 3. Distance-This mode displays the distance you have pedaled, in miles. Odometer-This mode displays the distance pedaled since batteries were inserted into the console. HOW TO USE THE CONSOLE Make sure that provide instant exercise feedback during your workouts. To turn on the console, remove it. Note: To reset the display, press the console button. Pulse Sensors bar, with your heart rate. For the most accurate heart rate reading, continue to hold the handle- If the pedals are not moved and the console buttons...
English Manual
Page 10
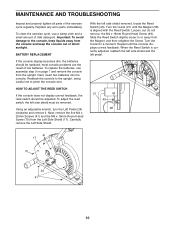
... the Reed Switch slightly closer to pinch the console wire. Turn the Crank for a moment. Using an adjustable wrench, turn the Left Pedal (24) clockwise and remove it. MAINTENANCE AND TROUBLESHOOTING Inspect and properly tighten all parts of low batteries. Carefully remove the Left Side Shield. To clean the exercise cycle, use a damp cloth and a small amount of direct sunlight. Loosen, but do not remove, the M4 x 16mm Round Head Screw (49...
... the Reed Switch slightly closer to pinch the console wire. Turn the Crank for a moment. Using an adjustable wrench, turn the Left Pedal (24) clockwise and remove it. MAINTENANCE AND TROUBLESHOOTING Inspect and properly tighten all parts of low batteries. Carefully remove the Left Side Shield. To clean the exercise cycle, use a damp cloth and a small amount of direct sunlight. Loosen, but do not remove, the M4 x 16mm Round Head Screw (49...
English Manual
Page 11
... any exercise program, consult your body begin to use stored fat calories for longer than 20 minutes.) A cool-down, with your heart rate in your condition, plan three workouts each week, if desired. The pulse sensor is not a medical device. This increases the demand on the heart to pump blood to the muscles, and on the lungs to burn fat, adjust...
... any exercise program, consult your body begin to use stored fat calories for longer than 20 minutes.) A cool-down, with your heart rate in your condition, plan three workouts each week, if desired. The pulse sensor is not a medical device. This increases the demand on the heart to pump blood to the muscles, and on the lungs to burn fat, adjust...
English Manual
Page 12
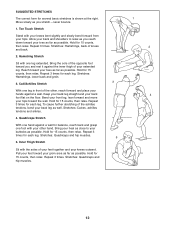
..., then relax. Repeat 3 times for 15 counts, then relax. Hold for each leg. Repeat 3 times. Toe Touch Stretch Stand with your other , reach forward and place your buttocks as possible. Stretches: Hamstrings, lower back and groin. 3 3. Hold for 15 counts, then relax. Bring your heel... SUGGESTED STRETCHES The correct form for each leg. Keep your back leg straight and your toes as far as possible. Quadriceps Stretch With one hand against the inner thigh of knees and back. 2. Hamstring Stretch Sit with the soles of the other hand. Move slowly as possible. Stretches...
..., then relax. Repeat 3 times for 15 counts, then relax. Hold for each leg. Repeat 3 times. Toe Touch Stretch Stand with your other , reach forward and place your buttocks as possible. Stretches: Hamstrings, lower back and groin. 3 3. Hold for 15 counts, then relax. Bring your heel... SUGGESTED STRETCHES The correct form for each leg. Keep your back leg straight and your toes as far as possible. Quadriceps Stretch With one hand against the inner thigh of knees and back. 2. Hamstring Stretch Sit with the soles of the other hand. Move slowly as possible. Stretches...

English Manual
Page 14
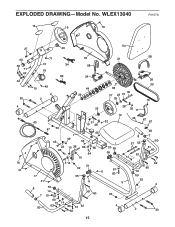
... 1 Upright 14 5 M8 Washer 15 2 Pulse Sensor 16 1 Console 17 1 Left Side Shield 18 1 Right Side Shield 19 1 Resistance Knob Assembly 20 1 Seat Frame Bushing 21 1 Crank/Pulley 22 1 Reed Switch Clamp 23 1 M10 Washer 24 1 Left Pedal 25 2 6000Z Bearing 26 1 Right Pedal 27 2 Console Screw 28 2 U-bracket 29 1 Crank Nut 30 4 M10 x 65mm Carriage Bolt 31 2 Eyebolt 32 3 M6 Nut 33 4 M10 Nylon Locknut 34 1 Pulse Wire 35 1 Belt...
... 1 Upright 14 5 M8 Washer 15 2 Pulse Sensor 16 1 Console 17 1 Left Side Shield 18 1 Right Side Shield 19 1 Resistance Knob Assembly 20 1 Seat Frame Bushing 21 1 Crank/Pulley 22 1 Reed Switch Clamp 23 1 M10 Washer 24 1 Left Pedal 25 2 6000Z Bearing 26 1 Right Pedal 27 2 Console Screw 28 2 U-bracket 29 1 Crank Nut 30 4 M10 x 65mm Carriage Bolt 31 2 Eyebolt 32 3 M6 Nut 33 4 M10 Nylon Locknut 34 1 Pulse Wire 35 1 Belt...
English Manual
Page 15
WLEX13040 15 16 70 R1107A 54 27 40 40 59 71 42 42 30 4 70 41 71 13 19 34 69 10 49 4 2 18 58 24 44 29 58 21 38 39 37 23 31 25 26 35 10 28 25 32 11 45 31 10 28 47 33 9 65 1 49 43 65 22 68 10 36 66 66 64 10 3 14 51 32 17 41 55 6 8 7 50 55 14 10 61 60 10 14 63 60 61 52 62 61 60 12 32 20 55 56 61 6 60 5 33 4 46 67 67 48 8 7 57 55 53 14 50 61 60 63 63 62 6160 61 60 33 4 2 30 15 EXPLODED DRAWING-Model No.
WLEX13040 15 16 70 R1107A 54 27 40 40 59 71 42 42 30 4 70 41 71 13 19 34 69 10 49 4 2 18 58 24 44 29 58 21 38 39 37 23 31 25 26 35 10 28 25 32 11 45 31 10 28 47 33 9 65 1 49 43 65 22 68 10 36 66 66 64 10 3 14 51 32 17 41 55 6 8 7 50 55 14 10 61 60 10 14 63 60 61 52 62 61 60 12 32 20 55 56 61 6 60 5 33 4 46 67 67 48 8 7 57 55 53 14 50 61 60 63 63 62 6160 61 60 33 4 2 30 15 EXPLODED DRAWING-Model No.
English Manual
Page 16
... (WESLO PURSUIT 6.0 DX exercise cycle) • the SERIAL NUMBER of the product (see the front cover of this manual) • the KEY NUMBER and DESCRIPTION of the part(s) (see the PART LIST on how long an implied warranty lasts. ICON's obligation under normal use and service conditions, for which vary from state to state. No other warranties and any and all other warranty beyond that specifically set forth herein. LIMITED WARRANTY ICON Health & Fitness, Inc. (ICON), warrants...
... (WESLO PURSUIT 6.0 DX exercise cycle) • the SERIAL NUMBER of the product (see the front cover of this manual) • the KEY NUMBER and DESCRIPTION of the part(s) (see the PART LIST on how long an implied warranty lasts. ICON's obligation under normal use and service conditions, for which vary from state to state. No other warranties and any and all other warranty beyond that specifically set forth herein. LIMITED WARRANTY ICON Health & Fitness, Inc. (ICON), warrants...


