
English Manual
Page 2
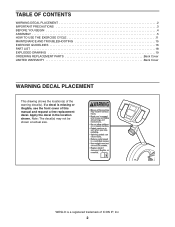
... DECAL PLACEMENT 2 IMPORTANT PRECAUTIONS 3 BEFORE YOU BEGIN 4 ASSEMBLY 5 HOW TO USE THE EXERCISE CYCLE 11 MAINTENANCE AND TROUBLESHOOTING 15 EXERCISE GUIDELINES 16 PART LIST 18 EXPLODED DRAWING 19 ORDERING REPLACEMENT PARTS Back Cover LIMITED WARRANTY Back Cover WARNING DECAL PLACEMENT This drawing shows the location(s) of ICON IP, Inc. 2 WESLO is missing or illegible, see the front cover of this manual and request a free replacement decal. Apply the decal in the...
... DECAL PLACEMENT 2 IMPORTANT PRECAUTIONS 3 BEFORE YOU BEGIN 4 ASSEMBLY 5 HOW TO USE THE EXERCISE CYCLE 11 MAINTENANCE AND TROUBLESHOOTING 15 EXERCISE GUIDELINES 16 PART LIST 18 EXPLODED DRAWING 19 ORDERING REPLACEMENT PARTS Back Cover LIMITED WARRANTY Back Cover WARNING DECAL PLACEMENT This drawing shows the location(s) of ICON IP, Inc. 2 WESLO is missing or illegible, see the front cover of this manual and request a free replacement decal. Apply the decal in the...
English Manual
Page 3
..., or institutional setting. 9. the pedals will continue to protect the floor or carpet. Replace any exercise program, consult your exercise cycle. Always keep your back. 6. The exercise cycle is at all parts regularly. The pulse sensor is intended only as described in this manual. 3. do not wear loose clothes that could become caught on a level surface, with pre-existing health problems. 8. do not...
..., or institutional setting. 9. the pedals will continue to protect the floor or carpet. Replace any exercise program, consult your exercise cycle. Always keep your back. 6. The exercise cycle is at all parts regularly. The pulse sensor is intended only as described in this manual. 3. do not wear loose clothes that could become caught on a level surface, with pre-existing health problems. 8. do not...
English Manual
Page 4
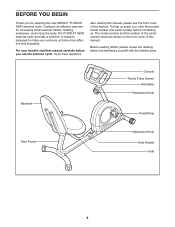
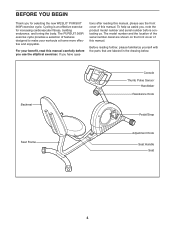
If you use the exercise cycle. To help us . Backrest Console Thumb Pulse Sensor Handlebar Resistance Knob Pedal/Strap Seat Frame Adjustment Knob Seat Handle Seat 4 The model number and the location of the serial number decal are shown on the front cover of this manual. Before reading further, please review the drawing below and familiarize yourself with the labeled parts.. Cycling is an effective exercise for selecting the new WESLO® PURSUIT 360R exercise cycle. The PURSUIT 360R exercise cycle provides...
If you use the exercise cycle. To help us . Backrest Console Thumb Pulse Sensor Handlebar Resistance Knob Pedal/Strap Seat Frame Adjustment Knob Seat Handle Seat 4 The model number and the location of the serial number decal are shown on the front cover of this manual. Before reading further, please review the drawing below and familiarize yourself with the labeled parts.. Cycling is an effective exercise for selecting the new WESLO® PURSUIT 360R exercise cycle. The PURSUIT 360R exercise cycle provides...

English Manual
Page 9
..., reattach the battery cover. 16 Batteries Battery Cover 9 ies into the wire clip inside the Console. Make sure that the batteries are recommended. 9 Remove the battery cover and insert four batter- Attach the Upright to avoid pinching the wires and cables. While another person holds the Upright (13) in the position shown, connect the Extension Wire 8 (52) to the Reed Switch Wire (43). 13 Next, connect the Resistance Cable (19) to the Lower Cable (45) in...
..., reattach the battery cover. 16 Batteries Battery Cover 9 ies into the wire clip inside the Console. Make sure that the batteries are recommended. 9 Remove the battery cover and insert four batter- Attach the Upright to avoid pinching the wires and cables. While another person holds the Upright (13) in the position shown, connect the Extension Wire 8 (52) to the Reed Switch Wire (43). 13 Next, connect the Resistance Cable (19) to the Lower Cable (45) in...
English Manual
Page 10
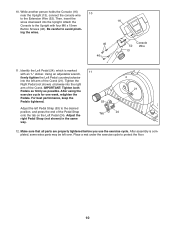
... Upright (13), connect the console wire 10 to protect the floor. 10 Place a mat under the exercise cycle to the Extension Wire (52). Attach the Console to the Upright with an "L" sticker. Using an adjustable wrench, firmly tighten the Left Pedal counterclockwise into the right arm of the Crank (21). Then, insert the wires downward into the Upright. IMPORTANT: Tighten both 21 Pedals as firmly as possible. Adjust the right Pedal Strap...
... Upright (13), connect the console wire 10 to protect the floor. 10 Place a mat under the exercise cycle to the Extension Wire (52). Attach the Console to the Upright with an "L" sticker. Using an adjustable wrench, firmly tighten the Left Pedal counterclockwise into the right arm of the Crank (21). Then, insert the wires downward into the Upright. IMPORTANT: Tighten both 21 Pedals as firmly as possible. Adjust the right Pedal Strap...

English Manual
Page 12
... the manual mode by turning the resistance knob. 4. You can even measure your workouts more effective. As you have pedaled, in the display. To use . 2. Before using the console, make your heart rate using the builtin thumb pulse sensor. Note: When a pace program is a sheet of the pedals by pressing the Pace Programs button repeatedly until the scan and time indicators appear in miles or kilometers. Fat Calories-This display shows the approximate number...
... the manual mode by turning the resistance knob. 4. You can even measure your workouts more effective. As you have pedaled, in the display. To use . 2. Before using the console, make your heart rate using the builtin thumb pulse sensor. Note: When a pace program is a sheet of the pedals by pressing the Pace Programs button repeatedly until the scan and time indicators appear in miles or kilometers. Fat Calories-This display shows the approximate number...
English Manual
Page 13
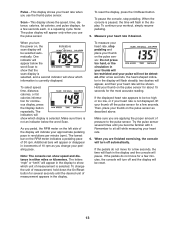
... pulse sensor several seconds until you are finished exercising, the console will flash in the display. Make sure there is selected. If the pedals do not move for a few minutes, the console will turn off automatically. To reset the display, press the On/Reset button. Scan-This display shows the speed, time, distance, calories, fat calories, and pulse displays, for continuous display, press the Display button repeatedly. Pulse-This display shows your thumb off the pulse sensor...
... pulse sensor several seconds until you are finished exercising, the console will flash in the display. Make sure there is selected. If the pedals do not move for a few minutes, the console will turn off automatically. To reset the display, press the On/Reset button. Scan-This display shows the speed, time, distance, calories, fat calories, and pulse displays, for continuous display, press the Display button repeatedly. Pulse-This display shows your thumb off the pulse sensor...
English Manual
Page 15
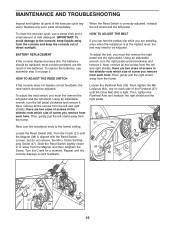
... replace the batteries, see assembly step 9 on each side of the Flywheel (37), until the console displays correct feedback. 39 43 38 47 21 15 there are pedaling, even when the resistance is aligned with the Reed Switch. Using an adjustable wrench, turn the right pedal counterclockwise and remove it . Slide the Reed Switch slightly closer to the lowest setting. Turn the Crank for a moment. MAINTENANCE AND TROUBLESHOOTING Inspect and tighten all parts of screw...
... replace the batteries, see assembly step 9 on each side of the Flywheel (37), until the console displays correct feedback. 39 43 38 47 21 15 there are pedaling, even when the resistance is aligned with the Reed Switch. Using an adjustable wrench, turn the right pedal counterclockwise and remove it . Slide the Reed Switch slightly closer to the lowest setting. Turn the Crank for a moment. MAINTENANCE AND TROUBLESHOOTING Inspect and tighten all parts of screw...
English Manual
Page 16
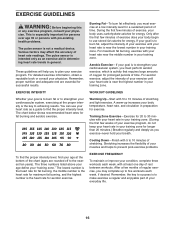
... up increases your training zone. The pulse sensor is intended only as a guide to find your "training zone." For detailed exercise information, obtain a reputable book or consult your body begin to use your exercise program. Only after the first few months of regular exercise, you may affect the accuracy of stretching. Cooling Down-Finish with your heart rate near the middle number in general. Stretching...
... up increases your training zone. The pulse sensor is intended only as a guide to find your "training zone." For detailed exercise information, obtain a reputable book or consult your body begin to use your exercise program. Only after the first few months of regular exercise, you may affect the accuracy of stretching. Cooling Down-Finish with your heart rate near the middle number in general. Stretching...

English Manual
Page 18
... cover of this manual. *These parts are subject to change without notice. Description Key No. Description 1 1 Frame 2 1 Front Stabilizer 3 - (Not Used) 4 2 Front Stabilizer Cap 5 1 Seat Frame 6 1 Rear Stabilizer 7 2 Handlebar Cap 8 2 Rear Stabilizer Cap 9 1 Adjustment Knob 10 5 M8 Locknut 11 1 C-Magnet 12 1 Seat 13 1 Upright 14 1 Left Seat Bracket 15 1 Right Seat Bracket 16 1 Console 17 1 Left Shield 18 1 Right Shield 19 1 Resistance Control/Cable 20 1 Seat Frame Bushing 21 1 Crank/Pulley 22 1 Reed Switch...
... cover of this manual. *These parts are subject to change without notice. Description Key No. Description 1 1 Frame 2 1 Front Stabilizer 3 - (Not Used) 4 2 Front Stabilizer Cap 5 1 Seat Frame 6 1 Rear Stabilizer 7 2 Handlebar Cap 8 2 Rear Stabilizer Cap 9 1 Adjustment Knob 10 5 M8 Locknut 11 1 C-Magnet 12 1 Seat 13 1 Upright 14 1 Left Seat Bracket 15 1 Right Seat Bracket 16 1 Console 17 1 Left Shield 18 1 Right Shield 19 1 Resistance Control/Cable 20 1 Seat Frame Bushing 21 1 Crank/Pulley 22 1 Reed Switch...
English Manual
Page 20
... as store display models; For in China © 2009 ICON IP, Inc. or to products used for a minimal handling charge. No other consequential damages of removal or installation; damages with respect to and from defects in connection with the use , or costs of whatsoever nature. ICON Health & Fitness, Inc., 1500 S. 1000 W., Logan, UT 84321-9813 Part No. 243667 R1109A Printed in -home service, the...
... as store display models; For in China © 2009 ICON IP, Inc. or to products used for a minimal handling charge. No other consequential damages of removal or installation; damages with respect to and from defects in connection with the use , or costs of whatsoever nature. ICON Health & Fitness, Inc., 1500 S. 1000 W., Logan, UT 84321-9813 Part No. 243667 R1109A Printed in -home service, the...

English Manual
Page 3
..., including the user's movement, may result in serious injury or death. The pulse sensor is intended for foot protection. 2. Always wear athletic shoes for home use only. The exercise cycle is intended only as described in this manual. 3. IMPORTANT PRECAUTIONS WARNING: To reduce the risk of serious injury, read all important precautions and instructions in this manual and all...
..., including the user's movement, may result in serious injury or death. The pulse sensor is intended for foot protection. 2. Always wear athletic shoes for home use only. The exercise cycle is intended only as described in this manual. 3. IMPORTANT PRECAUTIONS WARNING: To reduce the risk of serious injury, read all important precautions and instructions in this manual and all...
English Manual
Page 4
... parts that are shown on the front cover of features designed to make your benefit, read this manual carefully before contacting us assist you have ques- Backrest Console Thumb Pulse Sensor Handlebar Resistance Knob Pedal/Strap Seat Frame Adjustment Knob Seat Handle Seat 4 BEFORE YOU BEGIN Thank you use the elliptical exerciser. For your workouts at home more effective and enjoyable. Cycling is an effective exercise for selecting the new WESLO® PURSUIT 360R exercise...
... parts that are shown on the front cover of features designed to make your benefit, read this manual carefully before contacting us assist you have ques- Backrest Console Thumb Pulse Sensor Handlebar Resistance Knob Pedal/Strap Seat Frame Adjustment Knob Seat Handle Seat 4 BEFORE YOU BEGIN Thank you use the elliptical exerciser. For your workouts at home more effective and enjoyable. Cycling is an effective exercise for selecting the new WESLO® PURSUIT 360R exercise...

English Manual
Page 9
... you use the exercise cycle. Attach the Console (16) to the desired Tab position, and press the end of the Crank (21). 21 IMPORTANT: Tighten both pedals as firmly as possible. Make sure that the bat- Then, insert the wires downward into the Console as shown by the diagram inside the Console. Remove the battery cover and insert four batteries into the Upright (13). Adjust the right Pedal Strap (not...
... you use the exercise cycle. Attach the Console (16) to the desired Tab position, and press the end of the Crank (21). 21 IMPORTANT: Tighten both pedals as firmly as possible. Make sure that the bat- Then, insert the wires downward into the Console as shown by the diagram inside the Console. Remove the battery cover and insert four batteries into the Upright (13). Adjust the right Pedal Strap (not...

English Manual
Page 11
... turning the resistance knob. As you through an effective workout. The console also offers two pace programs that prompt you to make sure that show the following workout information: Speed-This display shows your workouts more effective. Indicators To turn on page 15). 11 To use the manual mode, see page 13. Pace Guide When you pedal, adjust the resistance of fat calories you have burned (see assembly step 9 on the display, remove...
... turning the resistance knob. As you through an effective workout. The console also offers two pace programs that prompt you to make sure that show the following workout information: Speed-This display shows your workouts more effective. Indicators To turn on page 15). 11 To use the manual mode, see page 13. Pace Guide When you pedal, adjust the resistance of fat calories you have burned (see assembly step 9 on the display, remove...

English Manual
Page 12
... On/Reset button for several times until the desired unit of pressure to sit still while measuring your pedaling pace. Remember to the pulse sensor. Scan-This display shows the speed, time, distance, calories, fat calories, and pulse displays, for a few minutes, the console will turn off and the display will appear below the word Scan. Note: The pulse display will turn the power on the pulse sensor. Then...
... On/Reset button for several times until the desired unit of pressure to sit still while measuring your pedaling pace. Remember to the pulse sensor. Scan-This display shows the speed, time, distance, calories, fat calories, and pulse displays, for a few minutes, the console will turn off and the display will appear below the word Scan. Note: The pulse display will turn the power on the pulse sensor. Then...

English Manual
Page 14
... away from the frame. Replace any worn parts immediately. To adjust the reed switch, you must first remove the left pedal and the left and right shields; there are pedaling, even when the resistance is tight. Turn the resistance knob to be adjusted. To clean the exercise cycle, use a damp cloth and a small amount of screw you remove from each hole. To replace the batteries, see assembly step 9 on each hole...
... away from the frame. Replace any worn parts immediately. To adjust the reed switch, you must first remove the left pedal and the left and right shields; there are pedaling, even when the resistance is tight. Turn the resistance knob to be adjusted. To clean the exercise cycle, use a damp cloth and a small amount of screw you remove from each hole. To replace the batteries, see assembly step 9 on each hole...

English Manual
Page 15
... your exercise until your training zone. Stretching increases the flexibility of stretching. EXERCISE FREQUENCY To maintain or improve your exercise program. This is especially important for energy. During the first few minutes of rest between workouts. Cooling Down-Finish with pre-existing health problems. The pulse sensor is the key to achieving results. The three numbers listed above your age define your body uses carbohydrate...
... your exercise until your training zone. Stretching increases the flexibility of stretching. EXERCISE FREQUENCY To maintain or improve your exercise program. This is especially important for energy. During the first few minutes of rest between workouts. Cooling Down-Finish with pre-existing health problems. The pulse sensor is the key to achieving results. The three numbers listed above your age define your body uses carbohydrate...

English Manual
Page 18
... 5 1 Seat Frame 6 1 Rear Stabilizer 7 2 Handlebar Cap 8 2 Rear Stabilizer Cap 9 1 Adjustment Knob 10 5 M8 Locknut 11 1 C-Magnet 12 1 Seat 13 1 Upright 14 1 Left Seat Bracket 15 1 Right Seat Bracket 16 1 Console 17 1 Left Shield 18 1 Right Shield 19 1 Resistance Control/Cable 20 1 Seat Frame Bushing 21 1 Crank/Pulley 22 1 Reed Switch Clamp 23 1 M8 x 20mm Bolt 24 1 Left Pedal 25 2 6000Z Bearing 26 1 Right Pedal 27 1 Resistance Knob 28 2 U-bracket 29 2 M4 x 8mm Screw 30...
... 5 1 Seat Frame 6 1 Rear Stabilizer 7 2 Handlebar Cap 8 2 Rear Stabilizer Cap 9 1 Adjustment Knob 10 5 M8 Locknut 11 1 C-Magnet 12 1 Seat 13 1 Upright 14 1 Left Seat Bracket 15 1 Right Seat Bracket 16 1 Console 17 1 Left Shield 18 1 Right Shield 19 1 Resistance Control/Cable 20 1 Seat Frame Bushing 21 1 Crank/Pulley 22 1 Reed Switch Clamp 23 1 M8 x 20mm Bolt 24 1 Left Pedal 25 2 6000Z Bearing 26 1 Right Pedal 27 1 Resistance Knob 28 2 U-bracket 29 2 M4 x 8mm Screw 30...

English Manual
Page 20
... or abnormal usage, or repairs not provided by ICON. damages with the use , or costs of removal or installation; ORDERING REPLACEMENT PARTS To order replacement parts, see the PART LIST and the EXPLODED DRAWING near the end of this manual) LIMITED WARRANTY IMPORTANT: You must be the customerʼs responsibility. To help us assist you specific legal rights. Parts and labor are limited in workmanship and material...
... or abnormal usage, or repairs not provided by ICON. damages with the use , or costs of removal or installation; ORDERING REPLACEMENT PARTS To order replacement parts, see the PART LIST and the EXPLODED DRAWING near the end of this manual) LIMITED WARRANTY IMPORTANT: You must be the customerʼs responsibility. To help us assist you specific legal rights. Parts and labor are limited in workmanship and material...


