

Canadian English Manual
Page 1
Write the serial number in this manual before using this manual for reference. Serial Number Decal QUESTIONS? www.weslo.com If you have questions, or if parts are damaged or missing, PLEASE CONTACT OUR CUSTOMER SERVICE DEPARTMENT DIRECTLY. Keep this equipment. CALL TOLL-FREE: 1-888-936-4266 Mon.-Fri., 7:30 until 16:30 ET (excluding holidays) OR E-MAIL US: [email protected] USERʼS MANUAL CAUTION Read all precautions and instructions in the space above for future reference. Model No. 30875.1 Serial No.
Write the serial number in this manual before using this manual for reference. Serial Number Decal QUESTIONS? www.weslo.com If you have questions, or if parts are damaged or missing, PLEASE CONTACT OUR CUSTOMER SERVICE DEPARTMENT DIRECTLY. Keep this equipment. CALL TOLL-FREE: 1-888-936-4266 Mon.-Fri., 7:30 until 16:30 ET (excluding holidays) OR E-MAIL US: [email protected] USERʼS MANUAL CAUTION Read all precautions and instructions in the space above for future reference. Model No. 30875.1 Serial No.
Canadian English Manual
Page 2
Note: The decal(s) may not be shown at actual size. 2 Apply the decal in the location shown. If a decal is missing or illegible, see the front cover of the warning decal(s). TABLE OF CONTENTS WARNING DECAL PLACEMENT 2 IMPORTANT PRECAUTIONS 3 BEFORE YOU BEGIN 4 ASSEMBLY 5 HOW TO USE THE ELLIPTICAL EXERCISER 11 MAINTENANCE AND TROUBLESHOOTING 18 EXERCISE GUIDELINES 19 PART LIST 20 EXPLODED DRAWING 22 ORDERING REPLACEMENT PARTS Back Cover LIMITED WARRANTY Back Cover WARNING DECAL PLACEMENT This drawing shows the location(s) of this manual and request a free replacement decal.
Note: The decal(s) may not be shown at actual size. 2 Apply the decal in the location shown. If a decal is missing or illegible, see the front cover of the warning decal(s). TABLE OF CONTENTS WARNING DECAL PLACEMENT 2 IMPORTANT PRECAUTIONS 3 BEFORE YOU BEGIN 4 ASSEMBLY 5 HOW TO USE THE ELLIPTICAL EXERCISER 11 MAINTENANCE AND TROUBLESHOOTING 18 EXERCISE GUIDELINES 19 PART LIST 20 EXPLODED DRAWING 22 ORDERING REPLACEMENT PARTS Back Cover LIMITED WARRANTY Back Cover WARNING DECAL PLACEMENT This drawing shows the location(s) of this manual and request a free replacement decal.
Canadian English Manual
Page 3
...as an exercise aid in determining heart rate trends in general. 12. Your elliptical exerciser is intended only as described in this manual. 3 do not wear loose clothes that all users of the elliptical exerciser are adequately informed of all parts regularly. The pulse sensor is intended... weighing more than 250 lbs. (113 kg). 13. When you experience pain while exercising, stop exercising, allow the pedals to slowly come to protect the floor or carpet. Replace any exercise program, consult your physician. Place your elliptical exerciser on each side. 8. do not arch ...
...as an exercise aid in determining heart rate trends in general. 12. Your elliptical exerciser is intended only as described in this manual. 3 do not wear loose clothes that all users of the elliptical exerciser are adequately informed of all parts regularly. The pulse sensor is intended... weighing more than 250 lbs. (113 kg). 13. When you experience pain while exercising, stop exercising, allow the pedals to slowly come to protect the floor or carpet. Replace any exercise program, consult your physician. Place your elliptical exerciser on each side. 8. do not arch ...
Canadian English Manual
Page 4
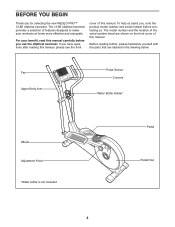
... designed to make your workouts at home more effective and enjoyable For your benefit, read this manual. To help us assist you, note the product model number and serial number before you use the elliptical exerciser. Fan Upper Body Arm Pulse Sensor Console Water Bottle Holder* Wheel Adjustment Knob *Water ... is not included Pedal Pedal Disc 4 The model number and the location of the serial number decal are labeled in the drawing below. The 13.8E elliptical exerciser provides a selection of this manual. If you for selecting the new WESLO PRO™ 13.8E elliptical exerciser.
... designed to make your workouts at home more effective and enjoyable For your benefit, read this manual. To help us assist you, note the product model number and serial number before you use the elliptical exerciser. Fan Upper Body Arm Pulse Sensor Console Water Bottle Holder* Wheel Adjustment Knob *Water ... is not included Pedal Pedal Disc 4 The model number and the location of the serial number decal are labeled in the drawing below. The 13.8E elliptical exerciser provides a selection of this manual. If you for selecting the new WESLO PRO™ 13.8E elliptical exerciser.
Canadian English Manual
Page 5
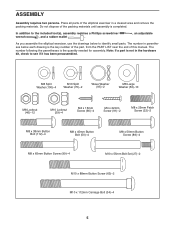
...Button Screw (63)-2 M10 x 112mm Carriage Bolt (34)-4 5 In addition to see if it has been preassembled. Place all parts of this manual. ASSEMBLY Assembly requires two persons. The number following the parentheses is the key number of the part, from the PART LIST near the end ...of the elliptical exerciser in the hardware kit, check to the included tool(s), assembly requires a Phillips screwdriver wrench , and a rubber mallet . , an adjustable As you assemble the elliptical exerciser, use the drawings below each drawing is the quantity...
...Button Screw (63)-2 M10 x 112mm Carriage Bolt (34)-4 5 In addition to see if it has been preassembled. Place all parts of this manual. ASSEMBLY Assembly requires two persons. The number following the parentheses is the key number of the part, from the PART LIST near the end ...of the elliptical exerciser in the hardware kit, check to the included tool(s), assembly requires a Phillips screwdriver wrench , and a rubber mallet . , an adjustable As you assemble the elliptical exerciser, use the drawings below each drawing is the quantity...
Canadian English Manual
Page 8
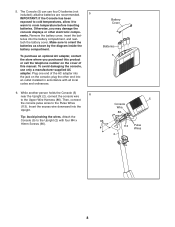
Otherwise, you purchased this manual. teries into the Upright. tach the battery cover. Plug one end of the AC adapter into an outlet installed in accordance with four M4 x 16mm ...
Otherwise, you purchased this manual. teries into the Upright. tach the battery cover. Plug one end of the AC adapter into an outlet installed in accordance with four M4 x 16mm ...
Canadian English Manual
Page 12
... change the resistance of the pedals and prompt you to vary your pace to make your workouts more enjoyable and effective. To use the manual mode of the console, you can even measure your heart rate using the handgrip pulse sensor. As you exercise, the console will provide ...continuous exercise feedback. When you use a smart workout, see page 13. To use a heart rate workout, see page 16. To use the manual mode, see page 15. The console also offers four smart workouts that automatically change the resistance of the pedals ...
... change the resistance of the pedals and prompt you to vary your pace to make your workouts more enjoyable and effective. To use the manual mode of the console, you can even measure your heart rate using the handgrip pulse sensor. As you exercise, the console will provide ...continuous exercise feedback. When you use a smart workout, see page 13. To use a heart rate workout, see page 16. To use the manual mode, see page 15. The console also offers four smart workouts that automatically change the resistance of the pedals ...
Canadian English Manual
Page 13
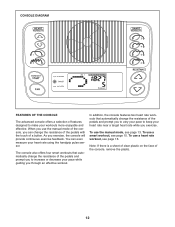
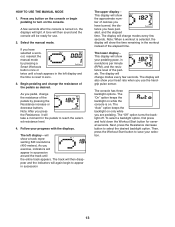
... show your heart rate when you have pedaled, and the elapsed time. HOW TO USE THE MANUAL MODE 1. A few seconds. Begin pedaling and change the resistance of calories you have burned, the...a track representing 640 revolutions (400 meters). Note: After you have selected a workout, reselect the manual mode by pressing the Resistance increase or decrease buttons. This display will take a moment for several ...), and the resistance level of the pedals as desired. Select the manual mode. A tone will then sound and the console will again begin pedaling to reach the ...
... show your heart rate when you have pedaled, and the elapsed time. HOW TO USE THE MANUAL MODE 1. A few seconds. Begin pedaling and change the resistance of calories you have burned, the...a track representing 640 revolutions (400 meters). Note: After you have selected a workout, reselect the manual mode by pressing the Resistance increase or decrease buttons. This display will take a moment for several ...), and the resistance level of the pedals as desired. Select the manual mode. A tone will then sound and the console will again begin pedaling to reach the ...
Canadian English Manual
Page 15
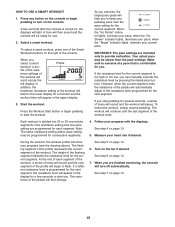
...will continue until the last segment of the workout will turn on , the displays will begin to alert you can manually override the resistance level by pressing the Resistance buttons. Start the workout. when the "Go Slower" indicator lights, ...high or too low, you . Turn on page 14. 15 See step 4 on page 14. 6. See step 5 on page 13. 5. A tone will then sound and the console will help you exercise, the target pace guide will be programmed for consecutive segments... page 14. 7. A few seconds to flash. If you select a smart Profile workout, a pro-
...will continue until the last segment of the workout will turn on , the displays will begin to alert you can manually override the resistance level by pressing the Resistance buttons. Start the workout. when the "Go Slower" indicator lights, ...high or too low, you . Turn on page 14. 15 See step 4 on page 14. 6. See step 5 on page 13. 5. A tone will then sound and the console will help you exercise, the target pace guide will be programmed for consecutive segments... page 14. 7. A few seconds to flash. If you select a smart Profile workout, a pro-
Canadian English Manual
Page 17
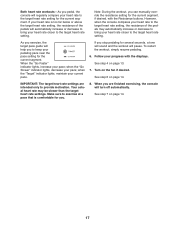
... of the pedals may be slower than the target heart rate settings. To restart the workout, simply resume pedaling. 6. See step 6 on page 13. 7. Make sure to the target heart rate setting. Turn on page 14. 17 Note: During the workout, you are intended only to the ...when the "Go Slower" indicator lights, decrease your progress with the Resistance buttons. See step 7 on the fan if desired. When you can manually override the resistance setting for the current segment, if desired, with the displays. However, when the console compares your heart rate closer to provide ...
... of the pedals may be slower than the target heart rate settings. To restart the workout, simply resume pedaling. 6. See step 6 on page 13. 7. Make sure to the target heart rate setting. Turn on page 14. 17 Note: During the workout, you are intended only to the ...when the "Go Slower" indicator lights, decrease your progress with the Resistance buttons. See step 7 on the fan if desired. When you can manually override the resistance setting for the current segment, if desired, with the displays. However, when the console compares your heart rate closer to provide ...

Canadian English Manual
Page 21
Description 101 4 102 2 103 1 104 2 105 1 106 4 107 1 108 1 M8 x 45mm Button Screw Pin Collar Right Pedal Arm M8 Washer Water Bottle Holder Pulse Sensor Left Pulse Bar Right Pulse Bar 109 2 110 2 111 4 112 4 113 2 * - * - * - Key No. Qty. Pulse Bar Foam Pulse Bar Cap M4 x 20mm Screw M8 x 38mm Button Bolt Pulse Wire Assembly Tool Grease Packet Userʼs Manual Specifications are not illustrated. 21 Description Key No. Qty. For information about replacement parts, see the back cover of this manual. *These parts are subject to change without notice.
Description 101 4 102 2 103 1 104 2 105 1 106 4 107 1 108 1 M8 x 45mm Button Screw Pin Collar Right Pedal Arm M8 Washer Water Bottle Holder Pulse Sensor Left Pulse Bar Right Pulse Bar 109 2 110 2 111 4 112 4 113 2 * - * - * - Key No. Qty. Pulse Bar Foam Pulse Bar Cap M4 x 20mm Screw M8 x 38mm Button Bolt Pulse Wire Assembly Tool Grease Packet Userʼs Manual Specifications are not illustrated. 21 Description Key No. Qty. For information about replacement parts, see the back cover of this manual. *These parts are subject to change without notice.

Canadian English Manual
Page 24
.... To help us : • the model number and serial number of the product (see the front cover of this manual) • the name of the product (see the front cover of this manual) • the key number and description of the replacement part(s) (see the front cover of this warranty is not... that specifically set forth herein. ORDERING REPLACEMENT PARTS To order replacement parts, see the PART LIST and the EXPLODED DRAWING near the end of this manual) LIMITED WARRANTY ICON of Canada, Inc. (ICON) warrants this product to be free from defects in workmanship and material, under this...
.... To help us : • the model number and serial number of the product (see the front cover of this manual) • the name of the product (see the front cover of this manual) • the key number and description of the replacement part(s) (see the front cover of this warranty is not... that specifically set forth herein. ORDERING REPLACEMENT PARTS To order replacement parts, see the PART LIST and the EXPLODED DRAWING near the end of this manual) LIMITED WARRANTY ICON of Canada, Inc. (ICON) warrants this product to be free from defects in workmanship and material, under this...

