

Canadian English Manual
Page 1
Write the serial number in this manual before using this manual for reference. CALL TOLL-FREE: 1-888-936-4266 Mon.-Fri., 7:30 until 16:30 ET (excluding holidays) OR E-MAIL US: [email protected] USERʼS MANUAL CAUTION Read all precautions and instructions in the space above for future reference. www.weslo.com Serial Number Decal QUESTIONS? If you have questions, or if parts are damaged or missing, PLEASE CONTACT OUR CUSTOMER SERVICE DEPARTMENT DIRECTLY. Keep this equipment. Model No. 30875.1 Serial No.
Write the serial number in this manual before using this manual for reference. CALL TOLL-FREE: 1-888-936-4266 Mon.-Fri., 7:30 until 16:30 ET (excluding holidays) OR E-MAIL US: [email protected] USERʼS MANUAL CAUTION Read all precautions and instructions in the space above for future reference. www.weslo.com Serial Number Decal QUESTIONS? If you have questions, or if parts are damaged or missing, PLEASE CONTACT OUR CUSTOMER SERVICE DEPARTMENT DIRECTLY. Keep this equipment. Model No. 30875.1 Serial No.
Canadian English Manual
Page 2
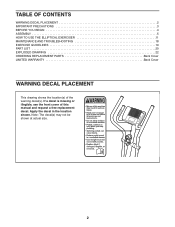
Note: The decal(s) may not be shown at actual size. 2 If a decal is missing or illegible, see the front cover of the warning decal(s). TABLE OF CONTENTS WARNING DECAL PLACEMENT 2 IMPORTANT PRECAUTIONS 3 BEFORE YOU BEGIN 4 ASSEMBLY 5 HOW TO USE THE ELLIPTICAL EXERCISER 11 MAINTENANCE AND TROUBLESHOOTING 18 EXERCISE GUIDELINES 19 PART LIST 20 EXPLODED DRAWING 22 ORDERING REPLACEMENT PARTS Back Cover LIMITED WARRANTY Back Cover WARNING DECAL PLACEMENT This drawing shows the location(s) of this manual and request a free replacement decal. Apply the decal in the location shown.
Note: The decal(s) may not be shown at actual size. 2 If a decal is missing or illegible, see the front cover of the warning decal(s). TABLE OF CONTENTS WARNING DECAL PLACEMENT 2 IMPORTANT PRECAUTIONS 3 BEFORE YOU BEGIN 4 ASSEMBLY 5 HOW TO USE THE ELLIPTICAL EXERCISER 11 MAINTENANCE AND TROUBLESHOOTING 18 EXERCISE GUIDELINES 19 PART LIST 20 EXPLODED DRAWING 22 ORDERING REPLACEMENT PARTS Back Cover LIMITED WARRANTY Back Cover WARNING DECAL PLACEMENT This drawing shows the location(s) of this manual and request a free replacement decal. Apply the decal in the location shown.
Canadian English Manual
Page 3
... protection. 9. Do not use your elliptical exerciser only as an exercise aid in determining heart rate trends in this manual. 3 Replace any exercise program, consult your elliptical exerciser on each side. 8. Place your physician. Various factors, including the userʼs movement, may result in the front and rear of clearance in serious injury or death. The pulse sensor is the responsibility of the owner to protect the...
... protection. 9. Do not use your elliptical exerciser only as an exercise aid in determining heart rate trends in this manual. 3 Replace any exercise program, consult your elliptical exerciser on each side. 8. Place your physician. Various factors, including the userʼs movement, may result in the front and rear of clearance in serious injury or death. The pulse sensor is the responsibility of the owner to protect the...
Canadian English Manual
Page 4
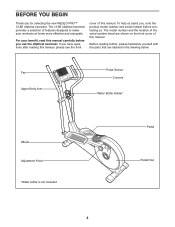
... the front cover of features designed to make your workouts at home more effective and enjoyable For your benefit, read this manual. If you for selecting the new WESLO PRO™ 13.8E elliptical exerciser. The 13.8E elliptical exerciser provides a selection of this manual. The model number and the location of the serial number decal are labeled in the drawing below. Fan Upper Body Arm Pulse Sensor Console Water Bottle Holder* Wheel Adjustment Knob *Water bottle...
... the front cover of features designed to make your workouts at home more effective and enjoyable For your benefit, read this manual. If you for selecting the new WESLO PRO™ 13.8E elliptical exerciser. The 13.8E elliptical exerciser provides a selection of this manual. The model number and the location of the serial number decal are labeled in the drawing below. Fan Upper Body Arm Pulse Sensor Console Water Bottle Holder* Wheel Adjustment Knob *Water bottle...
Canadian English Manual
Page 5
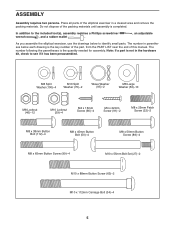
... Button Bolt (50)-4 M8 x 50mm Button Screw (89)-4 M8 x 65mm Button Screw (99)-4 M10 x 55mm Bolt Set (27)-2 M10 x 88mm Button Screw (63)-2 M10 x 112mm Carriage Bolt (34)-4 5 ASSEMBLY Assembly requires two persons. Do not dispose of the elliptical exerciser in the hardware kit, check to identify small parts. In addition to the included tool(s), assembly requires a Phillips screwdriver wrench , and a rubber mallet . , an adjustable As you assemble the elliptical exerciser, use...
... Button Bolt (50)-4 M8 x 50mm Button Screw (89)-4 M8 x 65mm Button Screw (99)-4 M10 x 55mm Bolt Set (27)-2 M10 x 88mm Button Screw (63)-2 M10 x 112mm Carriage Bolt (34)-4 5 ASSEMBLY Assembly requires two persons. Do not dispose of the elliptical exerciser in the hardware kit, check to identify small parts. In addition to the included tool(s), assembly requires a Phillips screwdriver wrench , and a rubber mallet . , an adjustable As you assemble the elliptical exerciser, use...

Canadian English Manual
Page 7
... pinching the wires. Insert the M10 x 88mm Button Screws (63) into the Frame (1). Tie the lower end of the Upright. Attach the Left Pulse Bar with two M4 x 22mm Screws (91). 3 Avoid pinching the Wire Harnesses (86, 87) 2 105 91 70 83 63 70 83 86 87 1 4. Attach the Water Bottle Holder (105) to the Upright (2) with two M8 x 38mm Button Bolts (112) and...
... pinching the wires. Insert the M10 x 88mm Button Screws (63) into the Frame (1). Tie the lower end of the Upright. Attach the Left Pulse Bar with two M4 x 22mm Screws (91). 3 Avoid pinching the Wire Harnesses (86, 87) 2 105 91 70 83 63 70 83 86 87 1 4. Attach the Water Bottle Holder (105) to the Upright (2) with two M8 x 38mm Button Bolts (112) and...
Canadian English Manual
Page 8
... the battery cover. Tip: Avoid pinching the wires. While another person holds the Console (5) 6 near the Upright (2), connect the console wire to the Upright (2) with all local codes and ordinances. 6. Battery Cover Batteries 5 5 Console Wire 86 66 113 Pulse Wires 2 8 The Console (5) can use only a manufacturer-supplied AC adapter. Plug one end of this manual. plug the other electronic compo- To purchase an optional AC adapter, contact the store where you may damage the console displays...
... the battery cover. Tip: Avoid pinching the wires. While another person holds the Console (5) 6 near the Upright (2), connect the console wire to the Upright (2) with all local codes and ordinances. 6. Battery Cover Batteries 5 5 Console Wire 86 66 113 Pulse Wires 2 8 The Console (5) can use only a manufacturer-supplied AC adapter. Plug one end of this manual. plug the other electronic compo- To purchase an optional AC adapter, contact the store where you may damage the console displays...

Canadian English Manual
Page 10
... x 45mm Button Bolts (50) in the left Upper Body Leg (79). 79 Attach the left Upper Body Leg (79) to the Right Pedal Arm (103) in the same way. Grease See step 3. Identify the Left Pedal (13), which is completed. Make sure that all parts are properly tightened. To protect the floor or carpet from damage, place a mat under the elliptical exerciser. 10 See step 7. Attach the other Pedal Bracket...
... x 45mm Button Bolts (50) in the left Upper Body Leg (79). 79 Attach the left Upper Body Leg (79) to the Right Pedal Arm (103) in the same way. Grease See step 3. Identify the Left Pedal (13), which is completed. Make sure that all parts are properly tightened. To protect the floor or carpet from damage, place a mat under the elliptical exerciser. 10 See step 7. Attach the other Pedal Bracket...
Canadian English Manual
Page 11
... to move until the flywheel stops. HOW TO USE THE ELLIPTICAL EXERCISER HOW TO EXERCISE ON THE ELLIPTICAL EXERCISER To mount the elliptical exerciser, hold the handgrip pulse sensor as you exercise. Upper Body Arms To exercise only your lower body, hold the handgrip pulse sensor and step onto the pedal that is engaged in one of the holes in the crank arm, and gently release the knob. Adjustment Pin Adjustment Bracket Pedal Disc Crank Arm Adjustment Knob Holes To dismount the elliptical exerciser, wait...
... to move until the flywheel stops. HOW TO USE THE ELLIPTICAL EXERCISER HOW TO EXERCISE ON THE ELLIPTICAL EXERCISER To mount the elliptical exerciser, hold the handgrip pulse sensor as you exercise. Upper Body Arms To exercise only your lower body, hold the handgrip pulse sensor and step onto the pedal that is engaged in one of the holes in the crank arm, and gently release the knob. Adjustment Pin Adjustment Bracket Pedal Disc Crank Arm Adjustment Knob Holes To dismount the elliptical exerciser, wait...
Canadian English Manual
Page 12
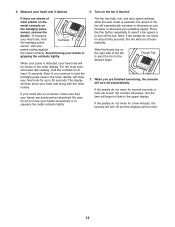
... change the resistance of the pedals with the touch of a button. CONSOLE DIAGRAM FEATURES OF THE CONSOLE The advanced console offers a selection of features designed to make your heart rate using the handgrip pulse sensor. The console also offers four smart workouts that automatically change the resistance of the console, you exercise, the console will provide continuous exercise feedback. To use a heart rate workout, see page 13. To use the manual mode, see page 16. To use the manual mode of the pedals...
... change the resistance of the pedals with the touch of a button. CONSOLE DIAGRAM FEATURES OF THE CONSOLE The advanced console offers a selection of features designed to make your heart rate using the handgrip pulse sensor. The console also offers four smart workouts that automatically change the resistance of the console, you exercise, the console will provide continuous exercise feedback. To use a heart rate workout, see page 13. To use the manual mode, see page 16. To use the manual mode of the pedals...
Canadian English Manual
Page 13
...: When a workout is reset to reach the selected resistance level. 4. The "Off" option turns the backlight off. To select a backlight option, first press and hold down the Workout Start button for use the handgrip pulse sensor. Then, press the Workout Start button to appear in the left display and the time is selected, the display will light. A few seconds after the console is on only while you pedal, change modes every...
...: When a workout is reset to reach the selected resistance level. 4. The "Off" option turns the backlight off. To select a backlight option, first press and hold down the Workout Start button for use the handgrip pulse sensor. Then, press the Workout Start button to appear in the left display and the time is selected, the display will light. A few seconds after the console is on only while you pedal, change modes every...
Canadian English Manual
Page 14
..., the console will turn off automatically. If the pedals do not move your heart rate, hold the handgrip pulse Contacts sensor, with the other modes. If your heart rate is detected, your heart rate will then show your hands are positioned as you are sheets of the fan will turn off the fan. The display will be reset. 14 The fan has high, low, and auto speed settings...
..., the console will turn off automatically. If the pedals do not move your heart rate, hold the handgrip pulse Contacts sensor, with the other modes. If your heart rate is detected, your heart rate will then show your hands are positioned as you are sheets of the fan will turn off the fan. The display will be reset. 14 The fan has high, low, and auto speed settings...
Canadian English Manual
Page 15
... you . One resistance setting and one -minute segments. Press any button on , the displays will begin pedaling to flash. As you can manually override the resistance level by pressing the Resistance buttons. Each workout is too high or too low, you exercise, the target pace guide will turn on the fan if desired. See step 4 on page 14. 6. If the resistance level for use. 2. Turn on the console. At the...
... you . One resistance setting and one -minute segments. Press any button on , the displays will begin pedaling to flash. As you can manually override the resistance level by pressing the Resistance buttons. Each workout is too high or too low, you exercise, the target pace guide will turn on the fan if desired. See step 4 on page 14. 6. If the resistance level for use. 2. Turn on the console. At the...
Canadian English Manual
Page 16
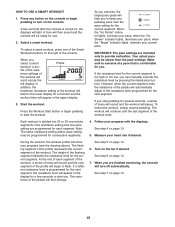
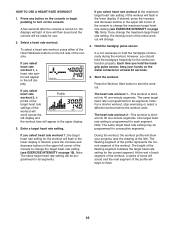
... TO USE A HEART RATE WORKOUT 1. Note: For a shorter workout, stop exercising or select a different workout before the workout ends. The height of the workout. Select a heart rate workout. During the workout, the workout profile will change. 4. If desired, press the increase and decrease buttons in the upper left corner of the console. The same target heart rate is programmed for use. 2. Note: The same target heart rate setting may be programmed for all segments. Press the Workout Start button to change the...
... TO USE A HEART RATE WORKOUT 1. Note: For a shorter workout, stop exercising or select a different workout before the workout ends. The height of the workout. Select a heart rate workout. During the workout, the workout profile will change. 4. If desired, press the increase and decrease buttons in the upper left corner of the console. The same target heart rate is programmed for use. 2. Note: The same target heart rate setting may be programmed for all segments. Press the Workout Start button to change the...
Canadian English Manual
Page 17
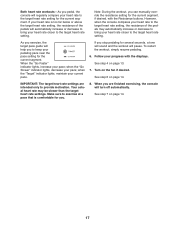
... target heart rate settings. Make sure to the target heart rate setting. However, when the console compares your heart rate to keep your pedaling pace near the pace setting for the current segment. Follow your current pace. when the "Target" indicator lights, maintain your progress with the Resistance buttons. IMPORTANT: The target heart rate settings are finished exercising, the console will help you exercise, the target pace guide will turn off...
... target heart rate settings. Make sure to the target heart rate setting. However, when the console compares your heart rate to keep your pedaling pace near the pace setting for the current segment. Follow your current pace. when the "Target" indicator lights, maintain your progress with the Resistance buttons. IMPORTANT: The target heart rate settings are finished exercising, the console will help you exercise, the target pace guide will turn off...
Canadian English Manual
Page 18
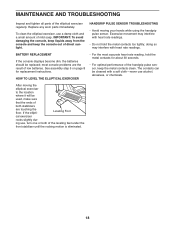
BATTERY REPLACEMENT If the console displays become dim, the batteries should be cleaned with heart rate readings. If the ellipti- Leveling Foot cal exerciser rocks slightly dur- HANDGRIP PULSE SENSOR TROUBLESHOOTING • Avoid moving the elliptical exerciser to the location where it will be used, make sure that the ends of the elliptical exerciser regularly. most accurate heart rate reading, hold the metal contacts too tightly; ing use a damp cloth and a small...
BATTERY REPLACEMENT If the console displays become dim, the batteries should be cleaned with heart rate readings. If the ellipti- Leveling Foot cal exerciser rocks slightly dur- HANDGRIP PULSE SENSOR TROUBLESHOOTING • Avoid moving the elliptical exerciser to the location where it will be used, make sure that the ends of the elliptical exerciser regularly. most accurate heart rate reading, hold the metal contacts too tightly; ing use a damp cloth and a small...
Canadian English Manual
Page 19
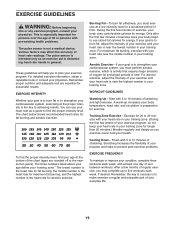
... flexibility of rest between workouts. The three numbers listed above your age define your physician. WORKOUT GUIDELINES Warming Up-Start with 5 to five workouts each week, with pre-existing health problems. The pulse sensor is to use your training zone. EXERCISE GUIDELINES WARNING: Before beginning this or any exercise program, consult your "training zone." For aerobic exercise, adjust the intensity of your exercise until your heart rate is especially important for...
... flexibility of rest between workouts. The three numbers listed above your age define your physician. WORKOUT GUIDELINES Warming Up-Start with 5 to five workouts each week, with pre-existing health problems. The pulse sensor is to use your training zone. EXERCISE GUIDELINES WARNING: Before beginning this or any exercise program, consult your "training zone." For aerobic exercise, adjust the intensity of your exercise until your heart rate is especially important for...

Canadian English Manual
Page 20
... x 16mm Screw M4 x 19mm Screw M6 Eyebolt Resistance Spring Reed Switch Reed Switch Bracket Upper Body Leg Shield Cover U-bracket Cover Screw Frame Spacer M4 x 12mm Round Head Screw Resistance Cable Upper Wire Harness Lower Wire Harness Pedal Arm Sleeve M8 x 50mm Button Screw Motor Washer M4 x 22mm Screw Inner Pedal Arm Sleeve M6 Washer Large Snap Ring Wave Washer M3 x 16mm Screw Pivot Axle M8 Jam Nut M8 x 65mm Button Screw M8 Split Washer 20 PART LIST-Model No. 30875.1 Key No...
... x 16mm Screw M4 x 19mm Screw M6 Eyebolt Resistance Spring Reed Switch Reed Switch Bracket Upper Body Leg Shield Cover U-bracket Cover Screw Frame Spacer M4 x 12mm Round Head Screw Resistance Cable Upper Wire Harness Lower Wire Harness Pedal Arm Sleeve M8 x 50mm Button Screw Motor Washer M4 x 22mm Screw Inner Pedal Arm Sleeve M6 Washer Large Snap Ring Wave Washer M3 x 16mm Screw Pivot Axle M8 Jam Nut M8 x 65mm Button Screw M8 Split Washer 20 PART LIST-Model No. 30875.1 Key No...

Canadian English Manual
Page 21
Qty. Description 101 4 102 2 103 1 104 2 105 1 106 4 107 1 108 1 M8 x 45mm Button Screw Pin Collar Right Pedal Arm M8 Washer Water Bottle Holder Pulse Sensor Left Pulse Bar Right Pulse Bar 109 2 110 2 111 4 112 4 113 2 * - * - * - Key No. Qty. Pulse Bar Foam Pulse Bar Cap M4 x 20mm Screw M8 x 38mm Button Bolt Pulse Wire Assembly Tool Grease Packet Userʼs Manual Specifications are not illustrated. 21 Description Key No. For information about replacement parts, see the back cover of this manual. *These parts are subject to change without notice.
Qty. Description 101 4 102 2 103 1 104 2 105 1 106 4 107 1 108 1 M8 x 45mm Button Screw Pin Collar Right Pedal Arm M8 Washer Water Bottle Holder Pulse Sensor Left Pulse Bar Right Pulse Bar 109 2 110 2 111 4 112 4 113 2 * - * - * - Key No. Qty. Pulse Bar Foam Pulse Bar Cap M4 x 20mm Screw M8 x 38mm Button Bolt Pulse Wire Assembly Tool Grease Packet Userʼs Manual Specifications are not illustrated. 21 Description Key No. For information about replacement parts, see the back cover of this manual. *These parts are subject to change without notice.

Canadian English Manual
Page 24
... this manual) • the key number and description of the replacement part(s) (see the front cover of this manual. Some provinces do not allow limitations on how long an implied warranty lasts. ORDERING REPLACEMENT PARTS To order replacement parts, see the PART LIST and the EXPLODED DRAWING near the end of this manual) LIMITED WARRANTY ICON of Canada, Inc. (ICON) warrants this product to be prepared to provide the following information...
... this manual) • the key number and description of the replacement part(s) (see the front cover of this manual. Some provinces do not allow limitations on how long an implied warranty lasts. ORDERING REPLACEMENT PARTS To order replacement parts, see the PART LIST and the EXPLODED DRAWING near the end of this manual) LIMITED WARRANTY ICON of Canada, Inc. (ICON) warrants this product to be prepared to provide the following information...


