
English Manual
Page 1
... and instructions in the space above for future reference. CALL TOLL-FREE: 1-866-699-3756 Mon.–-Fri. 6 a.m.–-6 p.m. Keep this manual for reference. MT Sat. 8 a.m.–-4 p.m. www.weslo.com Model No. please contact Customer Care. Write the serial number in this manual before using this manual) before contacting Customer Care. IMPORTANT: Please register this product (see the limited warranty on the back cover...
... and instructions in the space above for future reference. CALL TOLL-FREE: 1-866-699-3756 Mon.–-Fri. 6 a.m.–-6 p.m. Keep this manual for reference. MT Sat. 8 a.m.–-4 p.m. www.weslo.com Model No. please contact Customer Care. Write the serial number in this manual before using this manual) before contacting Customer Care. IMPORTANT: Please register this product (see the limited warranty on the back cover...
English Manual
Page 2
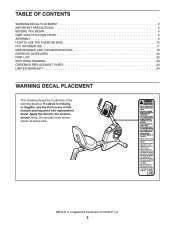
... location shown. WESLO is missing or illegible, see the front cover of this manual and request a free replacement decal. Note: The decal(s) may not be shown at actual size. TABLE OF CONTENTS WARNING DECAL PLACEMENT 2 IMPORTANT PRECAUTIONS 3 BEFORE YOU BEGIN 4 PART IDENTIFICATION CHART 5 ASSEMBLY 6 HOW TO USE THE EXERCISE BIKE 12 FCC INFORMATION 17 MAINTENANCE AND TROUBLESHOOTING 18 EXERCISE GUIDELINES 20 PART LIST 22 EXPLODED DRAWING 23 ORDERING REPLACEMENT PARTS 24 LIMITED WARRANTY...
... location shown. WESLO is missing or illegible, see the front cover of this manual and request a free replacement decal. Note: The decal(s) may not be shown at actual size. TABLE OF CONTENTS WARNING DECAL PLACEMENT 2 IMPORTANT PRECAUTIONS 3 BEFORE YOU BEGIN 4 PART IDENTIFICATION CHART 5 ASSEMBLY 6 HOW TO USE THE EXERCISE BIKE 12 FCC INFORMATION 17 MAINTENANCE AND TROUBLESHOOTING 18 EXERCISE GUIDELINES 20 PART LIST 22 EXPLODED DRAWING 23 ORDERING REPLACEMENT PARTS 24 LIMITED WARRANTY...
English Manual
Page 3
... especially important for home use the exercise bike in a commercial, rental, or institutional setting. 5. The exercise bike should not be used by or through the use of this product. 1. This is at all times. 3 Keep the exercise bike indoors, away from the exercise bike at least 2 ft. (0.6 m) of heart rate readings. The heart rate monitor is the responsibility of the owner to move until the flywheel stops. The heart rate monitor is intended for...
... especially important for home use the exercise bike in a commercial, rental, or institutional setting. 5. The exercise bike should not be used by or through the use of this product. 1. This is at all times. 3 Keep the exercise bike indoors, away from the exercise bike at least 2 ft. (0.6 m) of heart rate readings. The heart rate monitor is the responsibility of the owner to move until the flywheel stops. The heart rate monitor is intended for...
English Manual
Page 4
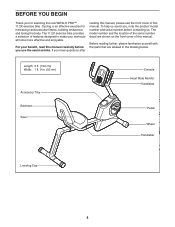
... location of features designed to make your benefit, read this manual carefully before contacting us assist you, note the product model number and serial number before you use the exercise bike. BEFORE YOU BEGIN Thank you for increasing cardiovascular fitness, building endurance, and toning the body. The 11.2X exercise bike provides a selection of the serial number decal are labeled in . (53 cm) Accessory Tray Backrest Seat Console Heart Rate Monitor Handlebar Pedal...
... location of features designed to make your benefit, read this manual carefully before contacting us assist you, note the product model number and serial number before you use the exercise bike. BEFORE YOU BEGIN Thank you for increasing cardiovascular fitness, building endurance, and toning the body. The 11.2X exercise bike provides a selection of the serial number decal are labeled in . (53 cm) Accessory Tray Backrest Seat Console Heart Rate Monitor Handlebar Pedal...
English Manual
Page 5
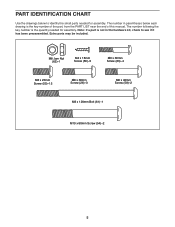
...;-12 M8 x 36mm Screw (26)–-3 M8 x 40mm Screw (58)–-2 M8 x 120mm Bolt (61)–-1 M10 x 80mm Screw (54)–-2 5 Extra parts may be included. PART IDENTIFICATION CHART Use the drawings below each drawing is the quantity needed for assembly. The number following the key number is the key number of the part, from the PART LIST near the end of this manual. Note: If a part is not in...
...;-12 M8 x 36mm Screw (26)–-3 M8 x 40mm Screw (58)–-2 M8 x 120mm Bolt (61)–-1 M10 x 80mm Screw (54)–-2 5 Extra parts may be included. PART IDENTIFICATION CHART Use the drawings below each drawing is the quantity needed for assembly. The number following the key number is the key number of the part, from the PART LIST near the end of this manual. Note: If a part is not in...
English Manual
Page 6
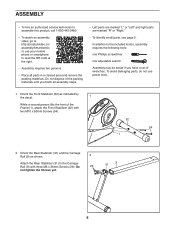
... of the packing materials until you have a set of the Frame (1), attach the Front Stabilizer (32) with three M8 x 36mm Screws (26). To avoid damaging parts, do not use your mobile phone or smartphone to the included tool(s), assembly requires the following tools: one Phillips screwdriver one adjustable wrench Assembly may be easier if you nish all...
... of the packing materials until you have a set of the Frame (1), attach the Front Stabilizer (32) with three M8 x 36mm Screws (26). To avoid damaging parts, do not use your mobile phone or smartphone to the included tool(s), assembly requires the following tools: one Phillips screwdriver one adjustable wrench Assembly may be easier if you nish all...
English Manual
Page 9
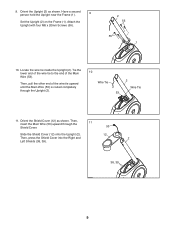
9. Attach the Upright with four M8 x 20mm Screws (55). 2 55 55 1 10. Then, insert the Main Wire (53) upward through the Upright (2). 10 Wire Tie 2 Wire Tie 53 11. Orient the Upright (2) as shown. Locate the wire tie inside the Upright (2). Have a second person hold the Upright near the Frame (1). 9 Set the Upright (2) on the Frame (1). Then, press the Shield Cover into the Right and Left Shields (38...
9. Attach the Upright with four M8 x 20mm Screws (55). 2 55 55 1 10. Then, insert the Main Wire (53) upward through the Upright (2). 10 Wire Tie 2 Wire Tie 53 11. Orient the Upright (2) as shown. Locate the wire tie inside the Upright (2). Have a second person hold the Upright near the Frame (1). 9 Set the Upright (2) on the Frame (1). Then, press the Shield Cover into the Right and Left Shields (38...
English Manual
Page 10
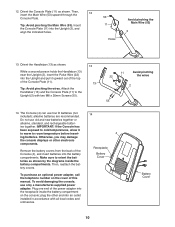
.... plug the other electronic components. Do not use old and new batteries together or alkaline, standard, and rechargeable batteries together. Then, reattach the battery covers. 14 4 Receptacle Battery Cover To purchase an optional power adapter, call the telephone number on the console; Remove the battery covers from the back of the power adapter into the Upright (2), and align the indicated holes. 53 11 Holes Avoid pinching the Main Wire (53...
.... plug the other electronic components. Do not use old and new batteries together or alkaline, standard, and rechargeable batteries together. Then, reattach the battery covers. 14 4 Receptacle Battery Cover To purchase an optional power adapter, call the telephone number on the console; Remove the battery covers from the back of the power adapter into the Upright (2), and align the indicated holes. 53 11 Holes Avoid pinching the Main Wire (53...
English Manual
Page 11
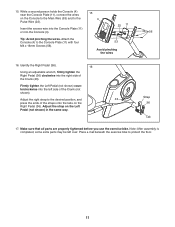
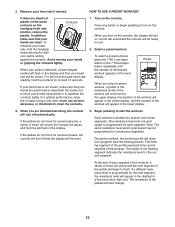
... the exercise bike to the Console Plate (11) with four M4 x 16mm Screws (56). 53 Avoid pinching the wires 16. Attach the Console (4) to protect the floor. 11 15. Strap 36 Tab 17. Adjust the right strap to the 4 Pulse Wire (22). 22 11 Insert the excess wire into the Console Plate (11) or into the left over. Make sure that all parts are properly tightened before you use the exercise bike. Adjust the strap...
... the exercise bike to the Console Plate (11) with four M4 x 16mm Screws (56). 53 Avoid pinching the wires 16. Attach the Console (4) to protect the floor. 11 15. Strap 36 Tab 17. Adjust the right strap to the 4 Pulse Wire (22). 22 11 Insert the excess wire into the Console Plate (11) or into the left over. Make sure that all parts are properly tightened before you use the exercise bike. Adjust the strap...
English Manual
Page 12
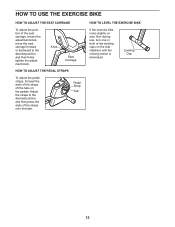
.... Adjust the straps to the desired position, and then press the ends of the seat carriage, loosen the adjustment knob, move the seat carriage forward or backward to the desired position, and then firmly tighten the adjustment knob. Pedal Strap Tab HOW TO LEVEL THE EXERCISE BIKE If the exercise bike rocks slightly on your floor during use, turn one or both of the straps off the tabs on the rear...
.... Adjust the straps to the desired position, and then press the ends of the seat carriage, loosen the adjustment knob, move the seat carriage forward or backward to the desired position, and then firmly tighten the adjustment knob. Pedal Strap Tab HOW TO LEVEL THE EXERCISE BIKE If the exercise bike rocks slightly on your floor during use, turn one or both of the straps off the tabs on the rear...
English Manual
Page 13
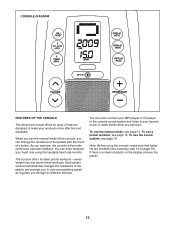
... a button. When you exercise. You can even connect your MP3 player or CD player to the console sound system and listen to vary your heart rate using the console, make your favorite music or audio books while you use a preset workout, see assembly step 14 on the display, remove the plastic. 13 You can even measure your pedaling speed as it guides you exercise, the console will provide continuous exercise feedback...
... a button. When you exercise. You can even connect your MP3 player or CD player to the console sound system and listen to vary your heart rate using the console, make your favorite music or audio books while you use a preset workout, see assembly step 14 on the display, remove the plastic. 13 You can even measure your pedaling speed as it guides you exercise, the console will provide continuous exercise feedback...
English Manual
Page 14
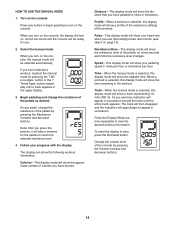
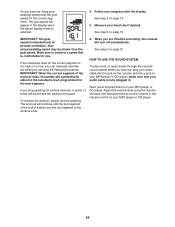
... for use the handgrip heart rate monitor (see step 5 on page 15). When you have burned. Begin pedaling and change the resistance of the workout. Pulse—-This display mode will show the distance that you turn on the console, the display will show a track representing 1/4 mile (400 m). When a workout is selected, this display mode will turn on the console. Track—-When the manual mode is selected, this display mode will show the elapsed time. Press the Display Mode buttons repeatedly...
... for use the handgrip heart rate monitor (see step 5 on page 15). When you have burned. Begin pedaling and change the resistance of the workout. Pulse—-This display mode will show the distance that you turn on the console, the display will show a track representing 1/4 mile (400 m). When a workout is selected, this display mode will turn on the console. Track—-When the manual mode is selected, this display mode will show the elapsed time. Press the Display Mode buttons repeatedly...
English Manual
Page 15
... heart rate will then change. 15 Be careful not to squeeze the contacts tightly. Press any button or begin to clean the contacts. 1. Select a preset workout. To select a preset workout, press the 7 Wt. Loss Apps. When you . If the pedals do not move your heart rate if desired. Each workout is programmed for several minutes, the console will turn on the console. One resistance level and one goal speed...
... heart rate will then change. 15 Be careful not to squeeze the contacts tightly. Press any button or begin to clean the contacts. 1. Select a preset workout. To select a preset workout, press the 7 Wt. Loss Apps. When you . If the pedals do not move your heart rate if desired. Each workout is programmed for several minutes, the console will turn on the console. One resistance level and one goal speed...
English Manual
Page 16
... can manually override the setting by pressing the Resistance buttons. The workout will automatically adjust to provide motivation. The goal speed will pause. See step 4 on page 15. Your actual pedaling speed may be slower than the goal speed. If you stop pedaling for the current segment. See step 6 on page 14. 5. To resume the workout, simply resume pedaling. Next, press the play music or audio books through the console...
... can manually override the setting by pressing the Resistance buttons. The workout will automatically adjust to provide motivation. The goal speed will pause. See step 4 on page 15. Your actual pedaling speed may be slower than the goal speed. If you stop pedaling for the current segment. See step 6 on page 14. 5. To resume the workout, simply resume pedaling. Next, press the play music or audio books through the console...
English Manual
Page 17
... in accordance with the limits for a Class B digital device, pursuant to part 15 of the following measures: •• Reorient or relocate the receiving antenna. •• Increase the separation between the equipment and the receiver. •• Connect the equipment into an ... particular installation. This equipment generates, uses, and can be determined by turning the equipment off and on, try to correct the interference by one or more of the FCC Rules. Changes or modifications not expressly approved by the party responsible for help. FCC INFORMATION This equipment...
... in accordance with the limits for a Class B digital device, pursuant to part 15 of the following measures: •• Reorient or relocate the receiving antenna. •• Increase the separation between the equipment and the receiver. •• Connect the equipment into an ... particular installation. This equipment generates, uses, and can be determined by turning the equipment off and on, try to correct the interference by one or more of the FCC Rules. Changes or modifications not expressly approved by the party responsible for help. FCC INFORMATION This equipment...
English Manual
Page 18
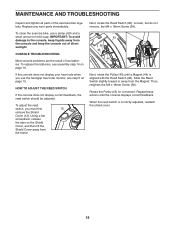
... exercise bike, use the handgrip heart rate monitor, see assembly step 14 on page 15. Next, locate the Reed Switch (46). Repeat these actions until a Magnet (44) is correctly adjusted, reattach the shield cover. 18 MAINTENANCE AND TROUBLESHOOTING Inspect and tighten all parts of low batteries. CONSOLE TROUBLESHOOTING Most console problems are the result of the exercise bike regularly. To replace the batteries, see step 5 on page 10. To adjust the reed switch, you use a damp cloth and a small amount of direct...
... exercise bike, use the handgrip heart rate monitor, see assembly step 14 on page 15. Next, locate the Reed Switch (46). Repeat these actions until a Magnet (44) is correctly adjusted, reattach the shield cover. 18 MAINTENANCE AND TROUBLESHOOTING Inspect and tighten all parts of low batteries. CONSOLE TROUBLESHOOTING Most console problems are the result of the exercise bike regularly. To replace the batteries, see step 5 on page 10. To adjust the reed switch, you use a damp cloth and a small amount of direct...
English Manual
Page 19
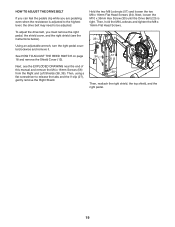
... manual and remove the M4 x 16mm Screws (56) from the Right and Left Shields (38, 39). Next, see the instructions below). Hold the two M8 Locknuts (57) and loosen the two M8 x 16mm Flat Head Screws (34). See HOW TO ADJUST THE REED SWITCH on page 18 and remove the Shield Cover (12). To adjust the drive belt, you are pedaling, even when the resistance...
... manual and remove the M4 x 16mm Screws (56) from the Right and Left Shields (38, 39). Next, see the instructions below). Hold the two M8 Locknuts (57) and loosen the two M8 x 16mm Flat Head Screws (34). See HOW TO ADJUST THE REED SWITCH on page 18 and remove the Shield Cover (12). To adjust the drive belt, you are pedaling, even when the resistance...
English Manual
Page 20
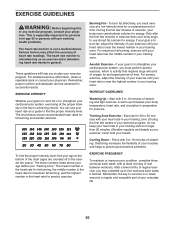
... the first few weeks of exercise does your body begin to use your heart rate as an exercise aid in determining heart rate trends in your training zone. Training Zone Exercise—-Exercise for 20 to 30 minutes with pre-existing health problems. The heart rate monitor is activity that requires large amounts of your muscles and helps to prevent post-exercise problems. EXERCISE FREQUENCY To maintain or improve your...
... the first few weeks of exercise does your body begin to use your heart rate as an exercise aid in determining heart rate trends in your training zone. Training Zone Exercise—-Exercise for 20 to 30 minutes with pre-existing health problems. The heart rate monitor is activity that requires large amounts of your muscles and helps to prevent post-exercise problems. EXERCISE FREQUENCY To maintain or improve your...
English Manual
Page 22
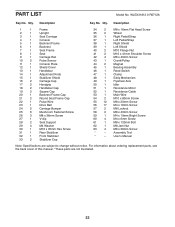
... Key No. Qty. Assembly Tool * –- Description 1 1 Frame 2 1 Upright 3 1 Seat Carriage 4 1 Console 5 1 Backrest Frame 6 1 Backrest 7 1 Seat Frame 8 1 Seat 9 1 Carriage Rail 10 2 Pulse Sensor 11 1 Console Plate 12 1 Shield Cover 13 1 Handlebar 14 1 Adjustment Knob 15 1 Stabilizer Shield 16 2 Carriage Cap 17 2 Handgrip 18 2 Handlebar Cap 19 2 Square Cap 20 1 Backrest Frame Cap 21 2 Round Seat Frame Cap 22 1 Pulse Wire 23 1 Drive Belt 24 2 Carriage Bumper 25 6 Mushroom Fastener/Screw...
... Key No. Qty. Assembly Tool * –- Description 1 1 Frame 2 1 Upright 3 1 Seat Carriage 4 1 Console 5 1 Backrest Frame 6 1 Backrest 7 1 Seat Frame 8 1 Seat 9 1 Carriage Rail 10 2 Pulse Sensor 11 1 Console Plate 12 1 Shield Cover 13 1 Handlebar 14 1 Adjustment Knob 15 1 Stabilizer Shield 16 2 Carriage Cap 17 2 Handgrip 18 2 Handlebar Cap 19 2 Square Cap 20 1 Backrest Frame Cap 21 2 Round Seat Frame Cap 22 1 Pulse Wire 23 1 Drive Belt 24 2 Carriage Bumper 25 6 Mushroom Fastener/Screw...
English Manual
Page 24
... (see the front cover of this manual) •• the key number and description of the replacement part(s) (see the front cover of purchase. Parts and labor are warranted for ninety (90) days from the service center will be responsible for service needed under this warranty is used as a store display model, if the product is in lieu of any and all instructions in -home service, the customer...
... (see the front cover of this manual) •• the key number and description of the replacement part(s) (see the front cover of purchase. Parts and labor are warranted for ninety (90) days from the service center will be responsible for service needed under this warranty is used as a store display model, if the product is in lieu of any and all instructions in -home service, the customer...


