
Canadian English Manual
Page 4
.... 3. Use the DAYBREAK only as gravel or wood chips. 5. Keep hair and body away from children and pets. 14. Do not sit on the spa cover or place objects on it is not properly primed (see PLUGGING IN THE DAYBREAK on page 12), plug the power cord directly into a grounded circuit... capable of injury: Do not remove or alter the covers on the spa cover. 12. Press the "reset" button. Inspect and tighten all chemicals away from the suction guard. You must be using the DAYBREAK outside, do ...
.... 3. Use the DAYBREAK only as gravel or wood chips. 5. Keep hair and body away from children and pets. 14. Do not sit on the spa cover or place objects on it is not properly primed (see PLUGGING IN THE DAYBREAK on page 12), plug the power cord directly into a grounded circuit... capable of injury: Do not remove or alter the covers on the spa cover. 12. Press the "reset" button. Inspect and tighten all chemicals away from the suction guard. You must be using the DAYBREAK outside, do ...

Canadian English Manual
Page 5
... DAYBREAK. 27. the unborn child could be supervised. 24. Special note: Individuals suffering from the DAYBREAK at all times; • Always replace and lock the spa cover when the DAYBREAK is permanently connected to consult your physician about possible side-effects of injury: The water temperature should not use of the unit...
... DAYBREAK. 27. the unborn child could be supervised. 24. Special note: Individuals suffering from the DAYBREAK at all times; • Always replace and lock the spa cover when the DAYBREAK is permanently connected to consult your physician about possible side-effects of injury: The water temperature should not use of the unit...
Canadian English Manual
Page 7
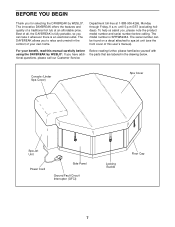
If you , please note the product model number and serial number before using the DAYBREAK by WESLO®. Department toll-free at an affordable price. Console (Under Spa Cover) Spa Cover Spa Jet Unit Power Cord Side Panel Ground Fault Circuit Interrupter (GFCI) Locking Buckle Floor Cap 7 The serial number can... is an electrical outlet. For your own home. The innovative DAYBREAK offers the features and quality of all, the DAYBREAK is fully portable, so you can be found on a decal attached to relax and unwind in the drawing below. BEFORE YOU BEGIN Thank you for...
If you , please note the product model number and serial number before using the DAYBREAK by WESLO®. Department toll-free at an affordable price. Console (Under Spa Cover) Spa Cover Spa Jet Unit Power Cord Side Panel Ground Fault Circuit Interrupter (GFCI) Locking Buckle Floor Cap 7 The serial number can... is an electrical outlet. For your own home. The innovative DAYBREAK offers the features and quality of all, the DAYBREAK is fully portable, so you can be found on a decal attached to relax and unwind in the drawing below. BEFORE YOU BEGIN Thank you for...

Canadian English Manual
Page 10
..., adjust the positions of the Side Panels (see the inset drawing). The edge of the Spa Liner should cover the bottom two inches of the Side Panels so the frame is not squared, the Spa Cover (not shown) will not fit properly. The measurement should be lined up with the Small... be the same. The seam in the Spa Liner should be placed. If the frame is squared. 5. Stretch the edge of the remaining Side Panels (1). 1 1 8 1 Both measurements must be equal 8 12 7. Be extremely care- The edge of the Insulated Floor Cover should hang over the top of the Side...
..., adjust the positions of the Side Panels (see the inset drawing). The edge of the Spa Liner should cover the bottom two inches of the Side Panels so the frame is not squared, the Spa Cover (not shown) will not fit properly. The measurement should be lined up with the Small... be the same. The seam in the Spa Liner should be placed. If the frame is squared. 5. Stretch the edge of the remaining Side Panels (1). 1 1 8 1 Both measurements must be equal 8 12 7. Be extremely care- The edge of the Insulated Floor Cover should hang over the top of the Side...
Canadian English Manual
Page 11
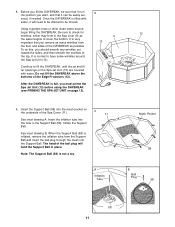
... mesh pocket on page 12). 9. Insert the inflation tube into the Support Ball. When the Support Ball (58) is not a toy. The head of the Spa Cover (11). 9 11 See inset drawing A. 8. Using a garden hose or other clean water source, begin filling the DAYBREAK. After the DAYBREAK is very important that it... above the bottoms of the DAYBREAK as 12 9 the water begins to fill the DAYBREAK, until the jet and filter openings on the Spa Jet Unit (13) are covered with water, it can be moved. Once the DAYBREAK is normal to check for wrinkles, which may form in place. To do this...
... mesh pocket on page 12). 9. Insert the inflation tube into the Support Ball. When the Support Ball (58) is not a toy. The head of the Spa Cover (11). 9 11 See inset drawing A. 8. Using a garden hose or other clean water source, begin filling the DAYBREAK. After the DAYBREAK is very important that it... above the bottoms of the DAYBREAK as 12 9 the water begins to fill the DAYBREAK, until the jet and filter openings on the Spa Jet Unit (13) are covered with water, it can be moved. Once the DAYBREAK is normal to check for wrinkles, which may form in place. To do this...

Canadian English Manual
Page 12
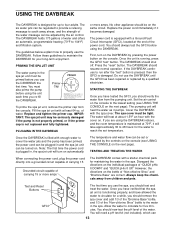
... holes in the same manner. 10 13 Strap Latch 23 21 11 21 1 12 Snap a Buckle (21) onto each of the seven latches on the Spa Cover (11) is properly centered and that the corners of the Side Panels (1). Attach the Buckle to position the Buckles if a second person holds the strap... the opposite side of the grooves in place, so the strap on the Spa Cover (11). Position one of the Spa Cover tight.) Do not place the Buckle over the Side Panels (1) and the Spa Jet Unit (13). 10. Be sure that the Spa Cover is tight. (Note: It may be easier to the Side Panel with...
... holes in the same manner. 10 13 Strap Latch 23 21 11 21 1 12 Snap a Buckle (21) onto each of the seven latches on the Spa Cover (11) is properly centered and that the corners of the Side Panels (1). Attach the Buckle to position the Buckles if a second person holds the strap... the opposite side of the grooves in place, so the strap on the Spa Cover (11). Position one of the Spa Cover tight.) Do not place the Buckle over the Side Panels (1) and the Spa Jet Unit (13). 10. Be sure that the Spa Cover is tight. (Note: It may be easier to the Side Panel with...
Canadian English Manual
Page 13
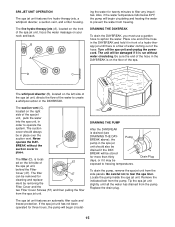
.... If the DAYBREAK continues to the water in the spa. The spa cover must be set temperature. Note: The first time the power cord is plugged in and the spa jet unit can be primed before you have verified that the spa jet unit is functioning properly, and have tested the GFCI...and the strength of "Non-chlorine Shox" and "Bromine Base" are using the DAYBREAK indoors, and the room temperature is equipped with the spa cover. The DAYBREAK should be adjusted by the controls on the console (see USING THE CONSOLE on the bottle of the water massage can 13 Allow...
.... If the DAYBREAK continues to the water in the spa. The spa cover must be set temperature. Note: The first time the power cord is plugged in and the spa jet unit can be primed before you have verified that the spa jet unit is functioning properly, and have tested the GFCI...and the strength of "Non-chlorine Shox" and "Bromine Base" are using the DAYBREAK indoors, and the room temperature is equipped with the spa cover. The DAYBREAK should be adjusted by the controls on the console (see USING THE CONSOLE on the bottle of the water massage can 13 Allow...

Canadian English Manual
Page 14
... circulate through the jets will decrease. 14 Let the water circulate through both the hydro-therapy jets and the whirlpool diverter. Replace the spa cover and allow the water to continue to the right, the amount will increase. The direction of the water. Press the control again. ...104°F. If the control is correct. Repeat until the pH level is turned to heat. SECURING THE SPA COVER The spa cover can be locked by snapping the latches on the spa cover into the buckles on the side panels. The buckles can be secured by inserting the key and turning ...
... circulate through the jets will decrease. 14 Let the water circulate through both the hydro-therapy jets and the whirlpool diverter. Replace the spa cover and allow the water to continue to the right, the amount will increase. The direction of the water. Press the control again. ...104°F. If the control is correct. Repeat until the pH level is turned to heat. SECURING THE SPA COVER The spa cover can be locked by snapping the latches on the spa cover into the buckles on the side panels. The buckles can be secured by inserting the key and turning ...
Canadian English Manual
Page 15
...The whirlpool diverter (B), located on your neck and back. The suction vent (C), located on the left side of the spa jet unit, directs the flow of the hose. The suction cover should also be exposed to operate the system. The filter (D), is drained (see DRAINING THE DAYBREAK above), the Pump ...should always be in order to freezing temperatures. ed on the right side of 57 the spa jet unit, behind the Filter Cover (47). D ment by removing the Filter Cover and the two Filter Cover Screws (57) and then pulling the filter from the pump. Drain Plug To drain the ...
...The whirlpool diverter (B), located on your neck and back. The suction vent (C), located on the left side of the spa jet unit, directs the flow of the hose. The suction cover should also be exposed to operate the system. The filter (D), is drained (see DRAINING THE DAYBREAK above), the Pump ...should always be in order to freezing temperatures. ed on the right side of 57 the spa jet unit, behind the Filter Cover (47). D ment by removing the Filter Cover and the two Filter Cover Screws (57) and then pulling the filter from the pump. Drain Plug To drain the ...

Canadian English Manual
Page 16
.... Replace the filter if there are any signs of relative acidity or alkalinity in the water. Re-insert the cleaned filter into the spa jet unit. Leave the cover on the clothes line until it in the water will need a pH test kit (not included), which can build-up of 1 to ...for information on a scale of dirt and oil. CHECKING AND CLEANING THE FILTER The filter should use . 6. To clean the spa cover, hang it over a clothes line and spray it in the spa. (See TESTING AND TREATING THE WATER on page 15.) WATER CHEMISTRY 4. Keep all chemicals out of the reach of the...
.... Replace the filter if there are any signs of relative acidity or alkalinity in the water. Re-insert the cleaned filter into the spa jet unit. Leave the cover on the clothes line until it in the water will need a pH test kit (not included), which can build-up of 1 to ...for information on a scale of dirt and oil. CHECKING AND CLEANING THE FILTER The filter should use . 6. To clean the spa cover, hang it over a clothes line and spray it in the spa. (See TESTING AND TREATING THE WATER on page 15.) WATER CHEMISTRY 4. Keep all chemicals out of the reach of the...

Canadian English Manual
Page 17
... GFCI breaker is fully tightened. SYMPTOM: THE CIRCUIT BREAKER OR GFCI BREAKER TRIPS WHILE THE SPA IS OPERATING a. Remove the filter housing from the spa jet unit and clean or replace the filter. a. Cover the DAYBREAK with the spa cover. b. Air Temperature 70°F + 50°F - 70°F 30°F -... only when the water level is the heater. Clean the filter if it may be debris in the spa jet unit is low. The spa cover must be jammed. a. a. If you are covered. 4. The pump may have a loose wire connection. Find the symptom that applies, and follow the steps...
... GFCI breaker is fully tightened. SYMPTOM: THE CIRCUIT BREAKER OR GFCI BREAKER TRIPS WHILE THE SPA IS OPERATING a. Remove the filter housing from the spa jet unit and clean or replace the filter. a. Cover the DAYBREAK with the spa cover. b. Air Temperature 70°F + 50°F - 70°F 30°F -... only when the water level is the heater. Clean the filter if it may be debris in the spa jet unit is low. The spa cover must be jammed. a. a. If you are covered. 4. The pump may have a loose wire connection. Find the symptom that applies, and follow the steps...
Canadian English Manual
Page 18
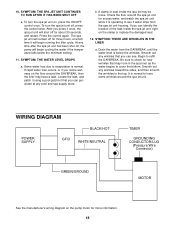
.../GROUND MOTOR See the manufacturer's wiring diagram on the floor around the spa jet unit for three hours, at any wrinkles toward the sides, and then smooth the wrinkles to cover the bottom. At any wrinkles that may form in the spa liner as the water begins to the top. Check the floor... around the DAYBREAK, then the liner may be loose. To turn the spa jet unit off for excess water, and watch...
.../GROUND MOTOR See the manufacturer's wiring diagram on the floor around the spa jet unit for three hours, at any wrinkles toward the sides, and then smooth the wrinkles to cover the bottom. At any wrinkles that may form in the spa liner as the water begins to the top. Check the floor... around the DAYBREAK, then the liner may be loose. To turn the spa jet unit off for excess water, and watch...
Canadian English Manual
Page 19
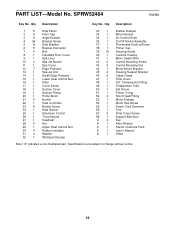
... Floor Cap Angle Bracket Bracket Screw Side Bracket Bracket Connector Bolt Insulated Floor Cover Spa Liner Spa Jet Nozzle Spa Cover Edge Protector Spa Jet Unit Small Edge Protector Lower Heat Control Nut Filter Cover Screw Suction Cover Suction Fitting Pump Motor Buckle Heat Controller Buckle Screw Heat Sensor Electronic Control ...Micro Switch/Wire Control Mounting Screw Control Mounting Nut Motor Mount Bracket Housing Support Bracket Cable Clamp Filter Cover 3/8" Compression Fitting Temperature Tube Set Screw Primer O-ring Short Head Fitting Motor Endcap Motor Cap Screw Power Cord Grommet Trim...
... Floor Cap Angle Bracket Bracket Screw Side Bracket Bracket Connector Bolt Insulated Floor Cover Spa Liner Spa Jet Nozzle Spa Cover Edge Protector Spa Jet Unit Small Edge Protector Lower Heat Control Nut Filter Cover Screw Suction Cover Suction Fitting Pump Motor Buckle Heat Controller Buckle Screw Heat Sensor Electronic Control ...Micro Switch/Wire Control Mounting Screw Control Mounting Nut Motor Mount Bracket Housing Support Bracket Cable Clamp Filter Cover 3/8" Compression Fitting Temperature Tube Set Screw Primer O-ring Short Head Fitting Motor Endcap Motor Cap Screw Power Cord Grommet Trim...
Canadian English Manual
Page 22
...; 3 times or more 5) Have you ever purchased an ICON product before? ❏ Yes ❏ No 6) Where did you first see the front cover of ICON Health & Fitness, Inc. The NAME of the product (SPRW52464). 2. Part No. 145207 H00298-C R0298A ICON Health & Fitness, Inc. ©...; 1998 Printed in USA WESLO is a registered trademark of this ICON product? ❏ Store Employee ❏ Television Ads ❏ Colour ❏ Electronic Features ❏ Magazine Ads &#...
...; 3 times or more 5) Have you ever purchased an ICON product before? ❏ Yes ❏ No 6) Where did you first see the front cover of ICON Health & Fitness, Inc. The NAME of the product (SPRW52464). 2. Part No. 145207 H00298-C R0298A ICON Health & Fitness, Inc. ©...; 1998 Printed in USA WESLO is a registered trademark of this ICON product? ❏ Store Employee ❏ Television Ads ❏ Colour ❏ Electronic Features ❏ Magazine Ads &#...

