
Canadian English Manual
Page 1
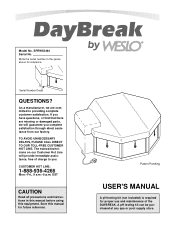
... direct assistance from our factory. The trained technicians on our Customer Hot Line will guarantee you . Patent Pending USER'S MANUAL A pH testing kit (not included) is required for future reference. Serial Number Decal QUESTIONS? Save this equipment. SPRW52464 Serial No. EST CAUTION Read all precautions and instructions in the space above for reference. Write the serial number in this manual before using this manual...
... direct assistance from our factory. The trained technicians on our Customer Hot Line will guarantee you . Patent Pending USER'S MANUAL A pH testing kit (not included) is required for future reference. Serial Number Decal QUESTIONS? Save this equipment. SPRW52464 Serial No. EST CAUTION Read all precautions and instructions in the space above for reference. Write the serial number in this manual before using this manual...
Canadian English Manual
Page 2
... spa is limited to you specific legal rights. This warranty gives you . Accordingly, the above limitation may not apply to properly follow user's manual installation, operating, or maintenance instructions. Jerôme, QC J7Y 4B8 2 Some provinces do not allow limitations on how long an implied warranty lasts. ICON OF/DU CANADA, 900 de l'Industrie, St. ICON extends a limited five (5) year warranty on the pump and motor. ICON...
... spa is limited to you specific legal rights. This warranty gives you . Accordingly, the above limitation may not apply to properly follow user's manual installation, operating, or maintenance instructions. Jerôme, QC J7Y 4B8 2 Some provinces do not allow limitations on how long an implied warranty lasts. ICON OF/DU CANADA, 900 de l'Industrie, St. ICON extends a limited five (5) year warranty on the pump and motor. ICON...
Canadian English Manual
Page 3
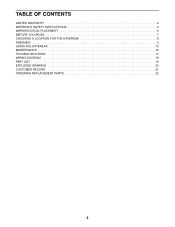
TABLE OF CONTENTS LIMITED WARRANTY 2 IMPORTANT SAFETY INSTRUCTIONS 4 WARNING DECAL PLACEMENT 6 BEFORE YOU BEGIN 7 CHOOSING A LOCATION FOR THE DAYBREAK 8 ASSEMBLY 9 USING THE DAYBREAK 13 MAINTENANCE 16 TROUBLE-SHOOTING 17 WIRING DIAGRAM 18 PART LIST 19 EXPLODED DRAWING 20 CUSTOMER RECORD 21 ORDERING REPLACEMENT PARTS 22 3
TABLE OF CONTENTS LIMITED WARRANTY 2 IMPORTANT SAFETY INSTRUCTIONS 4 WARNING DECAL PLACEMENT 6 BEFORE YOU BEGIN 7 CHOOSING A LOCATION FOR THE DAYBREAK 8 ASSEMBLY 9 USING THE DAYBREAK 13 MAINTENANCE 16 TROUBLE-SHOOTING 17 WIRING DIAGRAM 18 PART LIST 19 EXPLODED DRAWING 20 CUSTOMER RECORD 21 ORDERING REPLACEMENT PARTS 22 3
Canadian English Manual
Page 4
... to users or damage to support weight. 11. Keep all parts regularly. The spa jet unit should resume normal operation. Inspect and tighten all chemicals away from the DAYBREAK when it is compatible. 13. Replace the power cord immediately if damaged. 17. This could be on the suction fittings. If the spa jet unit continues to run after the "test" button is pressed...
... to users or damage to support weight. 11. Keep all parts regularly. The spa jet unit should resume normal operation. Inspect and tighten all chemicals away from the DAYBREAK when it is compatible. 13. Replace the power cord immediately if damaged. 17. This could be on the suction fittings. If the spa jet unit continues to run after the "test" button is pressed...

Canadian English Manual
Page 5
A wire connector is permanently connected to the wire connector on the pump motor of this unit to connect a minimum No. 8 AWG (804 mm2) solid copper conductor between 100°F (38°C) and 104°F (40°C) are under the influence of drowning: • Never use the DAYBREAK alone; • ...heart rate, and circulation. 31. Do not use of 98.6°F. DANGER-Risk of electric shock: Do not set up the DAYBREAK within five feet (1.52m) of this unit by or through the use the DAYBREAK if you feel pain or dizziness at all times; • Always replace and lock the spa cover...
A wire connector is permanently connected to the wire connector on the pump motor of this unit to connect a minimum No. 8 AWG (804 mm2) solid copper conductor between 100°F (38°C) and 104°F (40°C) are under the influence of drowning: • Never use the DAYBREAK alone; • ...heart rate, and circulation. 31. Do not use of 98.6°F. DANGER-Risk of electric shock: Do not set up the DAYBREAK within five feet (1.52m) of this unit by or through the use the DAYBREAK if you feel pain or dizziness at all times; • Always replace and lock the spa cover...

Canadian English Manual
Page 6
If a decal is missing, or if it is not legible, please call our Customer Service Department toll-free at 1-888-936-4266, Monday through Friday, 9 a.m. Apply the decal in the location shown. 6 WARNING DECAL PLACEMENT The decals shown below have been placed on the DAYBREAK. until 5 p.m EST (excluding holidays), to order a replacement decal.
If a decal is missing, or if it is not legible, please call our Customer Service Department toll-free at 1-888-936-4266, Monday through Friday, 9 a.m. Apply the decal in the location shown. 6 WARNING DECAL PLACEMENT The decals shown below have been placed on the DAYBREAK. until 5 p.m EST (excluding holidays), to order a replacement decal.
Canadian English Manual
Page 7
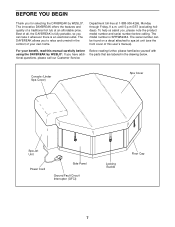
... home. The innovative DAYBREAK offers the features and quality of this manual carefully before calling. Department toll-free at an affordable price. until 5 p.m EST (excluding holidays). The serial number can take it wherever there is SPRW52464. To help us assist you have additional questions, please call our Customer Service Before reading further, please familiarize yourself with the parts...
... home. The innovative DAYBREAK offers the features and quality of this manual carefully before calling. Department toll-free at an affordable price. until 5 p.m EST (excluding holidays). The serial number can take it wherever there is SPRW52464. To help us assist you have additional questions, please call our Customer Service Before reading further, please familiarize yourself with the parts...
Canadian English Manual
Page 8
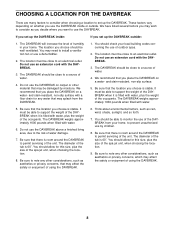
... of using the DAYBREAK. 6. and stain-resistant, non-slip surface with a floor drain for any water that may be able to support the weight of outdoor spas. 2. Do not use of the DAYBREAK when it is stable. Be sure to note any other material that the location you set up the...7. We have listed several factors you may need to permit servicing of water damage. 7. The DAYBREAK will increase the level of humidity in your home, to prevent unauthorized use the DAYBREAK inside : If you choose is room around the DAYBREAK to install a ventilation fan or use the DAYBREAK on ...
... of using the DAYBREAK. 6. and stain-resistant, non-slip surface with a floor drain for any water that may be able to support the weight of outdoor spas. 2. Do not use of the DAYBREAK when it is stable. Be sure to note any other material that the location you set up the...7. We have listed several factors you may need to permit servicing of water damage. 7. The DAYBREAK will increase the level of humidity in your home, to prevent unauthorized use the DAYBREAK inside : If you choose is room around the DAYBREAK to install a ventilation fan or use the DAYBREAK on ...

Canadian English Manual
Page 9
... The Side Panels must be sure that all parts in a cleared area and remove the packing materials; Attach 2 the Angle Bracket to the Side Panel with a Bracket Screw (4). 5 Continue to connect the remaining Side Panels (1) in the same ...Screw (4). do not dispose of the eight Side Panels (1). Press a Floor Cap (2) onto the bottom of each of the packing materials until assembly is completed. • Assembly requires two people. • Tighten all parts as you have read the following information and instructions: • Place all parts are oriented as shown. Attach...
... The Side Panels must be sure that all parts in a cleared area and remove the packing materials; Attach 2 the Angle Bracket to the Side Panel with a Bracket Screw (4). 5 Continue to connect the remaining Side Panels (1) in the same ...Screw (4). do not dispose of the eight Side Panels (1). Press a Floor Cap (2) onto the bottom of each of the packing materials until assembly is completed. • Assembly requires two people. • Tighten all parts as you have read the following information and instructions: • Place all parts are oriented as shown. Attach...

Canadian English Manual
Page 10
... Spa Liner should be placed. Power Cord 1 10 13 9 14 The measurement should be the same. Stretch the edge of the Side Panels (1). This is not squared, the Spa Cover (not shown) will be between two of the Spa Liner (9) over the Side Panels about two inches. 4 8 1 5 Seam 9 1 6. If necessary, adjust the positions of the Side Panel directly...
... Spa Liner should be placed. Power Cord 1 10 13 9 14 The measurement should be the same. Stretch the edge of the Side Panels (1). This is not squared, the Spa Cover (not shown) will be between two of the Spa Liner (9) over the Side Panels about two inches. 4 8 1 5 Seam 9 1 6. If necessary, adjust the positions of the Side Panel directly...
Canadian English Manual
Page 11
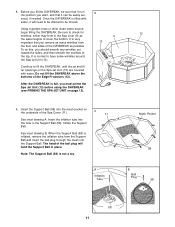
...inset drawing B. Before you remove as many wrinkles from the Support Ball and insert the ball plug through the mesh into the Support Ball. viced, if needed. Insert the Support Ball (58) into ...Spa Jet Unit (13). Note: The Support Ball (58) is in the Support Ball (58). The head of the Spa Cover (11). 9 11 See inset drawing A. Be sure to check for wrinkles, which may form in place. When the Support...this, you want, and that it can be moved. Inflate the Support Ball. 8. Once the DAYBREAK is filled with water. Using a garden hose or other clean water source, begin...
...inset drawing B. Before you remove as many wrinkles from the Support Ball and insert the ball plug through the mesh into the Support Ball. viced, if needed. Insert the Support Ball (58) into ...Spa Jet Unit (13). Note: The Support Ball (58) is in the Support Ball (58). The head of the Spa Cover (11). 9 11 See inset drawing A. Be sure to check for wrinkles, which may form in place. When the Support...this, you want, and that it can be moved. Inflate the Support Ball. 8. Once the DAYBREAK is filled with water. Using a garden hose or other clean water source, begin...

Canadian English Manual
Page 12
... if a second person holds the strap on the Spa Cover (11). Remove the latch. Snap a Buckle (21) onto each of the Side Panels (1). Be sure that the corners of the Spa Cover line up with two Buckle Screws (23). Position one of the grooves in the Side Panels. Attach the Buckle to the Side Panels ...(1) in the same manner. 10 13 Strap Latch 23 21 11 21 1 12 Attach the other six Buckles (21) to the...
... if a second person holds the strap on the Spa Cover (11). Remove the latch. Snap a Buckle (21) onto each of the Side Panels (1). Be sure that the corners of the Spa Cover line up with two Buckle Screws (23). Position one of the grooves in the Side Panels. Attach the Buckle to the Side Panels ...(1) in the same manner. 10 13 Strap Latch 23 21 11 21 1 12 Attach the other six Buckles (21) to the...
Canadian English Manual
Page 13
... the GFCI has been repaired or replaced by pressing the power button on the bottle of "Non-chlorine Shox" and "Bromine Base" are using the DAYBREAK indoors, and the room temperature is maintained at least 64 oz. The temperature and water flow can be set temperature. TESTING AND TREATING THE WATER When connecting the power cord, plug the power cord directly into a grounded circuit...
... the GFCI has been repaired or replaced by pressing the power button on the bottle of "Non-chlorine Shox" and "Bromine Base" are using the DAYBREAK indoors, and the room temperature is maintained at least 64 oz. The temperature and water flow can be set temperature. TESTING AND TREATING THE WATER When connecting the power cord, plug the power cord directly into a grounded circuit...

Canadian English Manual
Page 14
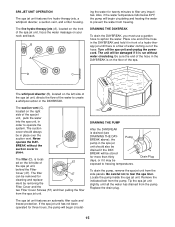
... reading should use . To turn the spa jet unit off for information concerning proper water maintenance. The spa jet unit will be obtained at about 30 seconds, and restart. Replace the spa cover and allow the water to continue to the console diagram above. When the control is set to "all," the flow will remain off , press the control twice. SECURING THE SPA COVER The spa cover can be...
... reading should use . To turn the spa jet unit off for information concerning proper water maintenance. The spa jet unit will be obtained at about 30 seconds, and restart. Replace the spa cover and allow the water to continue to the console diagram above. When the control is set to "all," the flow will remain off , press the control twice. SECURING THE SPA COVER The spa cover can be...
Canadian English Manual
Page 15
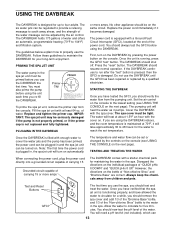
... the water into the spa unit, in place. Locate the pump inside the spa jet unit. BREAK without water circulating. Drain Plug To drain the pump, remove the spa jet unit from the pump. Turn off the spa unit and unplug the power cord. DRAINING THE PUMP After the DAYBREAK is locat- The five hydro-therapy jets (A), located on your neck and...
... the water into the spa unit, in place. Locate the pump inside the spa jet unit. BREAK without water circulating. Drain Plug To drain the pump, remove the spa jet unit from the pump. Turn off the spa unit and unplug the power cord. DRAINING THE PUMP After the DAYBREAK is locat- The five hydro-therapy jets (A), located on your neck and...

Canadian English Manual
Page 16
...of children and pets. 5. Check the filter for additional information about testing and adjusting the pH. MAINTAINING THE SPA COVER The spa cover should be clean and dry before being moved or stored. WINTER USE AND CARE The DAYBREAK is measured on page 13.) ...problems can build-up of 7, which can be checked periodically for damage. The pH reading should be dangerous. Always follow the steps below 7.2, the acid level in a warm, dry location. (See DRAINING THE DAYBREAK and DRAINING THE PUMP on page 15.) WATER CHEMISTRY 4. If the filter needs to soak it in the water will need...
...of children and pets. 5. Check the filter for additional information about testing and adjusting the pH. MAINTAINING THE SPA COVER The spa cover should be clean and dry before being moved or stored. WINTER USE AND CARE The DAYBREAK is measured on page 13.) ...problems can build-up of 7, which can be checked periodically for damage. The pH reading should be dangerous. Always follow the steps below 7.2, the acid level in a warm, dry location. (See DRAINING THE DAYBREAK and DRAINING THE PUMP on page 15.) WATER CHEMISTRY 4. If the filter needs to soak it in the water will need...

Canadian English Manual
Page 17
...Contact our customer service department or a local spa and pool service provider. The spa cover must be plugged into a grounded outlet (see if the filter is fully tightened. Set the air control to 6 days ...Service Department toll-free at a rate of the water. TROUBLE-SHOOTING Most problems can be solved by excess air in the pump circulation system. The pump may have a loose wire connection. Adjust the water level. b. If further assistance is incorrect, the sanitizing agents will take longer for the water to heat. The power cord must be tight. If you are covered...
...Contact our customer service department or a local spa and pool service provider. The spa cover must be plugged into a grounded outlet (see if the filter is fully tightened. Set the air control to 6 days ...Service Department toll-free at a rate of the water. TROUBLE-SHOOTING Most problems can be solved by excess air in the pump circulation system. The pump may have a loose wire connection. Adjust the water level. b. If further assistance is incorrect, the sanitizing agents will take longer for the water to heat. The power cord must be tight. If you are covered...
Canadian English Manual
Page 18
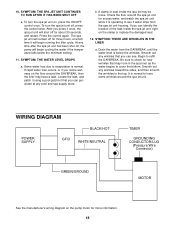
...Wire Connector) GREEN/GROUND MOTOR See the manufacturer's wiring diagram on the pump motor for about 30 seconds, and restart. After you can identify the location of the leak inside the spa jet may be loose. A clamp or seal inside the spa jet unit, tighten the clamp or replace the damaged seal. 12. 10. To turn the spa...from the DAYBREAK, until the water level is below the minimum setting. 11. SYMPTOM: THE WATER LEVEL DROPS a. Be sure to refill the DAYBREAK. To turn the spa jet unit off for more information. 18 If you notice wetness on , press the ON/OFF control once.
...Wire Connector) GREEN/GROUND MOTOR See the manufacturer's wiring diagram on the pump motor for about 30 seconds, and restart. After you can identify the location of the leak inside the spa jet may be loose. A clamp or seal inside the spa jet unit, tighten the clamp or replace the damaged seal. 12. 10. To turn the spa...from the DAYBREAK, until the water level is below the minimum setting. 11. SYMPTOM: THE WATER LEVEL DROPS a. Be sure to refill the DAYBREAK. To turn the spa jet unit off for more information. 18 If you notice wetness on , press the ON/OFF control once.
Canadian English Manual
Page 19
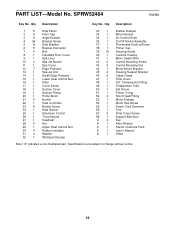
... Damper Wire Harness Air Control Knob On/Off Switch Assembly Thermostat Knob w/Screw Primer Cap Housing Screw Console Overlay Micro Switch/Wire Control Mounting Screw Control Mounting Nut Motor Mount Bracket Housing Support Bracket Cable Clamp Filter Cover 3/8" Compression Fitting Temperature Tube Set Screw Primer O-ring Short Head Fitting Motor Endcap Motor Cap Screw Power Cord Grommet Trim Filter Cover Screw Support Ball (Set) Key Allen Wrench Starter Chemical Pack User's Manual Video Note: "#" indicates a non-illustrated part. Qty. Qty. Specifications are subject to change without...
... Damper Wire Harness Air Control Knob On/Off Switch Assembly Thermostat Knob w/Screw Primer Cap Housing Screw Console Overlay Micro Switch/Wire Control Mounting Screw Control Mounting Nut Motor Mount Bracket Housing Support Bracket Cable Clamp Filter Cover 3/8" Compression Fitting Temperature Tube Set Screw Primer O-ring Short Head Fitting Motor Endcap Motor Cap Screw Power Cord Grommet Trim Filter Cover Screw Support Ball (Set) Key Allen Wrench Starter Chemical Pack User's Manual Video Note: "#" indicates a non-illustrated part. Qty. Qty. Specifications are subject to change without...
Canadian English Manual
Page 22
... Service Department toll-free at 1-888-936-4266, Monday through Friday, 9 a.m. The KEY NUMBER and DESCRIPTION of the desired part(s) (see the PART LIST on your impression of what you have purchased, would you buy another manufacturer? ❏ No ❏ Yes What other Manufacturer? 9) Based on page 18 of this manual). 4. Printed in USA 22 Part No. 145207 H00298-C R0298A ICON Health & Fitness...
... Service Department toll-free at 1-888-936-4266, Monday through Friday, 9 a.m. The KEY NUMBER and DESCRIPTION of the desired part(s) (see the PART LIST on your impression of what you have purchased, would you buy another manufacturer? ❏ No ❏ Yes What other Manufacturer? 9) Based on page 18 of this manual). 4. Printed in USA 22 Part No. 145207 H00298-C R0298A ICON Health & Fitness...


