
User Manual
Page 1
.... Serial Number Decal QUESTIONS? Keep this equipment. USER'S MANUAL Visit our website at www.weslo.com new products, prizes, fitness tips, and much more! CUSTOMER HOT LINE: 1-866-699-3756 Mon.-Fri., 6 a.m.-6 p.m. If you have questions, or if there are missing or damaged parts, we will provide immediate assistance, free of charge. MST CAUTION Read all precautions and instructions...
.... Serial Number Decal QUESTIONS? Keep this equipment. USER'S MANUAL Visit our website at www.weslo.com new products, prizes, fitness tips, and much more! CUSTOMER HOT LINE: 1-866-699-3756 Mon.-Fri., 6 a.m.-6 p.m. If you have questions, or if there are missing or damaged parts, we will provide immediate assistance, free of charge. MST CAUTION Read all precautions and instructions...
User Manual
Page 2
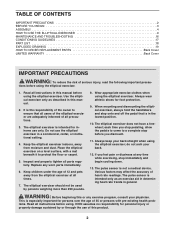
... the accuracy of all instructions in this manual. 2. ICON assumes no responsibility for persons over the age of serious injury, read the following important precau- TABLE OF CONTENTS IMPORTANT PRECAUTIONS 2 BEFORE YOU BEGIN 3 ASSEMBLY 4 HOW TO USE THE ELLIPTICAL EXERCISER 9 MAINTENANCE AND TROUBLESHOOTING 16 CONDITIONING GUIDELINES 17 PART LIST 18 EXPLODED DRAWING 19 HOW TO ORDER REPLACEMENT PARTS Back Cover LIMITED WARRANTY Back Cover IMPORTANT PRECAUTIONS WARNING...
... the accuracy of all instructions in this manual. 2. ICON assumes no responsibility for persons over the age of serious injury, read the following important precau- TABLE OF CONTENTS IMPORTANT PRECAUTIONS 2 BEFORE YOU BEGIN 3 ASSEMBLY 4 HOW TO USE THE ELLIPTICAL EXERCISER 9 MAINTENANCE AND TROUBLESHOOTING 16 CONDITIONING GUIDELINES 17 PART LIST 18 EXPLODED DRAWING 19 HOW TO ORDER REPLACEMENT PARTS Back Cover LIMITED WARRANTY Back Cover IMPORTANT PRECAUTIONS WARNING...
User Manual
Page 3
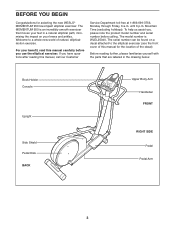
... the new WESLO® MOMENTUM 950 low-impact elliptical exerciser. For your knees and ankles. until 6 p.m. BEFORE YOU BEGIN Congratulations for the location of the decal). Welcome to the elliptical exerciser (see the front cover of this manual, call our Customer Service Department toll-free at 1-866-699-3756, Monday through Friday, 6 a.m. Before reading further, please familiarize yourself with the parts that moves your...
... the new WESLO® MOMENTUM 950 low-impact elliptical exerciser. For your knees and ankles. until 6 p.m. BEFORE YOU BEGIN Congratulations for the location of the decal). Welcome to the elliptical exerciser (see the front cover of this manual, call our Customer Service Department toll-free at 1-866-699-3756, Monday through Friday, 6 a.m. Before reading further, please familiarize yourself with the parts that moves your...
User Manual
Page 4
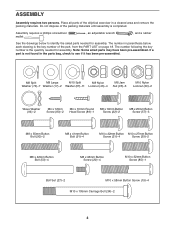
... Button Bolt (50)-4 M8 x 48mm Button Screw (20)-4 M10 x 32mm Button Screw (85)-1 Bolt Set (27)-2 M10 x 58mm Button Screw (19)-4 M10 x 105mm Carriage Bolt (34)-2 4 The number following the key number is the key number of the elliptical exerciser in parenthesis below to see if it has been pre-assembled. Assembly requires a phillips screwdriver mallet . , an adjustable wrench , and a rubber See the drawings below each drawing is the quantity needed for assembly. ASSEMBLY Assembly...
... Button Bolt (50)-4 M8 x 48mm Button Screw (20)-4 M10 x 32mm Button Screw (85)-1 Bolt Set (27)-2 M10 x 58mm Button Screw (19)-4 M10 x 105mm Carriage Bolt (34)-2 4 The number following the key number is the key number of the elliptical exerciser in parenthesis below to see if it has been pre-assembled. Assembly requires a phillips screwdriver mallet . , an adjustable wrench , and a rubber See the drawings below each drawing is the quantity needed for assembly. ASSEMBLY Assembly...
User Manual
Page 5
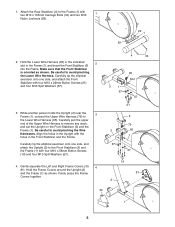
... elliptical exerciser onto one side, and attach the Upright (2) to the Frame (1) with four M10 x 58mm Button Screws (19) and four M10 Split Washers (67). 4. Firmly press the Frame Covers together. 4 34 65 Slot 3 1 67 67 21 2 79 3 65 1 67 67 19 81 2 30 1 5 Attach the Rear Stabilizer (4) to the Front Stabilizer (3) and the Frame (1) with 1 two M10 x 105mm Carriage Bolts...
... elliptical exerciser onto one side, and attach the Upright (2) to the Frame (1) with four M10 x 58mm Button Screws (19) and four M10 Split Washers (67). 4. Firmly press the Frame Covers together. 4 34 65 Slot 3 1 67 67 21 2 79 3 65 1 67 67 19 81 2 30 1 5 Attach the Rear Stabilizer (4) to the Front Stabilizer (3) and the Frame (1) with 1 two M10 x 105mm Carriage Bolts...

User Manual
Page 6
... pull the upper end of the included grease to the Right Upper Body Leg (not shown) in the inset drawing. Hold the Console Bracket (26) near the Upright (2), and locate the wire extending from the top of the Left Handlebar with stickers. Hold the Upright Covers around the Upper Wire Harness, as shown, and slide it . Attach the lower end of the...
... pull the upper end of the included grease to the Right Upper Body Leg (not shown) in the inset drawing. Hold the Console Bracket (26) near the Upright (2), and locate the wire extending from the top of the Left Handlebar with stickers. Hold the Upright Covers around the Upper Wire Harness, as shown, and slide it . Attach the lower end of the...

User Manual
Page 7
... "D" batteries (not included); Attach the Upper Handlebar Cover with an M10 x 32mm Button Screw (85), two M10 x 27mm Button Screws (39), and three M10 Split Washers (67). Make sure that the batteries are recommended. Reattach the battery cover. Insert both wire harnesses into the Console Bracket (26). Insert the excess wire harness into the open- Be careful to the indicated wire harness on the Handgrip Pulse...
... "D" batteries (not included); Attach the Upper Handlebar Cover with an M10 x 32mm Button Screw (85), two M10 x 27mm Button Screws (39), and three M10 Split Washers (67). Make sure that the batteries are recommended. Reattach the battery cover. Insert both wire harnesses into the Console Bracket (26). Insert the excess wire harness into the open- Be careful to the indicated wire harness on the Handgrip Pulse...
User Manual
Page 8
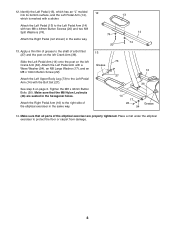
... Left Pedal Arm (14) with the Bolt Set (27). See step 6 on the left Crank Arm (36). Tighten the M8 x 42mm Button Bolts (50). Slide the Left Pedal Arm (14) onto the post on page 6. Attach the Left Pedal Arm with a sticker. Attach the Left Pedal (13) to protect the floor or carpet from damage. 8 Attach the Left Upper Body Leg (73) to the right side of the elliptical exerciser are seated in...
... Left Pedal Arm (14) with the Bolt Set (27). See step 6 on the left Crank Arm (36). Tighten the M8 x 42mm Button Bolts (50). Slide the Left Pedal Arm (14) onto the post on page 6. Attach the Left Pedal Arm with a sticker. Attach the Left Pedal (13) to protect the floor or carpet from damage. 8 Attach the Left Upper Body Leg (73) to the right side of the elliptical exerciser are seated in...
User Manual
Page 9
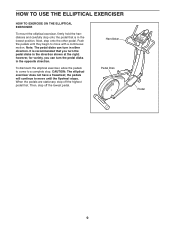
... pedal disks can turn the pedal disks in the lowest position. Handlebar Pedal Disk Pedal 9 To dismount the elliptical exerciser, allow the pedals to come to a complete stop. Then, step off the highest pedal first. It is recommended that is in the opposite direction. however, for variety, you turn the pedal disks in either direction. HOW TO USE THE ELLIPTICAL EXERCISER HOW TO EXERCISE ON THE ELLIPTICAL EXERCISER To mount the elliptical exerciser...
... pedal disks can turn the pedal disks in the lowest position. Handlebar Pedal Disk Pedal 9 To dismount the elliptical exerciser, allow the pedals to come to a complete stop. Then, step off the highest pedal first. It is recommended that is in the opposite direction. however, for variety, you turn the pedal disks in either direction. HOW TO USE THE ELLIPTICAL EXERCISER HOW TO EXERCISE ON THE ELLIPTICAL EXERCISER To mount the elliptical exerciser...
User Manual
Page 10
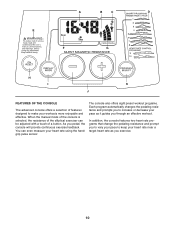
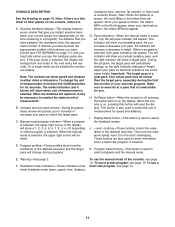
... a button. You can be adjusted with a touch of features designed to make your heart rate near a target heart rate as it guides you through an effective workout. When the manual mode of the console is selected, the resistance of the elliptical exerciser can even measure your pace as you to keep your workouts more enjoyable and effective. The console also offers eight preset workout programs. Each program automatically changes the pedaling resistance...
... a button. You can be adjusted with a touch of features designed to make your heart rate near a target heart rate as it guides you through an effective workout. When the manual mode of the console is selected, the resistance of the elliptical exerciser can even measure your pace as you to keep your workouts more enjoyable and effective. The console also offers eight preset workout programs. Each program automatically changes the pedaling resistance...
User Manual
Page 11
... change during the first few seconds. During the program, the target pace will show your heart rate is off, pressing this button will turn on the console, remove it may be selected for speed and distance. On/Reset button-When the console is shown, the letters BPM will appear; When the console is used to exercise at the same height. buttons-These buttons control the resistance of measurement for continuous display. These buttons...
... change during the first few seconds. During the program, the target pace will show your heart rate is off, pressing this button will turn on the console, remove it may be selected for speed and distance. On/Reset button-When the console is shown, the letters BPM will appear; When the console is used to exercise at the same height. buttons-These buttons control the resistance of measurement for continuous display. These buttons...
User Manual
Page 12
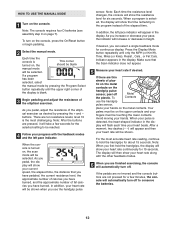
... the display. Each time the console is selected, the display will show your hands on the console, press the On/Reset button or begin pedaling. 2 Select the manual mode. As you pedal, the display will show the time remaining in the display. As you use the handgrip pulse sensor, place your heart rate continuously for 15 seconds. Make sure that you have pedaled, the current resistance level, the approximate number of...
... the display. Each time the console is selected, the display will show your hands on the console, press the On/Reset button or begin pedaling. 2 Select the manual mode. As you pedal, the display will show the time remaining in the display. As you use the handgrip pulse sensor, place your heart rate continuously for 15 seconds. Make sure that you have pedaled, the current resistance level, the approximate number of...
User Manual
Page 13
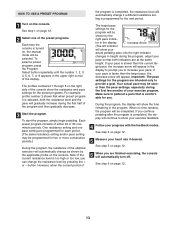
... USE A PRESET PROGRAM 1 Turn on the console. See step 1 on page 12. 6 When you can change if a different resistance setting is comfort- To select a preset program, press the Program Select button repeatedly until the number 1, 2, 3, 4, 5, 6, 7, or 8 appears in the display to prompt you . The profiles numbered 1 through 8 on , the manual mode will appear. button. The target pace settings for the program are programmed for each period. (The same resistance setting and/or pace setting...
... USE A PRESET PROGRAM 1 Turn on the console. See step 1 on page 12. 6 When you can change if a different resistance setting is comfort- To select a preset program, press the Program Select button repeatedly until the number 1, 2, 3, 4, 5, 6, 7, or 8 appears in the display to prompt you . The profiles numbered 1 through 8 on , the manual mode will appear. button. The target pace settings for the program are programmed for each period. (The same resistance setting and/or pace setting...
User Manual
Page 14
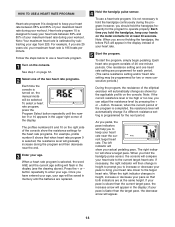
... maximum heart rate during your workout. See step 1 on , the manual mode will show the resistance settings for the heart rate programs. For example, profile number 9 shows that both indicators are replaced. 4 Hold the handgrip pulse sensor. Each time you hold the handgrips continuously during the program; Each heart rate program consists of 20 one of the two heart rate programs. Each time the console is turned on page 12. 2 Select one -minute periods. button...
... maximum heart rate during your workout. See step 1 on , the manual mode will show the resistance settings for the heart rate programs. For example, profile number 9 shows that both indicators are replaced. 4 Hold the handgrip pulse sensor. Each time you hold the handgrips continuously during the program; Each heart rate program consists of 20 one of the two heart rate programs. Each time the console is turned on page 12. 2 Select one -minute periods. button...

User Manual
Page 15
Your actual pace may be slower than the target pace, especially during the first few months of your progress with the feedback modes. If you continue pedaling after the program is comfortable for you are finished exercising, the console will continue to show your exercise feedback. 6 Follow your exercise program. See step 6 on page 12. 7 When you . Make sure to provide a goal. Important: The target pace is intended only to pedal at a pace that is completed, the display will automatically turn off. See step 4 on page 12. 15
Your actual pace may be slower than the target pace, especially during the first few months of your progress with the feedback modes. If you continue pedaling after the program is comfortable for you are finished exercising, the console will continue to show your exercise feedback. 6 Follow your exercise program. See step 6 on page 12. 7 When you . Make sure to provide a goal. Important: The target pace is intended only to pedal at a pace that is completed, the display will automatically turn off. See step 4 on page 12. 15
User Manual
Page 16
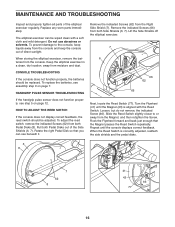
... Magnet (43) is correctly adjusted, reattach the side shields and the pedal disks. 6 8 7 62 8 41 43 66 77 16 MAINTENANCE AND TROUBLESHOOTING Inspect and properly tighten all parts of direct sunlight. Replace any worn parts immediately. To adjust the reed switch, remove the indicated Screws (62) from the console. Pull both Pedal Disks out of the Side Shields (6, 7). When storing the elliptical exerciser, remove the batteries from both Side Shields...
... Magnet (43) is correctly adjusted, reattach the side shields and the pedal disks. 6 8 7 62 8 41 43 66 77 16 MAINTENANCE AND TROUBLESHOOTING Inspect and properly tighten all parts of direct sunlight. Replace any worn parts immediately. To adjust the reed switch, remove the indicated Screws (62) from the console. Pull both Pedal Disks out of the Side Shields (6, 7). When storing the elliptical exerciser, remove the batteries from both Side Shields...
User Manual
Page 17
... middle number is make exercise a regular and enjoyable part of your body begin to use stored fat calories for a sustained period of the chart (ages are rounded off to strengthen your cardiovascular system, your age; The key to success is the recommended heart rate for individuals over the age of your exercise program, do not keep your heart rate in your training zone for...
... middle number is make exercise a regular and enjoyable part of your body begin to use stored fat calories for a sustained period of the chart (ages are rounded off to strengthen your cardiovascular system, your age; The key to success is the recommended heart rate for individuals over the age of your exercise program, do not keep your heart rate in your training zone for...
User Manual
Page 18
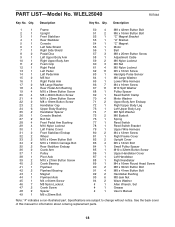
... 1 Belt 57 3 M8 x 25mm Button Screw 58 1 Adjustment Cable 59 2 M6 Nylon Locknut 60 3 M6 Nut 61 4 M5 Nylon Locknut 62 11 M5 x 16mm Screw 63 1 Handgrip Pulse Sensor 64 1 M6 Large Washer 65 1 Lower Wire Harness 66 7 M4 x 16mm Screw 67 11 M10 Split Washer 68 1 Pulley Spacer 69 1 Reed Switch Clamp 70 4 Motor Washer 71 2 Upper Body Arm Endcap 72 1 Right Upper Body Leg 73 1 Left Upper Body Leg...
... 1 Belt 57 3 M8 x 25mm Button Screw 58 1 Adjustment Cable 59 2 M6 Nylon Locknut 60 3 M6 Nut 61 4 M5 Nylon Locknut 62 11 M5 x 16mm Screw 63 1 Handgrip Pulse Sensor 64 1 M6 Large Washer 65 1 Lower Wire Harness 66 7 M4 x 16mm Screw 67 11 M10 Split Washer 68 1 Pulley Spacer 69 1 Reed Switch Clamp 70 4 Motor Washer 71 2 Upper Body Arm Endcap 72 1 Right Upper Body Leg 73 1 Left Upper Body Leg...
User Manual
Page 19
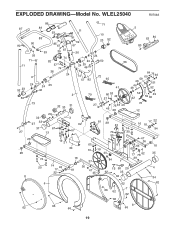
EXPLODED DRAWING-Model No. WLEL25040 R0704A 86 87 89 93 88 90 90 85 67 11 91 39 67 71 10 23 92 5 63 80 80 11 92 ...
EXPLODED DRAWING-Model No. WLEL25040 R0704A 86 87 89 93 88 90 90 85 67 11 91 39 67 71 10 23 92 5 63 80 80 11 92 ...
User Manual
Page 20
... limitations on how long an implied warranty lasts. ICON's obligation under normal use , costs of removal or installation or other rights which warranty claims are made must be prepared to give the following information when calling: • The MODEL NUMBER of the product (WLEL25040) • The NAME of the product (WESLO MOMENTUM 950 elliptical exerciser) • The SERIAL NUMBER of the product (see the front cover of this warranty...
... limitations on how long an implied warranty lasts. ICON's obligation under normal use , costs of removal or installation or other rights which warranty claims are made must be prepared to give the following information when calling: • The MODEL NUMBER of the product (WLEL25040) • The NAME of the product (WESLO MOMENTUM 950 elliptical exerciser) • The SERIAL NUMBER of the product (see the front cover of this warranty...


