
Uk Manual
Page 1
... assist you, please be prepared to give the following information: • The MODEL NUMBER of the product (WLEVEL28830) • The NAME of the product (WESLO® MOMENTUM 850 elliptical crosstrainer) • The SERIAL NUMBER of the product (see the front cover of this manual) • The KEY NUMBER and DESCRIPTION of the part(s) (see page 14) Part No. 201716 R0903A Printed in China © 2003 ICON Health & Fitness, Inc.
... assist you, please be prepared to give the following information: • The MODEL NUMBER of the product (WLEVEL28830) • The NAME of the product (WESLO® MOMENTUM 850 elliptical crosstrainer) • The SERIAL NUMBER of the product (see the front cover of this manual) • The KEY NUMBER and DESCRIPTION of the part(s) (see page 14) Part No. 201716 R0903A Printed in China © 2003 ICON Health & Fitness, Inc.

Uk Manual
Page 2
TABLE OF CONTENTS IMPORTANT PRECAUTIONS 3 BEFORE YOU BEGIN 4 ASSEMBLY 5 HOW TO USE THE ELLIPTICAL CROSSTRAINER 9 MAINTENANCE AND TROUBLESHOOTING 12 CONDITIONING GUIDELINES 13 PART LIST 14 EXPLODED DRAWING 15 HOW TO ORDER REPLACEMENT PARTS Back Cover WESLO is a registered trademark of ICON Health & Fitness, Inc. 2
TABLE OF CONTENTS IMPORTANT PRECAUTIONS 3 BEFORE YOU BEGIN 4 ASSEMBLY 5 HOW TO USE THE ELLIPTICAL CROSSTRAINER 9 MAINTENANCE AND TROUBLESHOOTING 12 CONDITIONING GUIDELINES 13 PART LIST 14 EXPLODED DRAWING 15 HOW TO ORDER REPLACEMENT PARTS Back Cover WESLO is a registered trademark of ICON Health & Fitness, Inc. 2
Uk Manual
Page 3
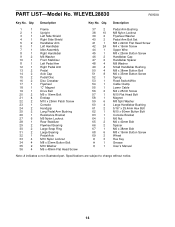
... 1 Lower Cable 56 2 M4 x 25mm Screw 57 1 M10 Flat Head Bolt 58 1 Magnet 59 6 M8 Split Washer 60 4 Large Handlebar Bushing 61 2 5/16" x 25.4mm Hex Bolt 62 1 M10 x 60mm Button Bolt 63 1 Console Bracket 64 1 M6 Nut 65 2 M6 x 40mm Bolt 66 2 Spacer 67 1 M6 x 38mm Bolt 68 6 M8 x 19mm Button Screw 69 2 Wheel # 3 Hex Key # 1 Grease # 1 User's Manual Note: # indicates a non-illustrated part. Description Key No. PART LIST-Model...
... 1 Lower Cable 56 2 M4 x 25mm Screw 57 1 M10 Flat Head Bolt 58 1 Magnet 59 6 M8 Split Washer 60 4 Large Handlebar Bushing 61 2 5/16" x 25.4mm Hex Bolt 62 1 M10 x 60mm Button Bolt 63 1 Console Bracket 64 1 M6 Nut 65 2 M6 x 40mm Bolt 66 2 Spacer 67 1 M6 x 38mm Bolt 68 6 M8 x 19mm Button Screw 69 2 Wheel # 3 Hex Key # 1 Grease # 1 User's Manual Note: # indicates a non-illustrated part. Description Key No. PART LIST-Model...
Uk Manual
Page 4
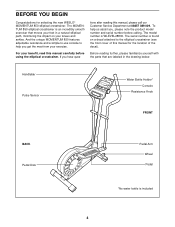
tions after reading this manual for selecting the new WESLO® MOMENTUM 850 elliptical crosstrainer. The model number is included 4 Handlebar Pulse Sensor Water Bottle Holder* Console Resistance Knob FRONT BACK Pedal Disk Pedal Arm Wheel Pedal *No water bottle is WLEVEL28830. The MOMENTUM 850 elliptical crosstrainer is found on your exercise. The serial number is an incredibly smooth exerciser that are labeled in a natural elliptical path, minimizing the impact on a decal attached to help us assist you...
tions after reading this manual for selecting the new WESLO® MOMENTUM 850 elliptical crosstrainer. The model number is included 4 Handlebar Pulse Sensor Water Bottle Holder* Console Resistance Knob FRONT BACK Pedal Disk Pedal Arm Wheel Pedal *No water bottle is WLEVEL28830. The MOMENTUM 850 elliptical crosstrainer is found on your exercise. The serial number is an incredibly smooth exerciser that are labeled in a natural elliptical path, minimizing the impact on a decal attached to help us assist you...
Uk Manual
Page 5
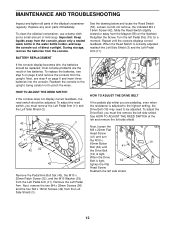
... away from the console. most console problems are pedaling, even when the resistance is adjusted to the highest setting, the Drive Belt (19) may need to pinch the wires. Remove the Left Pedal Arm. Slide the Reed Switch slightly toward or away from the Magnet (58) on page 6 and remove the console from the upright. Reattach the left Pedal Disc (15) for a moment. During storage, remove the batteries from the console, place only a sealed...
... away from the console. most console problems are pedaling, even when the resistance is adjusted to the highest setting, the Drive Belt (19) may need to pinch the wires. Remove the Left Pedal Arm. Slide the Reed Switch slightly toward or away from the Magnet (58) on page 6 and remove the console from the upright. Reattach the left Pedal Disc (15) for a moment. During storage, remove the batteries from the console, place only a sealed...
Uk Manual
Page 6
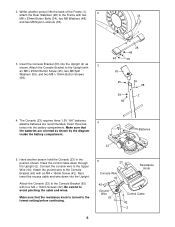
... bat- 4 teries into the Upright. Make sure that the resistance knob is turned to the lowest setting before continuing. 5 23 Console Wire 44 Resistance Knob 42 Ground Wire 63 Control Cable 42 2 6 Attach the ground wire to the Upper Wire (44). The Console (23) requires three 1.5V "AA" batteries; alkaline batteries are oriented as 3 shown. Connect the console wire to the Console Bracket (63) with an M8 x 25mm Button Screw (45), two M8 Split...
... bat- 4 teries into the Upright. Make sure that the resistance knob is turned to the lowest setting before continuing. 5 23 Console Wire 44 Resistance Knob 42 Ground Wire 63 Control Cable 42 2 6 Attach the ground wire to the Upper Wire (44). The Console (23) requires three 1.5V "AA" batteries; alkaline batteries are oriented as 3 shown. Connect the console wire to the Console Bracket (63) with an M8 x 25mm Button Screw (45), two M8 Split...
Uk Manual
Page 7
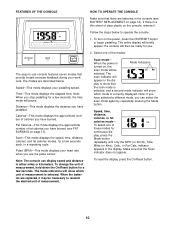
... replaced, it . Speed-This mode displays your heart rate when you have burned. Fat Calories-This mode displays the approximate number of measurement. Follow the steps below . When the power is a thin sheet of calories you have selected a different mode, you stop pedalling for a few seconds each, in the console (see FAT BURNING on , the scan mode will briefly appear; Distance-This mode displays the distance you have burned (see BATTERY REPLACEMENT...
... replaced, it . Speed-This mode displays your heart rate when you have burned. Fat Calories-This mode displays the approximate number of measurement. Follow the steps below . When the power is a thin sheet of calories you have selected a different mode, you stop pedalling for a few seconds each, in the console (see FAT BURNING on , the scan mode will briefly appear; Distance-This mode displays the distance you have burned (see BATTERY REPLACEMENT...
Uk Manual
Page 8
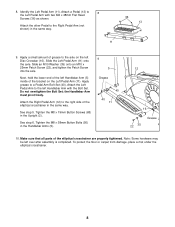
... the left over after assembly is completed. the Handlebar Arm must pivot freely. Tighten the M8 x 19mm Button Screws (68) in the same way. 11 36 13 9. See step 5. Attach the Left Pedal Arm to the left Handlebar Arm (5) inside of grease to the Right Pedal Arm (not shown) in the Upright (2). See step 6. Next, hold the lower end of the elliptical crosstrainer are properly tightened. Slide an M10...
... the left over after assembly is completed. the Handlebar Arm must pivot freely. Tighten the M8 x 19mm Button Screws (68) in the same way. 11 36 13 9. See step 5. Attach the Left Pedal Arm to the left Handlebar Arm (5) inside of grease to the Right Pedal Arm (not shown) in the Upright (2). See step 6. Next, hold the lower end of the elliptical crosstrainer are properly tightened. Slide an M10...


