
English Manual
Page 1
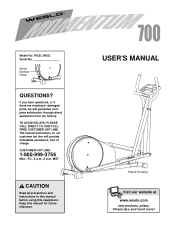
....weslo.com new products, prizes, fitness tips, and much more! TO AVOID DELAYS, PLEASE CALL DIRECT TO OUR TOLLFREE CUSTOMER HOT LINE. If you have questions, or if there are missing or damaged parts, we will provide immediate assistance, free of charge. Serial Number Decal QUESTIONS? WLEL19022 Serial No. MST CAUTION Read all precautions and instructions in this manual before using...
....weslo.com new products, prizes, fitness tips, and much more! TO AVOID DELAYS, PLEASE CALL DIRECT TO OUR TOLLFREE CUSTOMER HOT LINE. If you have questions, or if there are missing or damaged parts, we will provide immediate assistance, free of charge. Serial Number Decal QUESTIONS? WLEL19022 Serial No. MST CAUTION Read all precautions and instructions in this manual before using...
English Manual
Page 2
TABLE OF CONTENTS IMPORTANT PRECAUTIONS 3 BEFORE YOU BEGIN 4 PART IDENTIFICATION CHART 5 ASSEMBLY 6 HOW TO USE THE ELLIPTICAL 9 MAINTENANCE 11 CONDITIONING GUIDELINES 12 PART LIST 14 EXPLODED DRAWING 15 HOW TO ORDER REPLACEMENT PARTS Back Cover LIMITED WARRANTY Back Cover WESLO is a registered trademark of ICON Health & Fitness, Inc. 2
TABLE OF CONTENTS IMPORTANT PRECAUTIONS 3 BEFORE YOU BEGIN 4 PART IDENTIFICATION CHART 5 ASSEMBLY 6 HOW TO USE THE ELLIPTICAL 9 MAINTENANCE 11 CONDITIONING GUIDELINES 12 PART LIST 14 EXPLODED DRAWING 15 HOW TO ORDER REPLACEMENT PARTS Back Cover LIMITED WARRANTY Back Cover WESLO is a registered trademark of ICON Health & Fitness, Inc. 2

English Manual
Page 3
... step onto and off the pedal that all users of the elliptical are adequately informed of the owner to protect the floor or carpet. Do not arch your back straight when using . WARNING: Before beginning this manual. 3. Keep the elliptical indoors, away from the elliptical at any worn parts immediately. 6. Replace any time while exercising, stop exercising on a level surface, with pre-existing health problems. Read all parts...
... step onto and off the pedal that all users of the elliptical are adequately informed of the owner to protect the floor or carpet. Do not arch your back straight when using . WARNING: Before beginning this manual. 3. Keep the elliptical indoors, away from the elliptical at any worn parts immediately. 6. Replace any time while exercising, stop exercising on a level surface, with pre-existing health problems. Read all parts...
English Manual
Page 4
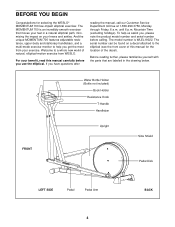
... the unique MOMENTUM 700 features adjustable resistance, upper-body and stationary handlebars, and a multi-mode exercise monitor to help us assist you use the elliptical. The serial number can be found on your benefit, read this manual for selecting the WESLO® MOMENTUM 700 low-impact elliptical exerciser. For your knees and ankles. until 6 p.m. To help you have questions after reading the manual, call our Customer Service Department toll-free at...
... the unique MOMENTUM 700 features adjustable resistance, upper-body and stationary handlebars, and a multi-mode exercise monitor to help us assist you use the elliptical. The serial number can be found on your benefit, read this manual for selecting the WESLO® MOMENTUM 700 low-impact elliptical exerciser. For your knees and ankles. until 6 p.m. To help you have questions after reading the manual, call our Customer Service Department toll-free at...
English Manual
Page 5
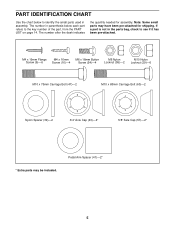
... pre-attached for assembly. The number in parenthesis below to the key number of the part, from the PART LIST on page 14. PART IDENTIFICATION CHART Use the chart below each part refers to identify the small parts used in the parts bag, check to see if it has been pre-attached. The number after the dash indicates the quantity needed for shipping. Note: Some small parts may be included. Pedal Arm...
... pre-attached for assembly. The number in parenthesis below to the key number of the part, from the PART LIST on page 14. PART IDENTIFICATION CHART Use the chart below each part refers to identify the small parts used in the parts bag, check to see if it has been pre-attached. The number after the dash indicates the quantity needed for shipping. Note: Some small parts may be included. Pedal Arm...
English Manual
Page 6
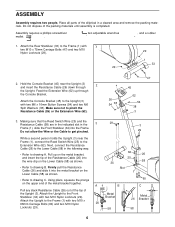
Hold the Console Bracket (45) near the Frame (1), connect the Reed Switch Wire (25) to the Front Stabilizer (34) with two M6 x 16mm Button Screws (54) and two M6 Split Washers (38). Firmly pull the Resistance Cable (26) and slide it into the Frame. A 60 B C Pull any slack Resistance Cable (26) out of the top of the metal bracket together. Attach the Rear Stabilizer...
Hold the Console Bracket (45) near the Frame (1), connect the Reed Switch Wire (25) to the Front Stabilizer (34) with two M6 x 16mm Button Screws (54) and two M6 Split Washers (38). Firmly pull the Resistance Cable (26) and slide it into the Frame. A 60 B C Pull any slack Resistance Cable (26) out of the top of the metal bracket together. Attach the Rear Stabilizer...
English Manual
Page 7
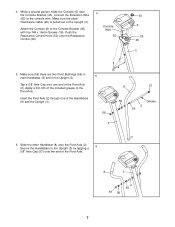
... film of the Upright (3). Push the Resistance Control Knob (50) onto the Resistance Control (26). 4 Console Wire 62 50 6 26 45 3 5. Make sure the slack Resistance Cable (26) is pulled out of the included grease to the Upright (3) by tapping a 6 5/8" Axle Cap (57) onto the end of the Handlebars (8) and the Upright (3). 16 5 8 56 56 57 Grease 2 56 3 6. Attach the Console (6) to the console wire. Make sure that...
... film of the Upright (3). Push the Resistance Control Knob (50) onto the Resistance Control (26). 4 Console Wire 62 50 6 26 45 3 5. Make sure the slack Resistance Cable (26) is pulled out of the included grease to the Upright (3) by tapping a 6 5/8" Axle Cap (57) onto the end of the Handlebars (8) and the Upright (3). 16 5 8 56 56 57 Grease 2 56 3 6. Attach the Console (6) to the console wire. Make sure that...

English Manual
Page 8
...) to one onto the Crank Arm. Apply a thin film of the batteries (marked "-") are properly tightened. Make sure that all parts of the elliptical in the indicated locations. Place a mat under the Console (6). 7. Attach the Left Pedal to the Upright (3) with the Left Pedal (31) onto the Handlebar and the Crank Arm. Next, slide the Pedal Arm (12) with two 7 M6 x 16mm Button Screws (54) and two M6...
...) to one onto the Crank Arm. Apply a thin film of the batteries (marked "-") are properly tightened. Make sure that all parts of the elliptical in the indicated locations. Place a mat under the Console (6). 7. Attach the Left Pedal to the Upright (3) with the Left Pedal (31) onto the Handlebar and the Crank Arm. Next, slide the Pedal Arm (12) with two 7 M6 x 16mm Button Screws (54) and two M6...
English Manual
Page 9
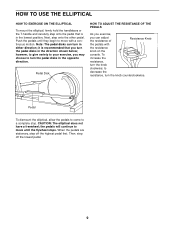
... can adjust the resistance of Resistance Knob the pedals with a continuous motion. however, to give variety to your exercise, you may choose to turn the knob counterclockwise. Then, step off the highest pedal first. the pedals will continue to move until the flywheel stops. When the pedals are stationary, step off the lowest pedal. 9 Push the pedals until they begin to move with the resistance knob on the console. CAUTION: The elliptical...
... can adjust the resistance of Resistance Knob the pedals with a continuous motion. however, to give variety to your exercise, you may choose to turn the knob counterclockwise. Then, step off the highest pedal first. the pedals will continue to move until the flywheel stops. When the pedals are stationary, step off the lowest pedal. 9 Push the pedals until they begin to move with the resistance knob on the console. CAUTION: The elliptical...
English Manual
Page 10
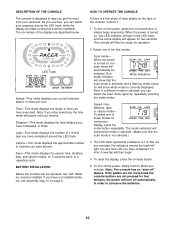
... current exercise speed, in miles per hour. A new lap will then begin exercising. To reset the display, press the on /reset button or simply begin . 4. If the pedals are not moved and the console buttons are described below. DESCRIPTION OF THE CONSOLE The console is turned on, the scan mode will automatically be selected. As you exercise, you have not installed batteries, see assembly step 10 on page 8. Laps-This mode displays the number of 1/4-mile...
... current exercise speed, in miles per hour. A new lap will then begin exercising. To reset the display, press the on /reset button or simply begin . 4. If the pedals are not moved and the console buttons are described below. DESCRIPTION OF THE CONSOLE The console is turned on, the scan mode will automatically be selected. As you exercise, you have not installed batteries, see assembly step 10 on page 8. Laps-This mode displays the number of 1/4-mile...

English Manual
Page 11
... worn parts immediately. Do not use abrasives or solvents. Keep the elliptical in the console. To prevent damage to assembly step 10 on page 8. The elliptical can be replaced. Use only a sealable water bottle in a clean, dry location, away from moisture and dust. 11 STORAGE When storing the elliptical, remove the batteries from the console. To replace the batteries, refer to the console, keep liquids away from the console. CONSOLE TROUBLESHOOTING...
... worn parts immediately. Do not use abrasives or solvents. Keep the elliptical in the console. To prevent damage to assembly step 10 on page 8. The elliptical can be replaced. Use only a sealable water bottle in a clean, dry location, away from moisture and dust. 11 STORAGE When storing the elliptical, remove the batteries from the console. To replace the batteries, refer to the console, keep liquids away from the console. CONSOLE TROUBLESHOOTING...
English Manual
Page 12
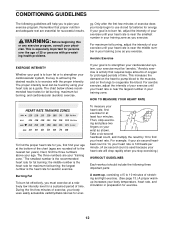
... burn fat, adjust the intensity of your exercise until your heart rate is especially important for a sustained period of time. This is near the largest number in your heart rate as you exercise. HOW TO MEASURE YOUR HEART RATE To find the proper heart rate for you, first find your body temperature, heart rate, and circulation in your age. Then, stop exercising.) WORKOUT GUIDELINES Each workout should include the...
... burn fat, adjust the intensity of your exercise until your heart rate is especially important for a sustained period of time. This is near the largest number in your heart rate as you exercise. HOW TO MEASURE YOUR HEART RATE To find the proper heart rate for you, first find your body temperature, heart rate, and circulation in your age. Then, stop exercising.) WORKOUT GUIDELINES Each workout should include the...
English Manual
Page 13
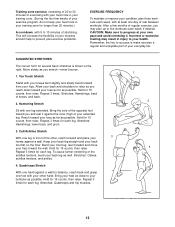
... part of your everyday life. Bend your front leg, lean forward and move your back foot flat on the floor. Training zone exercise, consisting of 20 to 30 minutes of exercising with your heart rate in your training zone. (During the first few months of regular exercise, you and rest it . After a few weeks of your exercise program, do not keep your heart rate...
... part of your everyday life. Bend your front leg, lean forward and move your back foot flat on the floor. Training zone exercise, consisting of 20 to 30 minutes of exercising with your heart rate in your training zone. (During the first few months of regular exercise, you and rest it . After a few weeks of your exercise program, do not keep your heart rate...
English Manual
Page 14
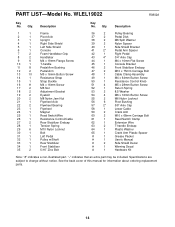
... 2 Pedal Arm 13 10 M5 x 16mm Button Screw 14 1 Resistance Strap 15 1 Strap Buckle 16 11 M4 x 16mm Screw 17 2 M6 Nut 18 2 Adjustment Bracket 19 2 Eyebolt 20 2 M8 Nylon Jam Nut 21 1 Flywheel Axle 22 2 Flywheel Bearing 23 1 Flywheel 24 1 Magnet 25 1 Reed Switch/Wire 26 1 Resistance Control/Cable 27 2 Rear Stabilizer Endcap 28 1 Tension Spring 29 6 M10 Nylon Locknut 30 1 Belt 31 1 Left Pedal 32 1 Pulley w/Shaft...
... 2 Pedal Arm 13 10 M5 x 16mm Button Screw 14 1 Resistance Strap 15 1 Strap Buckle 16 11 M4 x 16mm Screw 17 2 M6 Nut 18 2 Adjustment Bracket 19 2 Eyebolt 20 2 M8 Nylon Jam Nut 21 1 Flywheel Axle 22 2 Flywheel Bearing 23 1 Flywheel 24 1 Magnet 25 1 Reed Switch/Wire 26 1 Resistance Control/Cable 27 2 Rear Stabilizer Endcap 28 1 Tension Spring 29 6 M10 Nylon Locknut 30 1 Belt 31 1 Left Pedal 32 1 Pulley w/Shaft...
English Manual
Page 15
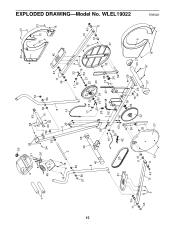
WLEL19022 15 7 11 39 43 9 50 49 13 6 51 45 51 38 54 63 57 26 54 56 56 63 55 10 56 56 8 16 16 2 3 29 14 4 13 16 13 43 42 11 16 39 56 57 56 8 46 31 30 11 41 12 43 11 13 46 34 58 16 61 25 60 62 59 35 37 17 18 22 17 20 18 19 9 53 21 22 20 28 19 53 24 23 1 48 40 13 65 35 52 36 60 59 12 13 43 41 11 37 36 29 64 15 44 29 32 33 27 5 27 47 16 R0802A EXPLODED DRAWING-Model No.
WLEL19022 15 7 11 39 43 9 50 49 13 6 51 45 51 38 54 63 57 26 54 56 56 63 55 10 56 56 8 16 16 2 3 29 14 4 13 16 13 43 42 11 16 39 56 57 56 8 46 31 30 11 41 12 43 11 13 46 34 58 16 61 25 60 62 59 35 37 17 18 22 17 20 18 19 9 53 21 22 20 28 19 53 24 23 1 48 40 13 65 35 52 36 60 59 12 13 43 41 11 37 36 29 64 15 44 29 32 33 27 5 27 47 16 R0802A EXPLODED DRAWING-Model No.
English Manual
Page 16
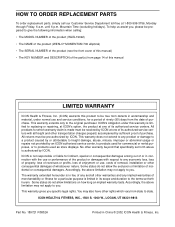
... product (WLEL19022) • The NAME of the product (WESLO® MOMENTUM 700 elliptical) • The SERIAL NUMBER of the product (see the front cover of this manual) • The KEY NUMBER and DESCRIPTION of the part(s) from page 14 of this manual LIMITED WARRANTY ICON Health & Fitness, Inc. (ICON) warrants this warranty is made must be free from defects in connection with the use or performance of the product or damages with...
... product (WLEL19022) • The NAME of the product (WESLO® MOMENTUM 700 elliptical) • The SERIAL NUMBER of the product (see the front cover of this manual) • The KEY NUMBER and DESCRIPTION of the part(s) from page 14 of this manual LIMITED WARRANTY ICON Health & Fitness, Inc. (ICON) warrants this warranty is made must be free from defects in connection with the use or performance of the product or damages with...


