
English Manual
Page 1
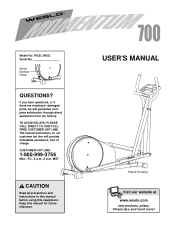
... missing or damaged parts, we will provide immediate assistance, free of charge. CUSTOMER HOT LINE: 1-800-999-3756 Mon.-Fri., 6 a.m.-6 p.m. Keep this equipment. Serial Number Decal QUESTIONS? MST CAUTION Read all precautions and instructions in this manual before using this manual for future reference. USER'S MANUAL Patent Pending Visit our website at www.weslo.com new products, prizes, fitness tips, and much...
... missing or damaged parts, we will provide immediate assistance, free of charge. CUSTOMER HOT LINE: 1-800-999-3756 Mon.-Fri., 6 a.m.-6 p.m. Keep this equipment. Serial Number Decal QUESTIONS? MST CAUTION Read all precautions and instructions in this manual before using this manual for future reference. USER'S MANUAL Patent Pending Visit our website at www.weslo.com new products, prizes, fitness tips, and much...
English Manual
Page 2
TABLE OF CONTENTS IMPORTANT PRECAUTIONS 3 BEFORE YOU BEGIN 4 PART IDENTIFICATION CHART 5 ASSEMBLY 6 HOW TO USE THE ELLIPTICAL 9 MAINTENANCE 11 CONDITIONING GUIDELINES 12 PART LIST 14 EXPLODED DRAWING 15 HOW TO ORDER REPLACEMENT PARTS Back Cover LIMITED WARRANTY Back Cover WESLO is a registered trademark of ICON Health & Fitness, Inc. 2
TABLE OF CONTENTS IMPORTANT PRECAUTIONS 3 BEFORE YOU BEGIN 4 PART IDENTIFICATION CHART 5 ASSEMBLY 6 HOW TO USE THE ELLIPTICAL 9 MAINTENANCE 11 CONDITIONING GUIDELINES 12 PART LIST 14 EXPLODED DRAWING 15 HOW TO ORDER REPLACEMENT PARTS Back Cover LIMITED WARRANTY Back Cover WESLO is a registered trademark of ICON Health & Fitness, Inc. 2

English Manual
Page 3
... or any exercise program, consult your back. 12. Replace any time while exercising, stop before using the elliptical. 2. This is in -home use only. Keep children under the age of 35 or persons with a mat beneath it to ensure that is especially important for foot protection. 9. If you stop exercising on a level surface, with pre-existing health problems. Read all instructions before using the elliptical. 1. It...
... or any exercise program, consult your back. 12. Replace any time while exercising, stop before using the elliptical. 2. This is in -home use only. Keep children under the age of 35 or persons with a mat beneath it to ensure that is especially important for foot protection. 9. If you stop exercising on a level surface, with pre-existing health problems. Read all instructions before using the elliptical. 1. It...
English Manual
Page 4
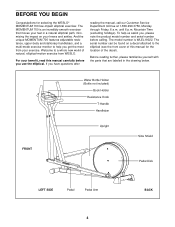
... product model number and serial number before you have questions after reading the manual, call our Customer Service Department toll-free at 1-800-999-3756, Monday through Friday, 6 a.m. BEFORE YOU BEGIN Congratulations for the location of the decal). If you use the elliptical. And the unique MOMENTUM 700 features adjustable resistance, upper-body and stationary handlebars, and a multi-mode exercise monitor to the elliptical (see the front cover of this manual...
... product model number and serial number before you have questions after reading the manual, call our Customer Service Department toll-free at 1-800-999-3756, Monday through Friday, 6 a.m. BEFORE YOU BEGIN Congratulations for the location of the decal). If you use the elliptical. And the unique MOMENTUM 700 features adjustable resistance, upper-body and stationary handlebars, and a multi-mode exercise monitor to the elliptical (see the front cover of this manual...
English Manual
Page 5
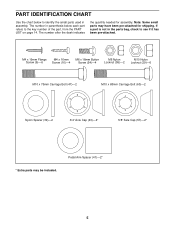
...)-2* * Extra parts may have been pre-attached for assembly. The number in parenthesis below to identify the small parts used in the parts bag, check to the key number of the part, from the PART LIST on page 14. The number after the dash indicates the quantity needed for shipping. Pedal Arm Spacer (41)-2* 5 Note: Some small parts may be included. PART IDENTIFICATION CHART Use the chart below each part refers to...
...)-2* * Extra parts may have been pre-attached for assembly. The number in parenthesis below to identify the small parts used in the parts bag, check to the key number of the part, from the PART LIST on page 14. The number after the dash indicates the quantity needed for shipping. Pedal Arm Spacer (41)-2* 5 Note: Some small parts may be included. PART IDENTIFICATION CHART Use the chart below each part refers to...
English Manual
Page 6
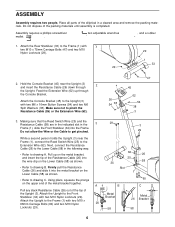
Hold the Console Bracket (45) near the Frame (1), connect the Reed Switch Wire (25) to drawing C. Feed the Extension Wire (62) up on the metal bracket, and insert the tip of the Resistance Cable (26) into the wire clip on the Lower Cable (58) as shown. 62 26 25 58 34 • Refer to the Upright (3) with two M10 x 68mm Carriage Bolts (60) and...
Hold the Console Bracket (45) near the Frame (1), connect the Reed Switch Wire (25) to drawing C. Feed the Extension Wire (62) up on the metal bracket, and insert the tip of the Resistance Cable (26) into the wire clip on the Lower Cable (58) as shown. 62 26 25 58 34 • Refer to the Upright (3) with two M10 x 68mm Carriage Bolts (60) and...
English Manual
Page 7
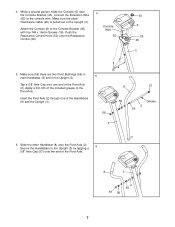
... grease to the Upright (3) by tapping a 6 5/8" Axle Cap (57) onto the end of the Pivot Axle (2). Secure the Handlebars to the Pivot Axle. Attach the Console (6) to the console wire. While a second person holds the Console (6) near the Console Bracket (45), connect the Extension Wire (62) to the Console Bracket (45) with four M4 x 16mm Screws (16). Push the Resistance Control Knob (50) onto the Resistance Control...
... grease to the Upright (3) by tapping a 6 5/8" Axle Cap (57) onto the end of the Pivot Axle (2). Secure the Handlebars to the Pivot Axle. Attach the Console (6) to the console wire. While a second person holds the Console (6) near the Console Bracket (45), connect the Extension Wire (62) to the Console Bracket (45) with four M4 x 16mm Screws (16). Push the Resistance Control Knob (50) onto the Resistance Control...

English Manual
Page 8
... Pedal Arm Bushings (11) in the indicated locations. Alkaline batteries are turned so the negative ends of grease to protect the floor or carpet from damage. 8 Attach the Left Pedal to the Upright (3) with the Left Pedal (31) onto the Handlebar and the Crank Arm. Attach the T-handle (10) to one onto the Crank Arm. Make sure that the batteries are recommended. 10 To install batteries, first locate the battery...
... Pedal Arm Bushings (11) in the indicated locations. Alkaline batteries are turned so the negative ends of grease to protect the floor or carpet from damage. 8 Attach the Left Pedal to the Upright (3) with the Left Pedal (31) onto the Handlebar and the Crank Arm. Attach the T-handle (10) to one onto the Crank Arm. Make sure that the batteries are recommended. 10 To install batteries, first locate the battery...
English Manual
Page 9
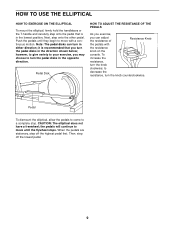
... knob counterclockwise. the pedals will continue to move with the resistance knob on the console. it is recommended that is in the direction shown below; Pedal Disk HOW TO ADJUST THE RESISTANCE OF THE PEDALS As you exercise, you can turn the pedal disks in the lowest position. When the pedals are stationary, step off the lowest pedal. 9 To increase the resistance, turn the pedal disks in either direction; to a complete stop...
... knob counterclockwise. the pedals will continue to move with the resistance knob on the console. it is recommended that is in the direction shown below; Pedal Disk HOW TO ADJUST THE RESISTANCE OF THE PEDALS As you exercise, you can turn the pedal disks in the lowest position. When the pedals are stationary, step off the lowest pedal. 9 To increase the resistance, turn the pedal disks in either direction; to a complete stop...
English Manual
Page 10
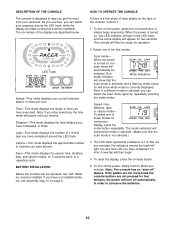
... mode displays your progress around the track will then be installed. Distance-This mode displays the total distance you can be operated, two "AA" batteries must be ready for about four minutes. Calorie-This mode displays the approximate number of 1/4 mile. Select one at a time until you stop exercising, the time mode will then begin exercising. The LED track represents a distance of Calories you have not installed batteries, see assembly step 10 on /reset button...
... mode displays your progress around the track will then be installed. Distance-This mode displays the total distance you can be operated, two "AA" batteries must be ready for about four minutes. Calorie-This mode displays the approximate number of 1/4 mile. Select one at a time until you stop exercising, the time mode will then begin exercising. The LED track represents a distance of Calories you have not installed batteries, see assembly step 10 on /reset button...

English Manual
Page 11
... to assembly step 10 on page 8. CONSOLE TROUBLESHOOTING If the console does not function properly, the batteries should be wiped clean with a soft cloth and mild detergent. Keep the elliptical in the console. Replace any worn parts immediately. Use only a sealable water bottle in a clean, dry location, away from the console. MAINTENANCE Inspect and tighten all parts of the elliptical regularly. The elliptical can be replaced. Do not use abrasives...
... to assembly step 10 on page 8. CONSOLE TROUBLESHOOTING If the console does not function properly, the batteries should be wiped clean with a soft cloth and mild detergent. Keep the elliptical in the console. Replace any worn parts immediately. Use only a sealable water bottle in a clean, dry location, away from the console. MAINTENANCE Inspect and tighten all parts of the elliptical regularly. The elliptical can be replaced. Do not use abrasives...
English Manual
Page 12
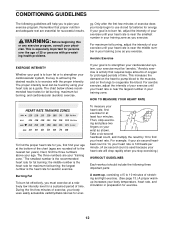
...-existing health problems. gy. Only after the first few minutes of exercise, your heart rate, first exercise for successful results. Then, stop exercising.) WORKOUT GUIDELINES Each workout should include the following guidelines will drop rapidly when you , first find the three numbers above your training zone as shown. Take a six-second heartbeat count, and multiply the result by using your cardiovascular system, the key...
...-existing health problems. gy. Only after the first few minutes of exercise, your heart rate, first exercise for successful results. Then, stop exercising.) WORKOUT GUIDELINES Each workout should include the following guidelines will drop rapidly when you , first find the three numbers above your training zone as shown. Take a six-second heartbeat count, and multiply the result by using your cardiovascular system, the key...
English Manual
Page 13
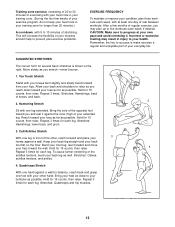
... it against the inner thigh of your extended leg. Incorrect or excessive training may plan up to five workouts each leg. Remember, the key to success is shown at least one leg in front of the other hand. Move slowly as well. Hamstring Stretch Sit with one... exercise program, do not keep your heart rate in your training zone for balance, reach back and grasp one leg extended. Training zone exercise, consisting of 20 to 30 minutes of exercising with your heart rate in your training zone. (During the first few months of regular exercise, you may result in injury to your health....
... it against the inner thigh of your extended leg. Incorrect or excessive training may plan up to five workouts each leg. Remember, the key to success is shown at least one leg in front of the other hand. Move slowly as well. Hamstring Stretch Sit with one... exercise program, do not keep your heart rate in your training zone for balance, reach back and grasp one leg extended. Training zone exercise, consisting of 20 to 30 minutes of exercising with your heart rate in your training zone. (During the first few months of regular exercise, you may result in injury to your health....
English Manual
Page 14
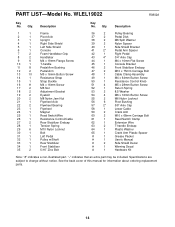
... x 75mm Carriage Bolt 48 1 Cable Clamp Assembly 49 1 M4 x 64mm Button Screw 50 1 Resistance Control Knob 51 4 M5 x 28mm Button Screw 52 1 Return Spring 53 2 8.5 Washer 54 4 M6 x 16mm Button Screw 55 2 M6 Nylon Locknut 56 6 Pivot Bushing 57 2* 5/8" Axle Cap 58 1 Lower Cable 59 2 Crank Arm 60 2 M10 x 68mm Carriage Bolt 61 1 Reed Switch Clamp 62 1 Extension Wire 63 2 T-handle Endcap 64 1 Plastic Washer 65 1 Crank Arm Plastic Spacer # 1 Grease Packet # 1 User's Manual # 2 Side...
... x 75mm Carriage Bolt 48 1 Cable Clamp Assembly 49 1 M4 x 64mm Button Screw 50 1 Resistance Control Knob 51 4 M5 x 28mm Button Screw 52 1 Return Spring 53 2 8.5 Washer 54 4 M6 x 16mm Button Screw 55 2 M6 Nylon Locknut 56 6 Pivot Bushing 57 2* 5/8" Axle Cap 58 1 Lower Cable 59 2 Crank Arm 60 2 M10 x 68mm Carriage Bolt 61 1 Reed Switch Clamp 62 1 Extension Wire 63 2 T-handle Endcap 64 1 Plastic Washer 65 1 Crank Arm Plastic Spacer # 1 Grease Packet # 1 User's Manual # 2 Side...
English Manual
Page 15
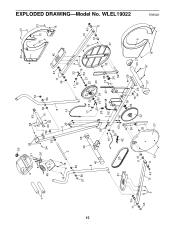
WLEL19022 15 7 11 39 43 9 50 49 13 6 51 45 51 38 54 63 57 26 54 56 56 63 55 10 56 56 8 16 16 2 3 29 14 4 13 16 13 43 42 11 16 39 56 57 56 8 46 31 30 11 41 12 43 11 13 46 34 58 16 61 25 60 62 59 35 37 17 18 22 17 20 18 19 9 53 21 22 20 28 19 53 24 23 1 48 40 13 65 35 52 36 60 59 12 13 43 41 11 37 36 29 64 15 44 29 32 33 27 5 27 47 16 R0802A EXPLODED DRAWING-Model No.
WLEL19022 15 7 11 39 43 9 50 49 13 6 51 45 51 38 54 63 57 26 54 56 56 63 55 10 56 56 8 16 16 2 3 29 14 4 13 16 13 43 42 11 16 39 56 57 56 8 46 31 30 11 41 12 43 11 13 46 34 58 16 61 25 60 62 59 35 37 17 18 22 17 20 18 19 9 53 21 22 20 28 19 53 24 23 1 48 40 13 65 35 52 36 60 59 12 13 43 41 11 37 36 29 64 15 44 29 32 33 27 5 27 47 16 R0802A EXPLODED DRAWING-Model No.
English Manual
Page 16
... (WESLO® MOMENTUM 700 elliptical) • The SERIAL NUMBER of the product (see the front cover of this product to be pre-authorized by ICON at one of its authorized service centers. You may not apply to you specific legal rights. All returns must be received by ICON. ICON's obligation under normal use and service conditions, for which vary from page 14 of this manual LIMITED WARRANTY ICON Health & Fitness...
... (WESLO® MOMENTUM 700 elliptical) • The SERIAL NUMBER of the product (see the front cover of this product to be pre-authorized by ICON at one of its authorized service centers. You may not apply to you specific legal rights. All returns must be received by ICON. ICON's obligation under normal use and service conditions, for which vary from page 14 of this manual LIMITED WARRANTY ICON Health & Fitness...


