
English Manual
Page 1
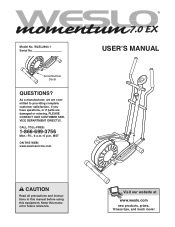
....wesloservice.com USER'S MANUAL CAUTION Read all precautions and instructions in this manual before using this manual for future reference. Visit our website at www.weslo.com new products, prizes, fitness tips, and much more! Serial Number Decal QUESTIONS? CALL TOLL-FREE: 1-866-699-3756 Mon.-Fri., 6 a.m.-6 p.m. WLEL2904.1 Serial No. Keep this equipment. If you have questions, or if parts are committed to...
....wesloservice.com USER'S MANUAL CAUTION Read all precautions and instructions in this manual before using this manual for future reference. Visit our website at www.weslo.com new products, prizes, fitness tips, and much more! Serial Number Decal QUESTIONS? CALL TOLL-FREE: 1-866-699-3756 Mon.-Fri., 6 a.m.-6 p.m. WLEL2904.1 Serial No. Keep this equipment. If you have questions, or if parts are committed to...
English Manual
Page 2
TABLE OF CONTENTS IMPORTANT PRECAUTIONS 3 BEFORE YOU BEGIN 4 ASSEMBLY 5 HOW TO USE THE ELLIPTICAL EXERCISER 9 MAINTENANCE AND TROUBLESHOOTING 11 CONDITIONING GUIDELINES 13 PART LIST 14 EXPLODED DRAWING 15 HOW TO ORDER REPLACEMENT PARTS Back Cover LIMITED WARRANTY Back Cover WESLO is a registered trademark of ICON IP, Inc. 2
TABLE OF CONTENTS IMPORTANT PRECAUTIONS 3 BEFORE YOU BEGIN 4 ASSEMBLY 5 HOW TO USE THE ELLIPTICAL EXERCISER 9 MAINTENANCE AND TROUBLESHOOTING 11 CONDITIONING GUIDELINES 13 PART LIST 14 EXPLODED DRAWING 15 HOW TO ORDER REPLACEMENT PARTS Back Cover LIMITED WARRANTY Back Cover WESLO is a registered trademark of ICON IP, Inc. 2
English Manual
Page 3
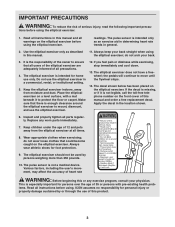
... front cover of this manual and order a free replacement decal. do not arch your back straight when using the elliptical exerciser. 1. The pulse sensor is especially important for personal injury or property damage sustained by persons weighing more than 250 pounds. 10. The pulse sensor is the responsibility of all warnings on the elliptical exerciser. Use the elliptical exerciser only as an exercise aid in determining heart rate trends...
... front cover of this manual and order a free replacement decal. do not arch your back straight when using the elliptical exerciser. 1. The pulse sensor is especially important for personal injury or property damage sustained by persons weighing more than 250 pounds. 10. The pulse sensor is the responsibility of all warnings on the elliptical exerciser. Use the elliptical exerciser only as an exercise aid in determining heart rate trends...
English Manual
Page 4
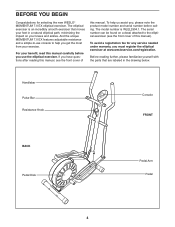
... the parts that moves your feet in the drawing below. Handlebar Pulse Bar Resistance Knob Console FRONT BACK Pedal Disk Pedal Arm Pedal 4 For your exercise. The serial number can be found on your knees and ankles. To help you get the most from your benefit, read this manual. To avoid a registration fee for selecting the new WESLO® MOMENTUM 7.0 EX elliptical exerciser. BEFORE YOU BEGIN Congratulations for any service needed under warranty...
... the parts that moves your feet in the drawing below. Handlebar Pulse Bar Resistance Knob Console FRONT BACK Pedal Disk Pedal Arm Pedal 4 For your exercise. The serial number can be found on your knees and ankles. To help you get the most from your benefit, read this manual. To avoid a registration fee for selecting the new WESLO® MOMENTUM 7.0 EX elliptical exerciser. BEFORE YOU BEGIN Congratulations for any service needed under warranty...
English Manual
Page 5
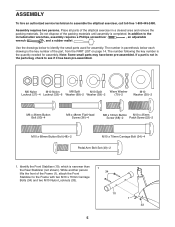
In addition to assemble the elliptical exerciser, call toll-free 1-800-445-2480. Do not dispose of the part, from the PART LIST on page 14. If a part is completed. Use the drawings below each drawing is the key number of the packing materials until assembly is not in the parts bag, check to see if it has been pre-assembled. M6 Nylon M10 Nylon...
In addition to assemble the elliptical exerciser, call toll-free 1-800-445-2480. Do not dispose of the part, from the PART LIST on page 14. If a part is completed. Use the drawings below each drawing is the key number of the packing materials until assembly is not in the parts bag, check to see if it has been pre-assembled. M6 Nylon M10 Nylon...

English Manual
Page 6
... the Speed Wire (44), which is thin- Plug the Speed Wire into the jack on the Upright (2). Attach the Console (23) to the Frame with two M10 x 70mm Carriage Bolts (34) and two M10 Nylon Locknuts (33). 3. Slide the Pulse Bar (65) onto the indicated bracket on the back of the Console. Be careful to the Console. Turn the Resistance Knob (45) counterclockwise to the lowest setting...
... the Speed Wire (44), which is thin- Plug the Speed Wire into the jack on the Upright (2). Attach the Console (23) to the Frame with two M10 x 70mm Carriage Bolts (34) and two M10 Nylon Locknuts (33). 3. Slide the Pulse Bar (65) onto the indicated bracket on the back of the Console. Be careful to the Console. Turn the Resistance Knob (45) counterclockwise to the lowest setting...

English Manual
Page 7
... the prongs on the Lower Cable (55) as shown. Do not fully tighten the Button Bolts yet. make sure that 59 the wires and 48 cables do not get pinched and damaged 44 during this step to assemble the Right Handlebar (8) and the other Pedal to the Reed Switch Wire (53). Slide the Upright (2) onto the Frame. Do not tighten the Button Bolts yet. 7. Identify the Left...
... the prongs on the Lower Cable (55) as shown. Do not fully tighten the Button Bolts yet. make sure that 59 the wires and 48 cables do not get pinched and damaged 44 during this step to assemble the Right Handlebar (8) and the other Pedal to the Reed Switch Wire (53). Slide the Upright (2) onto the Frame. Do not tighten the Button Bolts yet. 7. Identify the Left...
English Manual
Page 8
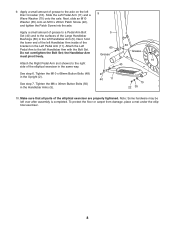
... on the left Handlebar Arm with the Bolt Set. Tighten the M10 x 68mm Button Bolts (48) in the Handlebar Arms (5). 40 11 70 22 35 10. Make sure that all parts of the elliptical exerciser in the left over after assembly is completed. Next, slide an M10 Washer (35) onto an M10 x 25mm Patch Screw (22), and tighten the Patch Screw into the axle. 9.
... on the left Handlebar Arm with the Bolt Set. Tighten the M10 x 68mm Button Bolts (48) in the Handlebar Arms (5). 40 11 70 22 35 10. Make sure that all parts of the elliptical exerciser in the left over after assembly is completed. Next, slide an M10 Washer (35) onto an M10 x 25mm Patch Screw (22), and tighten the Patch Screw into the axle. 9.
English Manual
Page 9
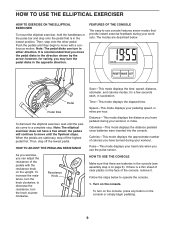
... pulse bar and step onto the pedal that provide instant exercise feedback during your workouts. If there is in either direction. The modes are described below to a complete stop. HOW TO ADJUST THE PEDALING RESISTANCE As you exercise, you use console features seven modes that is a thin sheet of clear plastic on the console. Follow the steps below . Distance-This mode displays the distance you have pedaled during your heart rate when you can turn the knob...
... pulse bar and step onto the pedal that provide instant exercise feedback during your workouts. If there is in either direction. The modes are described below to a complete stop. HOW TO ADJUST THE PEDALING RESISTANCE As you exercise, you use console features seven modes that is a thin sheet of clear plastic on the console. Follow the steps below . Distance-This mode displays the distance you have pedaled during your heart rate when you can turn the knob...

English Manual
Page 10
... not moved and the console buttons are thin sheets of these modes for continuous display, repeatedly press the MODE button. To set a goal quickly, hold down the SET button until the letters TIME, DIST, or CAL appear near the lower edge of the modes. Next, press the MODE button repeatedly until the number in the display. When the desired number is turned on the pulse sensors, peel them off. When your workout, first stop pedaling...
... not moved and the console buttons are thin sheets of these modes for continuous display, repeatedly press the MODE button. To set a goal quickly, hold down the SET button until the letters TIME, DIST, or CAL appear near the lower edge of the modes. Next, press the MODE button repeatedly until the number in the display. When the desired number is turned on the pulse sensors, peel them off. When your workout, first stop pedaling...
English Manual
Page 11
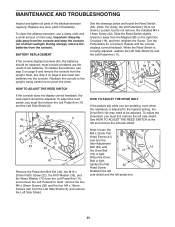
... Adjustment Bolt (62) until the console displays correct feedback. When the Drive Belt is tight. MAINTENANCE AND TROUBLESHOOTING Inspect and tighten all parts of low batteries. See the drawings below and locate the Reed Switch (53). (Note: For clarity, the left pedal arm. 11 To replace the batteries, see step 4 on the right Disc Crossbar (16), and then retighten the Screw. To clean the elliptical exerciser, use a damp cloth and a small amount of direct...
... Adjustment Bolt (62) until the console displays correct feedback. When the Drive Belt is tight. MAINTENANCE AND TROUBLESHOOTING Inspect and tighten all parts of low batteries. See the drawings below and locate the Reed Switch (53). (Note: For clarity, the left pedal arm. 11 To replace the batteries, see step 4 on the right Disc Crossbar (16), and then retighten the Screw. To clean the elliptical exerciser, use a damp cloth and a small amount of direct...
English Manual
Page 12
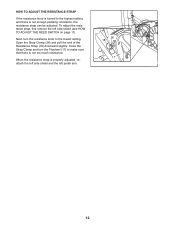
... turn the resistance knob to make sure that there is not enough pedaling resistance, the resistance strap can be adjusted. Open the Strap Clamp (26) and pull the end of the Resistance Strap (18) downward slightly. When the resistance strap is properly adjusted, reattach the left side shield and the left side shield (see HOW TO ADJUST THE REED SWITCH on page 11). To adjust the resistance strap, first remove the left pedal arm...
... turn the resistance knob to make sure that there is not enough pedaling resistance, the resistance strap can be adjusted. Open the Strap Clamp (26) and pull the end of the Resistance Strap (18) downward slightly. When the resistance strap is properly adjusted, reattach the left side shield and the left side shield (see HOW TO ADJUST THE REED SWITCH on page 11). To adjust the resistance strap, first remove the left pedal arm...

English Manual
Page 13
...-existing health problems. The pulse sensor is to burn fat or to strengthen your body uses easily accessible carbohydrate calories for you exercise. EXERCISE INTENSITY Whether your goal is not a medical device. During the first few weeks of your exercise program, do not keep your heart rate in your training zone as a guide. The pulse sensor is to exercise with at least one day of rest between workouts...
...-existing health problems. The pulse sensor is to burn fat or to strengthen your body uses easily accessible carbohydrate calories for you exercise. EXERCISE INTENSITY Whether your goal is not a medical device. During the first few weeks of your exercise program, do not keep your heart rate in your training zone as a guide. The pulse sensor is to exercise with at least one day of rest between workouts...
English Manual
Page 14
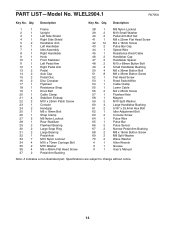
... Screw 53 1 Reed Switch/Wire 54 1 Cable Clamp 55 1 Lower Cable 56 2 M4 x 25mm Screw 57 1 Flywheel Axle 58 1 Magnet 59 2 M10 Split Washer 60 4 Large Handlebar Bushing 61 2 5/16" x 25.4mm Hex Bolt 62 1 Idler Adjustment Bolt 63 2 Console Screw 64 1 Pulse Wire 65 1 Pulse Bar 66 2 Pulse Sensor 67 2 Narrow Pedal Arm Bushing 68 2 M8 x 16mm Button Screw 69 2 M8 Split Washer 70 2 Wave Washer # 1 Allen Wrench # 1 Grease # 1 User's Manual Note: # indicates a non-illustrated part...
... Screw 53 1 Reed Switch/Wire 54 1 Cable Clamp 55 1 Lower Cable 56 2 M4 x 25mm Screw 57 1 Flywheel Axle 58 1 Magnet 59 2 M10 Split Washer 60 4 Large Handlebar Bushing 61 2 5/16" x 25.4mm Hex Bolt 62 1 Idler Adjustment Bolt 63 2 Console Screw 64 1 Pulse Wire 65 1 Pulse Bar 66 2 Pulse Sensor 67 2 Narrow Pedal Arm Bushing 68 2 M8 x 16mm Button Screw 69 2 M8 Split Washer 70 2 Wave Washer # 1 Allen Wrench # 1 Grease # 1 User's Manual Note: # indicates a non-illustrated part...
English Manual
Page 15
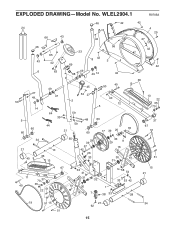
EXPLODED DRAWING-Model No. WLEL2904.1 R0705A 24 66 43 46 42 42 4 25 42 27 46 65 43 42 6 63 23 69 68 47 49 56 8 42 3 49 14 42 27 49 50 14 5 60 60 49 47 45 52 27 2 50 40 40 12 5 64 59 33 48 60 44 59 21 60 17 39 20 18 34 21 40 10 36 13 55 29 39 57 42 26 33 33 29 9 16 30 61 31 42 42 36 13 22 35 70 37 67 51 51 11 40 70 37 35 22 51 67 33 41 31 32 58 54 33 53 42 61 30 1 16 7 38 33 28 15 21 19 51 15 21 34 62 51 15
EXPLODED DRAWING-Model No. WLEL2904.1 R0705A 24 66 43 46 42 42 4 25 42 27 46 65 43 42 6 63 23 69 68 47 49 56 8 42 3 49 14 42 27 49 50 14 5 60 60 49 47 45 52 27 2 50 40 40 12 5 64 59 33 48 60 44 59 21 60 17 39 20 18 34 21 40 10 36 13 55 29 39 57 42 26 33 33 29 9 16 30 61 31 42 42 36 13 22 35 70 37 67 51 51 11 40 70 37 35 22 51 67 33 41 31 32 58 54 33 53 42 61 30 1 16 7 38 33 28 15 21 19 51 15 21 34 62 51 15

English Manual
Page 16
... cover of this manual) • the KEY NUMBER and DESCRIPTION of the part(s) (see the front cover of this manual. For in workmanship and material, under this warranty is shipped to a service center, freight charges to and from the service center will be free from defects in -home service, the customer will be pre-authorized by ICON. products used as store display models. ICON is limited in connection with the use...
... cover of this manual) • the KEY NUMBER and DESCRIPTION of the part(s) (see the front cover of this manual. For in workmanship and material, under this warranty is shipped to a service center, freight charges to and from the service center will be free from defects in -home service, the customer will be pre-authorized by ICON. products used as store display models. ICON is limited in connection with the use...


