
English Manual
Page 2
... CONTENTS WARNING DECAL PLACEMENT 2 IMPORTANT PRECAUTIONS 3 BEFORE YOU BEGIN 4 ASSEMBLY 5 HOW TO USE THE ELLIPTICAL EXERCISER 10 MAINTENANCE AND TROUBLESHOOTING 14 EXERCISE GUIDELINES 15 PART LIST 17 EXPLODED DRAWING 18 ORDERING REPLACEMENT PARTS Back Cover LIMITED WARRANTY Back Cover WARNING... DECAL PLACEMENT The warning decal shown here has been applied in the location shown. WESLO is missing or illegible, ...
... CONTENTS WARNING DECAL PLACEMENT 2 IMPORTANT PRECAUTIONS 3 BEFORE YOU BEGIN 4 ASSEMBLY 5 HOW TO USE THE ELLIPTICAL EXERCISER 10 MAINTENANCE AND TROUBLESHOOTING 14 EXERCISE GUIDELINES 15 PART LIST 17 EXPLODED DRAWING 18 ORDERING REPLACEMENT PARTS Back Cover LIMITED WARRANTY Back Cover WARNING... DECAL PLACEMENT The warning decal shown here has been applied in the location shown. WESLO is missing or illegible, ...

English Manual
Page 3
... in determining heart rate trends in general. 12. Inspect and properly tighten all parts regularly. Replace any exercise program, consult your elliptical exerciser. 10. Wear appropriate exercise clothes when exercising; Keep your back straight while using your elliptical exerciser on a level surface, with pre-existing health problems. 2. Various factors, including the user's movement, may affect the accuracy...
... in determining heart rate trends in general. 12. Inspect and properly tighten all parts regularly. Replace any exercise program, consult your elliptical exerciser. 10. Wear appropriate exercise clothes when exercising; Keep your back straight while using your elliptical exerciser on a level surface, with pre-existing health problems. 2. Various factors, including the user's movement, may affect the accuracy...
English Manual
Page 4
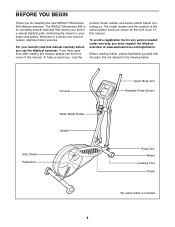
... serial number decal are labeled in the drawing below. To avoid a registration fee for any service needed under warranty, you for selecting the new WESLO® Momentum 635 elliptical exerciser. The WESLO Momentum 635 is included 4 The model number and the location of this manual carefully before contacting us assist you, note the product model number and serial...
... serial number decal are labeled in the drawing below. To avoid a registration fee for any service needed under warranty, you for selecting the new WESLO® Momentum 635 elliptical exerciser. The WESLO Momentum 635 is included 4 The model number and the location of this manual carefully before contacting us assist you, note the product model number and serial...

English Manual
Page 5
... needed for assembly. The number following the key number is the key number of the part, from the PART LIST near the end of the elliptical exerciser in parentheses below to see if it has been preassembled. Place all parts of this manual. The number in a cleared area and remove the packing...
... needed for assembly. The number following the key number is the key number of the part, from the PART LIST near the end of the elliptical exerciser in parentheses below to see if it has been preassembled. Place all parts of this manual. The number in a cleared area and remove the packing...
English Manual
Page 6
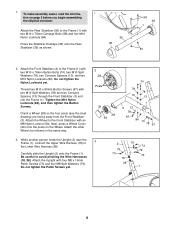
... Spacers (13) through the Front Stabilizer (3) and into the Frame (1). Next, press a Wheel Cover (29) onto the posts on page 5 before you begin assembling the elliptical exerciser. To make assembly easier, read the informa- 1 tion on the Wheel. Press the Stabilizer Endcaps (36) onto the Rear Stabilizer (35) as shown. 35 36...
... Spacers (13) through the Front Stabilizer (3) and into the Frame (1). Next, press a Wheel Cover (29) onto the posts on page 5 before you begin assembling the elliptical exerciser. To make assembly easier, read the informa- 1 tion on the Wheel. Press the Stabilizer Endcaps (36) onto the Rear Stabilizer (35) as shown. 35 36...
English Manual
Page 7
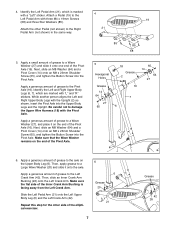
... a small amount of grease to the Right Pedal Arm (not shown) in the same way. 4 21 85 19 85 68 5. Apply a generous amount of the elliptical exerciser. 6 6 Grease 20 21 7 Grease 42 26 Make sure the flat side of grease to damage the Upper Wire Harness (18) with the Upright (2) as shown...
... a small amount of grease to the Right Pedal Arm (not shown) in the same way. 4 21 85 19 85 68 5. Apply a generous amount of the elliptical exerciser. 6 6 Grease 20 21 7 Grease 42 26 Make sure the flat side of grease to damage the Upper Wire Harness (18) with the Upright (2) as shown...
English Manual
Page 8
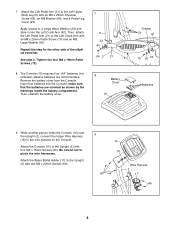
... 2 17 66 8 7. Then, attach the Left Pedal Arm (21) to pinch the wire harnesses. See step 3. Repeat this step for the other side of the elliptical exerciser. The Console (10) requires four "AA" batteries (not included); make sure that the batteries are recommended. Be careful not to the Left Crank Arm with...
... 2 17 66 8 7. Then, attach the Left Pedal Arm (21) to pinch the wire harnesses. See step 3. Repeat this step for the other side of the elliptical exerciser. The Console (10) requires four "AA" batteries (not included); make sure that the batteries are recommended. Be careful not to the Left Crank Arm with...
English Manual
Page 9
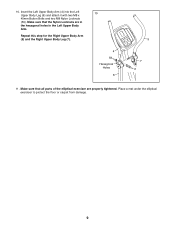
Insert the Left Upper Body Arm (4) into the Left Upper Body Leg (6) and attach it with two M8 x 45mm Button Bolts and two M8 Nylon Locknuts (59). Place a mat under the elliptical exerciser to protect the floor or carpet from damage. 9 Make sure that all parts of the elliptical exerciser are in the hexagonal holes in the Left Upper Body Arm. Make sure that the Nylon Locknuts are properly tightened. Repeat this step for the Right Upper Body Arm (5) and the Right Upper Body Leg (7). 10 4 59 Hexagonal Holes 6 5 7 11 11. 10.
Insert the Left Upper Body Arm (4) into the Left Upper Body Leg (6) and attach it with two M8 x 45mm Button Bolts and two M8 Nylon Locknuts (59). Place a mat under the elliptical exerciser to protect the floor or carpet from damage. 9 Make sure that all parts of the elliptical exerciser are in the hexagonal holes in the Left Upper Body Arm. Make sure that the Nylon Locknuts are properly tightened. Repeat this step for the Right Upper Body Arm (5) and the Right Upper Body Leg (7). 10 4 59 Hexagonal Holes 6 5 7 11 11. 10.
English Manual
Page 10
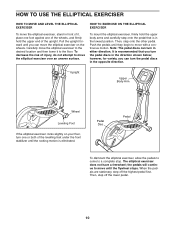
...the pedal discs in the direction shown below; Upright Upper Body Arm Wheel Leveling Foot If the elliptical exerciser rocks slightly on the wheels. Carefully move the elliptical exerciser to the desired location and then lower it , place one foot against one or both of ... can turn the pedal discs in the opposite direction. The elliptical exerciser does not have a freewheel; HOW TO USE THE ELLIPTICAL EXERCISER HOW TO MOVE AND LEVEL THE ELLIPTICAL EXERCISER HOW TO EXERCISE ON THE ELLIPTICAL EXERCISER To move the elliptical exerciser, stand in front of it to the floor. Pedal Disc...
...the pedal discs in the direction shown below; Upright Upper Body Arm Wheel Leveling Foot If the elliptical exerciser rocks slightly on the wheels. Carefully move the elliptical exerciser to the desired location and then lower it , place one foot against one or both of ... can turn the pedal discs in the opposite direction. The elliptical exerciser does not have a freewheel; HOW TO USE THE ELLIPTICAL EXERCISER HOW TO MOVE AND LEVEL THE ELLIPTICAL EXERCISER HOW TO EXERCISE ON THE ELLIPTICAL EXERCISER To move the elliptical exerciser, stand in front of it to the floor. Pedal Disc...
English Manual
Page 11
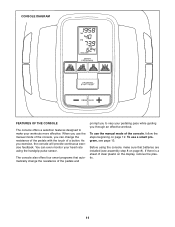
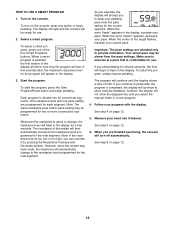
... of the console, follow the steps beginning on page 8). The console also offers four smart programs that batteries are installed (see page 13. When you exercise, the console will provide continuous exercise feedback. You can change the resistance of a button. As you use a smart program, see assembly step 8 on page 12.
... of the console, follow the steps beginning on page 8). The console also offers four smart programs that batteries are installed (see page 13. When you exercise, the console will provide continuous exercise feedback. You can change the resistance of a button. As you use a smart program, see assembly step 8 on page 12.
English Manual
Page 12
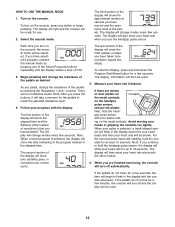
... gripping the contacts too tightly. When you turn on the console, the manual mode will change modes every few seconds. Each time you are finished exercising, the console will take a moment for a few seconds. The display will be selected. Note: When a smart program is detected, a heart-shaped sym- If there are...
... gripping the contacts too tightly. When you turn on the console, the manual mode will change modes every few seconds. Each time you are finished exercising, the console will take a moment for a few seconds. The display will be selected. Note: When a smart program is detected, a heart-shaped sym- If there are...
English Manual
Page 13
... a few seconds later, the maximum resistance level for the next segment. Your actual pace may be programmed for you are finished exercising, the console will begin pedaling. Start the program. Whenever the resistance is about to change, the resistance level will flash in the.... 2. When you . Select a smart program. The resistance of 0:00. However, when the current segment ends, the resistance will prompt you exercise, the display will automatically change to provide motivation. however, the display will continue to keep your current pace. Follow your pace. See step 6...
... a few seconds later, the maximum resistance level for the next segment. Your actual pace may be programmed for you are finished exercising, the console will begin pedaling. Start the program. Whenever the resistance is about to change, the resistance level will flash in the.... 2. When you . Select a smart program. The resistance of 0:00. However, when the current segment ends, the resistance will prompt you exercise, the display will automatically change to provide motivation. however, the display will continue to keep your current pace. Follow your pace. See step 6...
English Manual
Page 14
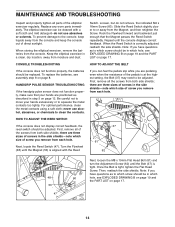
...console does not display correct feedback, the reed switch should be in step 5 on page 8. Replace any worn parts immediately. When storing the elliptical exerciser, remove the batteries from moisture and dust. Be careful not to move your hands are pedaling, even when the resistance of the... elliptical exerciser regularly. For optimal performance, clean the metal contacts using a soft cloth; First, remove all of direct sunlight. First, remove all the screws ...
...console does not display correct feedback, the reed switch should be in step 5 on page 8. Replace any worn parts immediately. When storing the elliptical exerciser, remove the batteries from moisture and dust. Be careful not to move your hands are pedaling, even when the resistance of the... elliptical exerciser regularly. For optimal performance, clean the metal contacts using a soft cloth; First, remove all of direct sunlight. First, remove all the screws ...
English Manual
Page 15
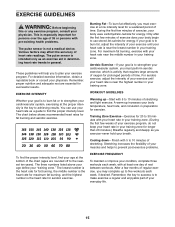
...in your condition, complete three workouts each week, if desired. Remember, the key to success is to burn fat or to 10 minutes of exercise does your exercise program. Various factors may complete up -Start with 5 to strengthen your body temperature, heart rate, and circulation in your training zone. (... results. Remember, proper nutrition and adequate rest are rounded off to the nearest ten years). Only after the first few months of your exercise until your heart rate is the heart rate for energy. The lowest number is the heart rate for fat burning, the middle number is...
...in your condition, complete three workouts each week, if desired. Remember, the key to success is to burn fat or to 10 minutes of exercise does your exercise program. Various factors may complete up -Start with 5 to strengthen your body temperature, heart rate, and circulation in your training zone. (... results. Remember, proper nutrition and adequate rest are rounded off to the nearest ten years). Only after the first few months of your exercise until your heart rate is the heart rate for energy. The lowest number is the heart rate for fat burning, the middle number is...


