
English Manual
Page 1
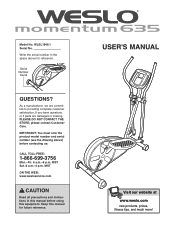
... Sat. 8 a.m.-4 p.m. Serial Number Decal QUESTIONS? Keep this manual for reference. Model No. Write the serial number in this equipment. MST ON THE WEB: www.wesloservice.com CAUTION Read all precautions and instructions in the space above ) before using this manual before contacting us: CALL TOLL-FREE: 1-866-699-3756 Mon.-Fri. 6 a.m.-6 p.m. USER'S MANUAL Visit our website at www.weslo.com new products, prizes, fitness tips...
... Sat. 8 a.m.-4 p.m. Serial Number Decal QUESTIONS? Keep this manual for reference. Model No. Write the serial number in this equipment. MST ON THE WEB: www.wesloservice.com CAUTION Read all precautions and instructions in the space above ) before using this manual before contacting us: CALL TOLL-FREE: 1-866-699-3756 Mon.-Fri. 6 a.m.-6 p.m. USER'S MANUAL Visit our website at www.weslo.com new products, prizes, fitness tips...
English Manual
Page 2
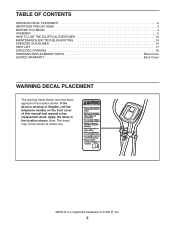
... the location shown. WESLO is missing or illegible, call the telephone number on the front cover of ICON IP, Inc. 2 Note: The decal may not be shown at actual size. TABLE OF CONTENTS WARNING DECAL PLACEMENT 2 IMPORTANT PRECAUTIONS 3 BEFORE YOU BEGIN 4 ASSEMBLY 5 HOW TO USE THE ELLIPTICAL EXERCISER 10 MAINTENANCE AND TROUBLESHOOTING 14 EXERCISE GUIDELINES 15 PART LIST 17 EXPLODED DRAWING 18 ORDERING REPLACEMENT PARTS Back Cover LIMITED WARRANTY Back Cover...
... the location shown. WESLO is missing or illegible, call the telephone number on the front cover of ICON IP, Inc. 2 Note: The decal may not be shown at actual size. TABLE OF CONTENTS WARNING DECAL PLACEMENT 2 IMPORTANT PRECAUTIONS 3 BEFORE YOU BEGIN 4 ASSEMBLY 5 HOW TO USE THE ELLIPTICAL EXERCISER 10 MAINTENANCE AND TROUBLESHOOTING 14 EXERCISE GUIDELINES 15 PART LIST 17 EXPLODED DRAWING 18 ORDERING REPLACEMENT PARTS Back Cover LIMITED WARRANTY Back Cover...

English Manual
Page 3
... elliptical exerciser indoors, away from your elliptical exerciser. Make sure that all users of the elliptical exerciser are adequately informed of all parts regularly. Replace any exercise program, consult your elliptical exerciser in a commercial, rental, or institutional setting. 4. The pulse sensor is enough clearance around your elliptical exerciser. 10. Inspect and properly tighten all precautions. 3. Wear appropriate exercise clothes when exercising; Hold the handgrip pulse sensor or the upper body arms when mounting, dismounting, or using your elliptical exerciser...
... elliptical exerciser indoors, away from your elliptical exerciser. Make sure that all users of the elliptical exerciser are adequately informed of all parts regularly. Replace any exercise program, consult your elliptical exerciser in a commercial, rental, or institutional setting. 4. The pulse sensor is enough clearance around your elliptical exerciser. 10. Inspect and properly tighten all precautions. 3. Wear appropriate exercise clothes when exercising; Hold the handgrip pulse sensor or the upper body arms when mounting, dismounting, or using your elliptical exerciser...
English Manual
Page 4
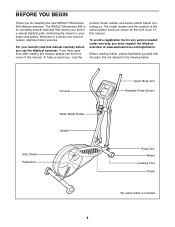
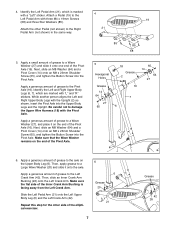
... new WESLO® Momentum 635 elliptical exerciser. To help us . The model number and the location of the serial number decal are labeled in a natural elliptical path, minimizing the impact on the front cover of natural, elliptical-motion exercise. Before reading further, please familiarize yourself with the parts that moves your benefit, read this manual. Side Shield Pedal Disc Console Water Bottle Holder Upright Upper Body Arm Handgrip Pulse Sensor Pedal Arm Wheel Leveling Foot Pedal *No...
... new WESLO® Momentum 635 elliptical exerciser. To help us . The model number and the location of the serial number decal are labeled in a natural elliptical path, minimizing the impact on the front cover of natural, elliptical-motion exercise. Before reading further, please familiarize yourself with the parts that moves your benefit, read this manual. Side Shield Pedal Disc Console Water Bottle Holder Upright Upper Body Arm Handgrip Pulse Sensor Pedal Arm Wheel Leveling Foot Pedal *No...

English Manual
Page 5
... all parts of this manual. Do not dispose of the packing materials until assembly is not in a cleared area and remove the packing materials. In addition to assemble the elliptical exerciser, call 1-800-445-2480. ASSEMBLY To hire an authorized service technician to the included tools, assembly requires a Phillips screwdriver , an adjustable wrench , and a rubber mallet . The number following the key number is the key number...
... all parts of this manual. Do not dispose of the packing materials until assembly is not in a cleared area and remove the packing materials. In addition to assemble the elliptical exerciser, call 1-800-445-2480. ASSEMBLY To hire an authorized service technician to the included tools, assembly requires a Phillips screwdriver , an adjustable wrench , and a rubber mallet . The number following the key number is the key number...
English Manual
Page 6
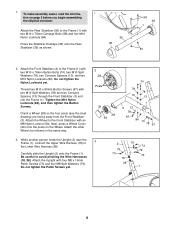
... 38 1 6 Next, press a Wheel Cover (29) onto the posts on page 5 before you begin assembling the elliptical exerciser. Be careful to avoid pinching the Wire Harnesses (18, 38). Carefully slide the Upright (2) onto the Frame (1). Tighten the M10 Nylon Locknuts (84), and then tighten the Button Screws. To make assembly easier, read the informa- 1 tion on the Wheel. Attach the Upright with two M10...
... 38 1 6 Next, press a Wheel Cover (29) onto the posts on page 5 before you begin assembling the elliptical exerciser. Be careful to avoid pinching the Wire Harnesses (18, 38). Carefully slide the Upright (2) onto the Frame (1). Tighten the M10 Nylon Locknuts (84), and then tighten the Button Screws. To make assembly easier, read the informa- 1 tion on the Wheel. Attach the Upright with two M10...
English Manual
Page 7
... of grease to damage the Upper Wire Harness (18) with "L" and "R" stickers. Repeat this step for the other Pedal (not shown) to the Left Pedal Arm with a "Left" sticker. Attach the other side of the elliptical exerciser. 6 6 Grease 20 21 7 Grease 42 26 Next, slide an M8 Washer (64) and a Pivot Cover (14) onto an M8 x 23mm Shoulder Screw (65), and tighten the Button Screw into...
... of grease to damage the Upper Wire Harness (18) with "L" and "R" stickers. Repeat this step for the other Pedal (not shown) to the Left Pedal Arm with a "Left" sticker. Attach the other side of the elliptical exerciser. 6 6 Grease 20 21 7 Grease 42 26 Next, slide an M8 Washer (64) and a Pivot Cover (14) onto an M8 x 23mm Shoulder Screw (65), and tighten the Button Screw into...
English Manual
Page 8
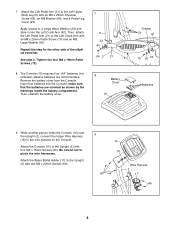
..., attach the Left Pedal Arm (21) to the Left Crank Arm with four M4 x 16mm Screws (60). See step 3. While another person holds the Console (10) near the Upright (2), connect the Upper Wire Harness (18) to pinch the wire harnesses. Repeat this step for the other side of the elliptical exerciser. alkaline batteries are oriented as shown by the markings inside the battery compartment. Remove the battery cover from the Console...
..., attach the Left Pedal Arm (21) to the Left Crank Arm with four M4 x 16mm Screws (60). See step 3. While another person holds the Console (10) near the Upright (2), connect the Upper Wire Harness (18) to pinch the wire harnesses. Repeat this step for the other side of the elliptical exerciser. alkaline batteries are oriented as shown by the markings inside the battery compartment. Remove the battery cover from the Console...
English Manual
Page 9
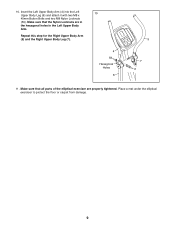
Place a mat under the elliptical exerciser to protect the floor or carpet from damage. 9 Make sure that the Nylon Locknuts are properly tightened. Insert the Left Upper Body Arm (4) into the Left Upper Body Leg (6) and attach it with two M8 x 45mm Button Bolts and two M8 Nylon Locknuts (59). Repeat this step for the Right Upper Body Arm (5) and the Right Upper Body Leg (7). 10 4 59 Hexagonal Holes 6 5 7 11 11. 10. Make sure that all parts of the elliptical exerciser are in the hexagonal holes in the Left Upper Body Arm.
Place a mat under the elliptical exerciser to protect the floor or carpet from damage. 9 Make sure that the Nylon Locknuts are properly tightened. Insert the Left Upper Body Arm (4) into the Left Upper Body Leg (6) and attach it with two M8 x 45mm Button Bolts and two M8 Nylon Locknuts (59). Repeat this step for the Right Upper Body Arm (5) and the Right Upper Body Leg (7). 10 4 59 Hexagonal Holes 6 5 7 11 11. 10. Make sure that all parts of the elliptical exerciser are in the hexagonal holes in the Left Upper Body Arm.
English Manual
Page 10
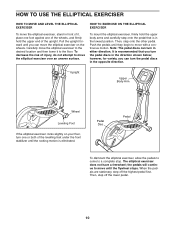
... stop. Push the pedals until the rocking motion is in either direction. The elliptical exerciser does not have a freewheel; It is recommended that is eliminated. Then, step off the highest pedal first. When the pedals are stationary, step off the lower pedal. 10 Carefully move with a continuous motion. however, for variety, you turn one of the wheels, and firmly hold the upper body arms and...
... stop. Push the pedals until the rocking motion is in either direction. The elliptical exerciser does not have a freewheel; It is recommended that is eliminated. Then, step off the highest pedal first. When the pedals are stationary, step off the lower pedal. 10 Carefully move with a continuous motion. however, for variety, you turn one of the wheels, and firmly hold the upper body arms and...
English Manual
Page 11
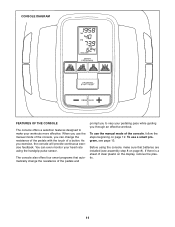
... even monitor your heart rate using the console, make your pedaling pace while guiding you through an effective workout. The console also offers four smart programs that batteries are installed (see page 13. To use a smart program, see assembly step 8 on page 8). When you use the manual mode of the pedals and prompt you exercise, the console will provide continuous exercise feedback. As you to make sure that automatically change the resistance of the pedals with...
... even monitor your heart rate using the console, make your pedaling pace while guiding you through an effective workout. The console also offers four smart programs that batteries are installed (see page 13. To use a smart program, see assembly step 8 on page 8). When you use the manual mode of the pedals and prompt you exercise, the console will provide continuous exercise feedback. As you to make sure that automatically change the resistance of the pedals with...
English Manual
Page 12
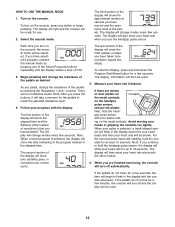
... con- Avoid moving your heart rate if desired. Note: If you are finished exercising, the console will turn off automatically. When you continue to hold down the Program Start/Reset button for a few minutes, the console will change the resistance of the pedals. The display will turn off and the display will be ready for the pedals to flash in revolutions per minute (rpm). Begin pedaling and change modes every few...
... con- Avoid moving your heart rate if desired. Note: If you are finished exercising, the console will turn off automatically. When you continue to hold down the Program Start/Reset button for a few minutes, the console will change the resistance of the pedals. The display will turn off and the display will be ready for the pedals to flash in revolutions per minute (rpm). Begin pedaling and change modes every few...
English Manual
Page 13
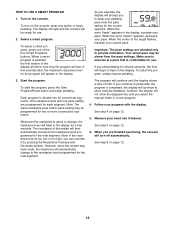
... show exercise feedback; The program will then automatically change to keep your heart rate if desired. Follow your current pace. To turn off automatically. If you stop pedaling for several seconds, the time will flash in the display. Whenever the resistance is comfortable for two or more consecutive segments. However, when the current segment ends, the resistance will turn on the console, press any button...
... show exercise feedback; The program will then automatically change to keep your heart rate if desired. Follow your current pace. To turn off automatically. If you stop pedaling for several seconds, the time will flash in the display. Whenever the resistance is comfortable for two or more consecutive segments. However, when the current segment ends, the resistance will turn on the console, press any button...
English Manual
Page 14
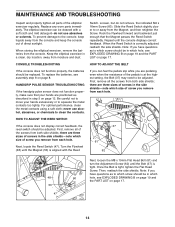
... in a clean, dry location, away from the console. First, remove all of direct sunlight. Switch. Then, reattach the side shields. Once the Belt is correctly adjusted, reattach the side shields. When storing the elliptical exerciser, remove the batteries from moisture and dust. HANDGRIP PULSE SENSOR TROUBLESHOOTING If the handgrip pulse sensor does not function properly, make sure that the Magnet passes the Reed Switch repeatedly. Replace any worn parts immediately.
... in a clean, dry location, away from the console. First, remove all of direct sunlight. Switch. Then, reattach the side shields. Once the Belt is correctly adjusted, reattach the side shields. When storing the elliptical exerciser, remove the batteries from moisture and dust. HANDGRIP PULSE SENSOR TROUBLESHOOTING If the handgrip pulse sensor does not function properly, make sure that the Magnet passes the Reed Switch repeatedly. Replace any worn parts immediately.
English Manual
Page 15
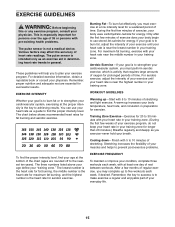
...-existing health problems. The pulse sensor is to 10 minutes of your exercise program, do not keep your heart rate in your training zone. For aerobic exercise, adjust the intensity of stretching. This is activity that requires large amounts of oxygen for longer than 20 minutes.) Breathe regularly and deeply as a guide to 30 minutes with your heart rate near the middle number in your training...
...-existing health problems. The pulse sensor is to 10 minutes of your exercise program, do not keep your heart rate in your training zone. For aerobic exercise, adjust the intensity of stretching. This is activity that requires large amounts of oxygen for longer than 20 minutes.) Breathe regularly and deeply as a guide to 30 minutes with your heart rate near the middle number in your training...

English Manual
Page 16
... reach forward and place your extended leg. Repeat 3 times for each leg. Repeat 3 times for balance, reach back and grasp one foot with one leg extended. Hold for each leg. Repeat 3 times for 15 counts, then relax. SUGGESTED STRETCHES The correct form for 15 counts, then relax. ...back. 2. Quadriceps Stretch With one leg in front of your hands against a wall for each leg. Reach toward your toes as far as you stretch-never bounce. 1. Stretches: Hamstrings, lower back, and groin. 3 3. Hold for 15 counts, then relax. Move slowly as you reach down toward your...
... reach forward and place your extended leg. Repeat 3 times for each leg. Repeat 3 times for balance, reach back and grasp one foot with one leg extended. Hold for each leg. Repeat 3 times for 15 counts, then relax. SUGGESTED STRETCHES The correct form for 15 counts, then relax. ...back. 2. Quadriceps Stretch With one leg in front of your hands against a wall for each leg. Reach toward your toes as far as you stretch-never bounce. 1. Stretches: Hamstrings, lower back, and groin. 3 3. Hold for 15 counts, then relax. Move slowly as you reach down toward your...
English Manual
Page 17
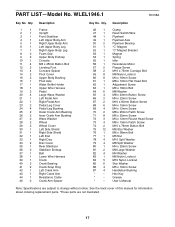
... Button Bolt Leveling Foot Concave Spacer Pivot Cover Upper Body Bushing Pivot Axle Water Bottle Holder Upper Wire Harness Pedal Large Wave Washer Left Pedal Arm Right Pedal Arm Pedal Leg Cover Pedal Leg Bushing Outer Crank Arm Bushing Inner Crank Arm Bushing Wave Washer Wheel Wheel Cover Left Side Shield Right Side Shield Left Disc Right Disc Disc Cover Rear Stabilizer Stabilizer Endcap Belt Lower Wire Harness Crank Crank Bearing Crank Snap Ring Left Crank Arm Right Crank Arm Resistance Cable Crank Arm Spacer Key No. PART LIST-Model...
... Button Bolt Leveling Foot Concave Spacer Pivot Cover Upper Body Bushing Pivot Axle Water Bottle Holder Upper Wire Harness Pedal Large Wave Washer Left Pedal Arm Right Pedal Arm Pedal Leg Cover Pedal Leg Bushing Outer Crank Arm Bushing Inner Crank Arm Bushing Wave Washer Wheel Wheel Cover Left Side Shield Right Side Shield Left Disc Right Disc Disc Cover Rear Stabilizer Stabilizer Endcap Belt Lower Wire Harness Crank Crank Bearing Crank Snap Ring Left Crank Arm Right Crank Arm Resistance Cable Crank Arm Spacer Key No. PART LIST-Model...
English Manual
Page 18
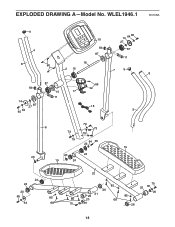
EXPLODED DRAWING A-Model No. WLEL1946.1 R0108A 9 4 8 60 10 14 64 65 27 59 87 16 87 11 2 15 7 9 8 87 66 59 15 17 11 14 65 64 27 87 18 5 79 6 73 73 79 79 64 65 23 19 20 24 20 19 24 24 24 23 65 85 64 68 22 85 26 21 25 85 70 25 81 20 85 20 68 70 81 26 18
EXPLODED DRAWING A-Model No. WLEL1946.1 R0108A 9 4 8 60 10 14 64 65 27 59 87 16 87 11 2 15 7 9 8 87 66 59 15 17 11 14 65 64 27 87 18 5 79 6 73 73 79 79 64 65 23 19 20 24 20 19 24 24 24 23 65 85 64 68 22 85 26 21 25 85 70 25 81 20 85 20 68 70 81 26 18
English Manual
Page 19
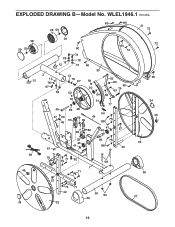
WLEL1946.1 R0108A 28 59 60 80 31 72 28 29 59 12 38 45 34 29 78 13 12 60 74 78 13 60 60 72 3 13 78 67 84 13 78 67 53 50 30 59 50 64 51 52 84 60 76 63 83 77 49 64 48 47 60 55 46 59 69 54 44 75 86 82 82 41 40 57 72 60 34 45 56 39 75 40 41 61 86 43 71 75 71 75 62 58 1 71 75 57 75 71 42 32 35 84 36 33 36 37 19 EXPLODED DRAWING B-Model No.
WLEL1946.1 R0108A 28 59 60 80 31 72 28 29 59 12 38 45 34 29 78 13 12 60 74 78 13 60 60 72 3 13 78 67 84 13 78 67 53 50 30 59 50 64 51 52 84 60 76 63 83 77 49 64 48 47 60 55 46 59 69 54 44 75 86 82 82 41 40 57 72 60 34 45 56 39 75 40 41 61 86 43 71 75 71 75 62 58 1 71 75 57 75 71 42 32 35 84 36 33 36 37 19 EXPLODED DRAWING B-Model No.
English Manual
Page 20
... long an implied warranty lasts. The warranty extended hereunder is in China © 2008 ICON IP, Inc. ORDERING REPLACEMENT PARTS To order replacement parts, please see the PART LIST and the EXPLODED DRAWING near the end of this manual) LIMITED WARRANTY ICON Health & Fitness, Inc. (ICON) warrants this product to be free from defects in workmanship and material, under this warranty is limited to replacing or repairing, at ICON's option, the product...
... long an implied warranty lasts. The warranty extended hereunder is in China © 2008 ICON IP, Inc. ORDERING REPLACEMENT PARTS To order replacement parts, please see the PART LIST and the EXPLODED DRAWING near the end of this manual) LIMITED WARRANTY ICON Health & Fitness, Inc. (ICON) warrants this product to be free from defects in workmanship and material, under this warranty is limited to replacing or repairing, at ICON's option, the product...


