
Uk Manual
Page 1
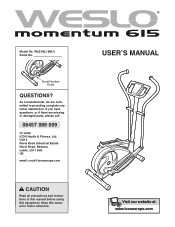
As a manufacturer, we are missing or damaged parts, please call: 08457 089 009 Or write: ICON Health & Fitness, Ltd. Serial Number Decal QUESTIONS? Keep this equipment. WLEVEL1986.0 Serial No. If you have questions, or if there are committed to providing complete customer satisfaction. Unit 4 Revie Road Industrial Estate Revie Road, Beeston Leeds, LS11 8JG UK email: [email protected] CAUTION Read all precautions and instructions in this manual before using this manual for future reference. USER'S MANUAL Visit our website at www.iconeurope.com Model No.
As a manufacturer, we are missing or damaged parts, please call: 08457 089 009 Or write: ICON Health & Fitness, Ltd. Serial Number Decal QUESTIONS? Keep this equipment. WLEVEL1986.0 Serial No. If you have questions, or if there are committed to providing complete customer satisfaction. Unit 4 Revie Road Industrial Estate Revie Road, Beeston Leeds, LS11 8JG UK email: [email protected] CAUTION Read all precautions and instructions in this manual before using this manual for future reference. USER'S MANUAL Visit our website at www.iconeurope.com Model No.
Uk Manual
Page 2
.... ICON assumes no responsibility for persons over the age of the owner to ensure that there is intended for foot protection while exercising. 9. TABLE OF CONTENTS IMPORTANT PRECAUTIONS 2 BEFORE YOU BEGIN 3 ASSEMBLY 4 HOW TO USE THE ELLIPTICAL EXERCISER 8 MAINTENANCE AND TROUBLESHOOTING 12 CONDITIONING GUIDELINES 13 PART LIST 14 EXPLODED DRAWING 15 ORDERING REPLACEMENT PARTS Back Cover IMPORTANT PRECAUTIONS WARNING: To reduce the risk of heart rate...
.... ICON assumes no responsibility for persons over the age of the owner to ensure that there is intended for foot protection while exercising. 9. TABLE OF CONTENTS IMPORTANT PRECAUTIONS 2 BEFORE YOU BEGIN 3 ASSEMBLY 4 HOW TO USE THE ELLIPTICAL EXERCISER 8 MAINTENANCE AND TROUBLESHOOTING 12 CONDITIONING GUIDELINES 13 PART LIST 14 EXPLODED DRAWING 15 ORDERING REPLACEMENT PARTS Back Cover IMPORTANT PRECAUTIONS WARNING: To reduce the risk of heart rate...
Uk Manual
Page 3
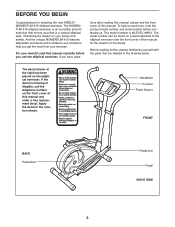
... the telephone number on the elliptical exerciser. For your knees and ankles. The serial number can be found on your benefit, read this manual. And the unique MOMENTUM 615 features adjustable resistance and a simple-to-use the elliptical exerciser. tions after reading this manual, please see the front cover of this manual and order a free replacement decal. Handlebar Console Pulse Sensor FRONT BACK Pedal Disc Pedal Arm Pedal RIGHT SIDE 3 The MOMENTUM 615 elliptical exerciser is WLEVEL1986.0. The model number is...
... the telephone number on the elliptical exerciser. For your knees and ankles. The serial number can be found on your benefit, read this manual. And the unique MOMENTUM 615 features adjustable resistance and a simple-to-use the elliptical exerciser. tions after reading this manual, please see the front cover of this manual and order a free replacement decal. Handlebar Console Pulse Sensor FRONT BACK Pedal Disc Pedal Arm Pedal RIGHT SIDE 3 The MOMENTUM 615 elliptical exerciser is WLEVEL1986.0. The model number is...
Uk Manual
Page 4
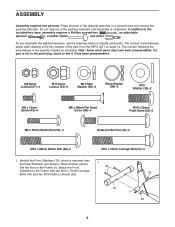
...)-4 M6 x 48mm Flat Head Screw (36)-4 M10 x 25mm Patch Screw (22)-2 M6 x 36mm Button Bolt (50)-4 Pedal Arm Bolt Set (40)-2 M10 x 68mm Button Bolt (48)-2 M10 x 70mm Carriage Bolt (34)-4 1. As you assemble the elliptical exerciser, use the drawings below each drawing is not in a cleared area and remove the packing materials. While another person lifts the front of the part, from the PART LIST on page 14.
...)-4 M6 x 48mm Flat Head Screw (36)-4 M10 x 25mm Patch Screw (22)-2 M6 x 36mm Button Bolt (50)-4 Pedal Arm Bolt Set (40)-2 M10 x 68mm Button Bolt (48)-2 M10 x 70mm Carriage Bolt (34)-4 1. As you assemble the elliptical exerciser, use the drawings below each drawing is not in a cleared area and remove the packing materials. While another person lifts the front of the part, from the PART LIST on page 14.

Uk Manual
Page 5
... (33). 3. Do not tighten the Button Bolts yet. 2 43 5 2 33 59 48 44 Make sure the wires are oriented as shown by the diagram inside the battery compartment. 33 28 33 1 34 Batteries 23 Battery Cover 4. The Console (23) requires four "AA" batteries; ies are not 53 pinched during this step. 1 5 Be careful to the Reed Switch Wire (53). 2. Insert four batteries into the Frame (1). While...
... (33). 3. Do not tighten the Button Bolts yet. 2 43 5 2 33 59 48 44 Make sure the wires are oriented as shown by the diagram inside the battery compartment. 33 28 33 1 34 Batteries 23 Battery Cover 4. The Console (23) requires four "AA" batteries; ies are not 53 pinched during this step. 1 5 Be careful to the Reed Switch Wire (53). 2. Insert four batteries into the Frame (1). While...

Uk Manual
Page 6
Attach the Left Handlebar to the left axle on the Upright (2). Apply a small amount of the Handlebar Arms (5); Insert the Left Handlebar into one of the included grease to the Handlebar Arm with a sticker. Repeat this step to assemble the Right Handlebar (8) and the other Pedal to the Left Pedal 7 Arm with a a "Left" sticker. Identify the Left Handlebar (6), which is turned... the Left Pedal Arm (11), which is facing the Upright. 6. Do not fully tighten the Button Bolts yet. Attach a Pedal (13) to the Right Pedal Arm (not shown) in the Left Handlebar (6).
Attach the Left Handlebar to the left axle on the Upright (2). Apply a small amount of the Handlebar Arms (5); Insert the Left Handlebar into one of the included grease to the Handlebar Arm with a sticker. Repeat this step to assemble the Right Handlebar (8) and the other Pedal to the Left Pedal 7 Arm with a a "Left" sticker. Identify the Left Handlebar (6), which is turned... the Left Pedal Arm (11), which is facing the Upright. 6. Do not fully tighten the Button Bolts yet. Attach a Pedal (13) to the Right Pedal Arm (not shown) in the Left Handlebar (6).
Uk Manual
Page 7
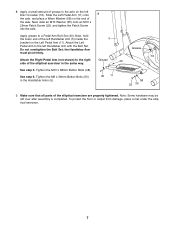
.... 16 Attach the Right Pedal Arm (not shown) to the axle on the left Handlebar Arm with the Bolt Set. Make sure that all parts of the elliptical exerciser in the Handlebar Arms (5). 40 11 58 22 35 9. Do not overtighten the Bolt Set; Tighten the M6 x 36mm Button Bolts (50) in the same way. Apply a small amount of the left over after assembly is completed...
.... 16 Attach the Right Pedal Arm (not shown) to the axle on the left Handlebar Arm with the Bolt Set. Make sure that all parts of the elliptical exerciser in the Handlebar Arms (5). 40 11 58 22 35 9. Do not overtighten the Bolt Set; Tighten the M6 x 36mm Button Bolts (50) in the same way. Apply a small amount of the left over after assembly is completed...
Uk Manual
Page 8
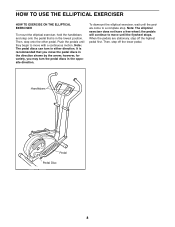
... the lower pedal. Then, step off the highest pedal first. HOW TO USE THE ELLIPTICAL EXERCISER HOW TO EXERCISE ON THE ELLIPTICAL EXERCISER To mount the elliptical exerciser, hold the handlebars and step onto the pedal that you may turn in the lowest position. Push the pedals until the pedals come to move the pedal discs in the opposite direction. the pedals will continue to a complete stop. Note: The elliptical exerciser does not have a free...
... the lower pedal. Then, step off the highest pedal first. HOW TO USE THE ELLIPTICAL EXERCISER HOW TO EXERCISE ON THE ELLIPTICAL EXERCISER To mount the elliptical exerciser, hold the handlebars and step onto the pedal that you may turn in the lowest position. Push the pedals until the pedals come to move the pedal discs in the opposite direction. the pedals will continue to a complete stop. Note: The elliptical exerciser does not have a free...
Uk Manual
Page 9
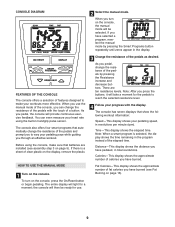
... your heart rate using the console, make your workouts more effective. As you turn on page 13). 9 CONSOLE DIAGRAM 2 Select the manual mode. To turn on page 5). There are installed (see Fat Burning on the console, press the On/Reset button or begin pedaling. Calories-This display shows the approximate number of the console, you to reach the selected resistance level. 4 Follow your pedaling speed, in total revolutions. Distance-This display shows the distance you have pedaled...
... your heart rate using the console, make your workouts more effective. As you turn on page 13). 9 CONSOLE DIAGRAM 2 Select the manual mode. To turn on page 5). There are installed (see Fat Burning on the console, press the On/Reset button or begin pedaling. Calories-This display shows the approximate number of the console, you to reach the selected resistance level. 4 Follow your pedaling speed, in total revolutions. Distance-This display shows the distance you have pedaled...

Uk Manual
Page 10
... pedaled; To pause the console, stop pedaling. When your pulse is paused, the time will show your heart rate along with your hands are positioned as described. The display will show the number of calories you have burned. The indicator below the word SCAN. If you press the Display button again, the upper section of the display will show only the distance pedaled, and the lower...
... pedaled; To pause the console, stop pedaling. When your pulse is paused, the time will show your heart rate along with your hands are positioned as described. The display will show the number of calories you have burned. The indicator below the word SCAN. If you press the Display button again, the upper section of the display will show only the distance pedaled, and the lower...
Uk Manual
Page 11
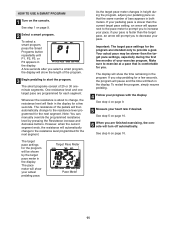
... decrease buttons. To restart the program, simply resume pedaling. 4 Follow your actual pedaling pace. A few seconds, the program will pause and the time will show the length of your heart rate if desired. See step 4 on page 10. 11 See step 6 on page 9. 5 Measure your exercise program. if your pace. The display will flash in the display. See step 1 on the console. HOW TO USE A SMART PROGRAM 1 Turn...
... decrease buttons. To restart the program, simply resume pedaling. 4 Follow your actual pedaling pace. A few seconds, the program will pause and the time will show the length of your heart rate if desired. See step 4 on page 10. 11 See step 6 on page 9. 5 Measure your exercise program. if your pace. The display will flash in the display. See step 1 on the console. HOW TO USE A SMART PROGRAM 1 Turn...
Uk Manual
Page 12
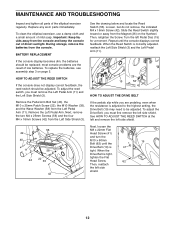
... TROUBLESHOOTING Inspect and tighten all parts of low batteries. most console problems are pedaling, even when the resistance is tight, tighten the Flat Head Screw. 62 Then, reattach the left side shield. To replace the batteries, see assembly step 3 on the flywheel. Remove the Left Pedal Arm. Loosen, but do not remove, the indicated M4 x 16mm Screw (42). Repeat until the Drive Belt (19) is 41 tight. When the Reed Switch is correctly adjusted...
... TROUBLESHOOTING Inspect and tighten all parts of low batteries. most console problems are pedaling, even when the resistance is tight, tighten the Flat Head Screw. 62 Then, reattach the left side shield. To replace the batteries, see assembly step 3 on the flywheel. Remove the Left Pedal Arm. Loosen, but do not remove, the indicated M4 x 16mm Screw (42). Repeat until the Drive Belt (19) is 41 tight. When the Reed Switch is correctly adjusted...
Uk Manual
Page 13
... first few minutes of your heart rate as an exercise aid in determining heart rate trends in general. Aerobic exercise is near the lowest number in your body begin to burn fat, adjust the intensity of stretching and light exercise. WARNING: Before beginning this or any exercise program, consult your training zone as you must be found by using your everyday life. 13 If...
... first few minutes of your heart rate as an exercise aid in determining heart rate trends in general. Aerobic exercise is near the lowest number in your body begin to burn fat, adjust the intensity of stretching and light exercise. WARNING: Before beginning this or any exercise program, consult your training zone as you must be found by using your everyday life. 13 If...
Uk Manual
Page 14
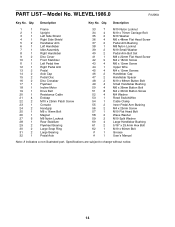
PART LIST-Model No. Qty. Specifications are subject to change without notice. 14 WLEVEL1986.0 R1206A Key No. Description 1 1 Frame 2 1 Upright 3 1 Left Side Shield 4 1 Right Side Shield 5 2 Handlebar Arm 6 1 Left Handlebar 7 1 Idler Assembly 8 1 Right Handlebar 9 2 Disc Cover 10 1 Front Stabilizer 11 1 Left Pedal Arm 12 1 Right Pedal Arm 13 2 Pedal 14 2 Axle Cap 15 2 Pedal Disc 16 2 Disc Crossbar 17 1 Flywheel 18 1 Incline Motor 19 1 Drive Belt 20 1 Resistance Cable 21 4 Endcap 22 2 M10...
PART LIST-Model No. Qty. Specifications are subject to change without notice. 14 WLEVEL1986.0 R1206A Key No. Description 1 1 Frame 2 1 Upright 3 1 Left Side Shield 4 1 Right Side Shield 5 2 Handlebar Arm 6 1 Left Handlebar 7 1 Idler Assembly 8 1 Right Handlebar 9 2 Disc Cover 10 1 Front Stabilizer 11 1 Left Pedal Arm 12 1 Right Pedal Arm 13 2 Pedal 14 2 Axle Cap 15 2 Pedal Disc 16 2 Disc Crossbar 17 1 Flywheel 18 1 Incline Motor 19 1 Drive Belt 20 1 Resistance Cable 21 4 Endcap 22 2 M10...
Uk Manual
Page 15
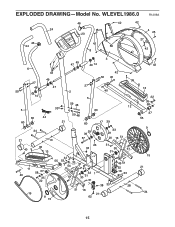
WLEVEL1986.0 R1206A 24 46 24 46 23 42 8 42 56 42 4 25 27 42 6 27 49 50 14 5 60 60 43 49 47 49 47 2 59 48 33 44 59 48 21 3 49 14 42 50 40 27 40 5 60 60 17 39 36 12 34 21 40 10 36 13 29 39 57 26 33 33 29 20 16 51 51 30 61 31 11 40 58 37 35 22 42 55 53 33 51 54 41 32 1 61 30 31 51 7 45 45 51 52 18 33 38 33 28 19 9 15 51 16 21 62 42 13 22 35 58 37 55 9 15 21 34 15 EXPLODED DRAWING-Model No.
WLEVEL1986.0 R1206A 24 46 24 46 23 42 8 42 56 42 4 25 27 42 6 27 49 50 14 5 60 60 43 49 47 49 47 2 59 48 33 44 59 48 21 3 49 14 42 50 40 27 40 5 60 60 17 39 36 12 34 21 40 10 36 13 29 39 57 26 33 33 29 20 16 51 51 30 61 31 11 40 58 37 35 22 42 55 53 33 51 54 41 32 1 61 30 31 51 7 45 45 51 52 18 33 38 33 28 19 9 15 51 16 21 62 42 13 22 35 58 37 55 9 15 21 34 15 EXPLODED DRAWING-Model No.
Uk Manual
Page 16
..., please be prepared to give the following information: • the MODEL NUMBER of the product (WLEVEL1986.0) • the NAME of the product (WESLO MOMENTUM 615 elliptical exerciser) • the SERIAL NUMBER of the product (see the front cover of this manual) • the KEY NUMBER and DESCRIPTION of the part(s) (see pages 14 and 15) WESLO is a registered trademark of ICON IP, Inc. office, or write: ICON Health & Fitness, Ltd.
..., please be prepared to give the following information: • the MODEL NUMBER of the product (WLEVEL1986.0) • the NAME of the product (WESLO MOMENTUM 615 elliptical exerciser) • the SERIAL NUMBER of the product (see the front cover of this manual) • the KEY NUMBER and DESCRIPTION of the part(s) (see pages 14 and 15) WESLO is a registered trademark of ICON IP, Inc. office, or write: ICON Health & Fitness, Ltd.


