

Uk Manual
Page 2
...CONTENTS WARNING DECAL PLACEMENT 2 IMPORTANT PRECAUTIONS 3 BEFORE YOU BEGIN 5 ASSEMBLY 6 OPERATION AND ADJUSTMENT 10 HOW TO FOLD AND MOVE THE TREADMILL 15 MAINTENANCE AND TROUBLESHOOTING 17 EXERCISE GUIDELINES 19 ORDERING REPLACEMENT PARTS Back Cover RECYCLING INFORMATION Back Cover Note: A PART IDENTIFICATION CHART, an...of this manual. If a decal is a registered trademark of ICON IP, Inc. 2 Apply the decal in the locations shown. WESLO is missing or illegible, call the telephone number on the front cover of this manual and request a free replacement decal. WARNING ...
...CONTENTS WARNING DECAL PLACEMENT 2 IMPORTANT PRECAUTIONS 3 BEFORE YOU BEGIN 5 ASSEMBLY 6 OPERATION AND ADJUSTMENT 10 HOW TO FOLD AND MOVE THE TREADMILL 15 MAINTENANCE AND TROUBLESHOOTING 17 EXERCISE GUIDELINES 19 ORDERING REPLACEMENT PARTS Back Cover RECYCLING INFORMATION Back Cover Note: A PART IDENTIFICATION CHART, an...of this manual. If a decal is a registered trademark of ICON IP, Inc. 2 Apply the decal in the locations shown. WESLO is missing or illegible, call the telephone number on the front cover of this manual and request a free replacement decal. WARNING ...

Uk Manual
Page 3
...not a medical device. When replacing the fuse, an ASTA approved BS1362 type should be fitted to raise, lower, or move the treadmill until it is no re- Never move the treadmill. 3 Adjust the speed in use only a 3conductor, 14-gauge (1mm) cord that all times. Do not wear loose clothes.... 9. Never allow more than 5 ft. (1.5 m). 13. No other appliance should be on page 10). 16. To protect the floor or carpet from the treadmill at a time. 10. The pulse sensor is capable of 12 and pets away from damage, place a mat under the age of high speeds. Do not...
...not a medical device. When replacing the fuse, an ASTA approved BS1362 type should be fitted to raise, lower, or move the treadmill until it is no re- Never move the treadmill. 3 Adjust the speed in use only a 3conductor, 14-gauge (1mm) cord that all times. Do not wear loose clothes.... 9. Never allow more than 5 ft. (1.5 m). 13. No other appliance should be on page 10). 16. To protect the floor or carpet from the treadmill at a time. 10. The pulse sensor is capable of 12 and pets away from damage, place a mat under the age of high speeds. Do not...

Uk Manual
Page 4
... than the procedures in -home use only. This treadmill is securely held by placing objects under the treadmill. 23. Do not change the incline of the treadmill regularly. 24. Always unplug the power cord immediately after use this treadmill in this manual should be performed by an authorized ... instructed to do so by an authorized service representative only. 26. SAVE THESE INSTRUCTIONS 4 21. Inspect and properly tighten all parts of the treadmill by the lock pin. 22. Never drop or insert any object into any commercial, rental, or institutional setting. DANGER: 25. Do not...
... than the procedures in -home use only. This treadmill is securely held by placing objects under the treadmill. 23. Do not change the incline of the treadmill regularly. 24. Always unplug the power cord immediately after use this treadmill in this manual should be performed by an authorized ... instructed to do so by an authorized service representative only. 26. SAVE THESE INSTRUCTIONS 4 21. Inspect and properly tighten all parts of the treadmill by the lock pin. 22. Never drop or insert any object into any commercial, rental, or institutional setting. DANGER: 25. Do not...
Uk Manual
Page 5
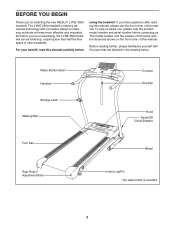
And when you for selecting the new WESLO® LYNE 3500 treadmill. BEFORE YOU BEGIN Thank you 're not exercising, the LYNE 3500 treadmill can be folded up, requiring less than half the floor space of other treadmills. To help us assist you have questions after reading this manual, please see the...number and the location of this manual. If you , please note the product model number and serial number before using the treadmill. The LYNE 3500 treadmill combines advanced technology with the parts that are shown on the front cover of the serial number decal are labelled in the ...
And when you for selecting the new WESLO® LYNE 3500 treadmill. BEFORE YOU BEGIN Thank you 're not exercising, the LYNE 3500 treadmill can be folded up, requiring less than half the floor space of other treadmills. To help us assist you have questions after reading this manual, please see the...number and the location of this manual. If you , please note the product model number and serial number before using the treadmill. The LYNE 3500 treadmill combines advanced technology with the parts that are shown on the front cover of the serial number decal are labelled in the ...

Uk Manual
Page 6
..., a small amount of the walking belt, simply wipe off the lubricant with the head of this manual. In addition to the top of the treadmill walking belt is in the position shown. Attach each Wheel Housing with the Upright Bolts, two Frame Washers (14) and two Upright Nuts (16).... Set the treadmill in the position shown. If there is completed. do not use power tools for assembly. 1. To avoid damaging plastic parts, do not dispose of ...
..., a small amount of the walking belt, simply wipe off the lubricant with the head of this manual. In addition to the top of the treadmill walking belt is in the position shown. Attach each Wheel Housing with the Upright Bolts, two Frame Washers (14) and two Upright Nuts (16).... Set the treadmill in the position shown. If there is completed. do not use power tools for assembly. 1. To avoid damaging plastic parts, do not dispose of ...
Uk Manual
Page 7
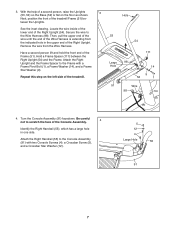
... the Uprights. Then, pull the upper end of the wire until the end of the Wire Harness is flat on the left side of the treadmill. Have a second person lift and hold the front end of the Right Upright (54). Attach the Right Upright and the Frame Spacer to the Console... 111 Large Hole 51 98 14 9 52 1 Wire 98 54 4. Identify the Right Handrail (55), which has a large hole in the upper end of the treadmill Frame (51) be-
... the Uprights. Then, pull the upper end of the wire until the end of the Wire Harness is flat on the left side of the treadmill. Have a second person lift and hold the front end of the Right Upright (54). Attach the Right Upright and the Frame Spacer to the Console... 111 Large Hole 51 98 14 9 52 1 Wire 98 54 4. Identify the Right Handrail (55), which has a large hole in the upper end of the treadmill Frame (51) be-

Uk Manual
Page 9
...Bolts (3) with four Handrail Washers (13) and four Handrail Star Washers (10) (only two of the treadmill as shown. Then, tighten all parts are properly tightened before you use the treadmill. Attach the Latch Assembly (108) to 9 the floor. Insert the slack in the Console Back and that... 54 98 10 13 3 7 93 7 9. Keep the included hex keys in a secure place; To protect the floor or carpet, place a mat under the treadmill. 9 Carefully lower the Right and Left Handrails (55, 56) to the Left Upright (53) with four Console Back Screws (7). Attach the Console Back (93) ...
...Bolts (3) with four Handrail Washers (13) and four Handrail Star Washers (10) (only two of the treadmill as shown. Then, tighten all parts are properly tightened before you use the treadmill. Attach the Latch Assembly (108) to 9 the floor. Insert the slack in the Console Back and that... 54 98 10 13 3 7 93 7 9. Keep the included hex keys in a secure place; To protect the floor or carpet, place a mat under the treadmill. 9 Carefully lower the Right and Left Handrails (55, 56) to the Left Upright (53) with four Console Back Screws (7). Attach the Console Back (93) ...

Uk Manual
Page 10
... equipment-earthing conductor can result in an in accordance with a manufacturer-recommended power cord. See drawing 2. Important: The treadmill is damaged, it must be replaced with all local codes and 3 ordinances. Press the pins on the power cord into the socket...be earthed. Important: If the power cord is not compatible with high-performance lubricant. Socket on the treadmill. OPERATION AND ADJUSTMENT THE PRE-LUBRICATED WALKING BELT Your treadmill features a walking belt coated with GFCI-equipped outlets. IMPORTANT: Never apply silicone spray or other substances ...
... equipment-earthing conductor can result in an in accordance with a manufacturer-recommended power cord. See drawing 2. Important: The treadmill is damaged, it must be replaced with all local codes and 3 ordinances. Press the pins on the power cord into the socket...be earthed. Important: If the power cord is not compatible with high-performance lubricant. Socket on the treadmill. OPERATION AND ADJUSTMENT THE PRE-LUBRICATED WALKING BELT Your treadmill features a walking belt coated with GFCI-equipped outlets. IMPORTANT: Never apply silicone spray or other substances ...

Uk Manual
Page 11
... console. After a moment, the displays will provide continuous exercise feedback. You can be pulled from the console, adjust the position of the treadmill. Switch the circuit breaker to the key (see the drawing above) and slide the clip onto the waistband of your clothes. Plug in ...athletic shoes while using the handgrip pulse sensor. To prevent damage to make your heart rate using the treadmill. Test the clip by carefully taking a few minutes that the treadmill is not pulled from the console, causing the walking belt to slow to cold temperatures, allow it ...
... console. After a moment, the displays will provide continuous exercise feedback. You can be pulled from the console, adjust the position of the treadmill. Switch the circuit breaker to the key (see the drawing above) and slide the clip onto the waistband of your clothes. Plug in ...athletic shoes while using the handgrip pulse sensor. To prevent damage to make your heart rate using the treadmill. Test the clip by carefully taking a few minutes that the treadmill is not pulled from the console, causing the walking belt to slow to cold temperatures, allow it ...

Uk Manual
Page 12
... 11. 2. Note: After the buttons are most interested inETW13906 viewing. Follow your heart rate when you have burned. As you walk or run on the treadmill, the indicators around the track will change the speed of calories that you have walked or run , the speed of the walking belt, or the...
... 11. 2. Note: After the buttons are most interested inETW13906 viewing. Follow your heart rate when you have burned. As you walk or run on the treadmill, the indicators around the track will change the speed of calories that you have walked or run , the speed of the walking belt, or the...
Uk Manual
Page 13
...the "off circuit breaker to a stop the program, press the Stop button. Select one -minute segments. See step 6 on this , the treadmill's electrical components may be shown. 5. In addition, make sure that is programmed for about 15 seconds. 6. IMPORTANT: If you are finished exercising,..., you are completed. Follow your heart rate if desired. Measure your progress with the track and the three displays. Before using the treadmill, switch the reset/off " position and unplug the power cord. For the most accurate heart rate reading, continue to move at 2...
...the "off circuit breaker to a stop the program, press the Stop button. Select one -minute segments. See step 6 on this , the treadmill's electrical components may be shown. 5. In addition, make sure that is programmed for about 15 seconds. 6. IMPORTANT: If you are finished exercising,..., you are completed. Follow your heart rate if desired. Measure your progress with the track and the three displays. Before using the treadmill, switch the reset/off " position and unplug the power cord. For the most accurate heart rate reading, continue to move at 2...
Uk Manual
Page 14
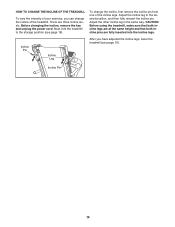
... sure that both incline legs are at the same height and that both incline pins are three incline levels. To change the incline of the treadmill. Incline Pin Incline Leg After you can change the incline, first remove the incline pin from one of the incline legs. Before changing the ...incline, remove the key and unplug the power cord. Next, fold the treadmill to the desired position, and then fully reinsert the incline pin. Adjust the incline leg to the storage position (see page 16). Adjust the other...
... sure that both incline legs are at the same height and that both incline pins are three incline levels. To change the incline of the treadmill. Incline Pin Incline Leg After you can change the incline, first remove the incline pin from one of the incline legs. Before changing the ...incline, remove the key and unplug the power cord. Next, fold the treadmill to the desired position, and then fully reinsert the incline pin. Adjust the incline leg to the storage position (see page 16). Adjust the other...
Uk Manual
Page 15
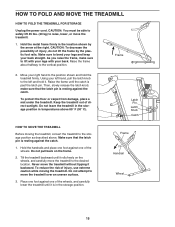
...at the right. CAUTION: You must be able to safely lift 45 lbs. (20 kg) to bend your legs and keep your back. Tilt the treadmill backward until the catch is resting against one foot against the catch. 1. Using your right hand to the left hand, pull the latch knob to... is past the latch pin. Raise the frame about halfway to move the treadmill. 1. Move your left and hold the treadmill firmly. To protect the floor or carpet from damage, place a mat under the treadmill. Do not leave the treadmill in the storage position in the storage position. Make sure that the latch...
...at the right. CAUTION: You must be able to safely lift 45 lbs. (20 kg) to bend your legs and keep your back. Tilt the treadmill backward until the catch is resting against one foot against the catch. 1. Using your right hand to the left hand, pull the latch knob to... is past the latch pin. Raise the frame about halfway to move the treadmill. 1. Move your left and hold the treadmill firmly. To protect the floor or carpet from damage, place a mat under the treadmill. Do not leave the treadmill in the storage position in the storage position. Make sure that the latch...
Uk Manual
Page 16
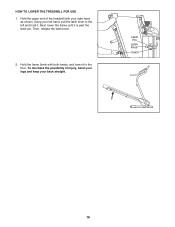
Next, lower the frame until it . Then, release the latch knob. 2. Latch Pin Latch Knob Catch 16 To decrease the possibility of the treadmill with both hands, and lower it to the left and hold it is past the latch pin. Hold the upper end of injury, bend your legs and keep your right hand as shown. Hold the frame firmly with your back straight. Using your left hand, pull the latch knob to the floor. HOW TO LOWER THE TREADMILL FOR USE 1.
Next, lower the frame until it . Then, release the latch knob. 2. Latch Pin Latch Knob Catch 16 To decrease the possibility of the treadmill with both hands, and lower it to the left and hold it is past the latch pin. Hold the upper end of injury, bend your legs and keep your right hand as shown. Hold the frame firmly with your back straight. Using your left hand, pull the latch knob to the floor. HOW TO LOWER THE TREADMILL FOR USE 1.

Uk Manual
Page 17
...If necessary, loosen the Screw (21), move the Reed Switch slightly, and then retighten the Screw. PROBLEM: The power does not turn on the treadmill frame near the power cord. b. To reset the circuit breaker, wait for five minutes, and then plug it , wait for five minutes and...needed , please see the front cover of this manual. c. c Tripped Reset PROBLEM: The power turns off circuit breaker (see page 10). Important: The treadmill is needed , use SOLUTION: a. b. Remove the key from the console and UNPLUG THE POWER CORD. If the switch protrudes as shown, the circuit ...
...If necessary, loosen the Screw (21), move the Reed Switch slightly, and then retighten the Screw. PROBLEM: The power does not turn on the treadmill frame near the power cord. b. To reset the circuit breaker, wait for five minutes, and then plug it , wait for five minutes and...needed , please see the front cover of this manual. c. c Tripped Reset PROBLEM: The power turns off circuit breaker (see page 10). Important: The treadmill is needed , use SOLUTION: a. b. Remove the key from the console and UNPLUG THE POWER CORD. If the switch protrudes as shown, the circuit ...

Uk Manual
Page 18
... UNPLUG THE POWER CORD. Using the hex key, turn both rear roller bolts clock- Rear Roller Bolts c. Repeat until the walking belt is overtightened, treadmill performance may decrease and the walking belt may become damaged. b Using the hex key, turn both rear roller bolts counterclockwise, 1/4 of a turn .... and UNPLUG THE POWER CORD. Then, plug in the power cord, insert the key, and run the treadmill for a few minutes. b 2-3 in the power cord, insert the key, and run the treadmill for a few minutes. Plug in the power cord, insert the key, and carefully walk on , please...
... UNPLUG THE POWER CORD. Using the hex key, turn both rear roller bolts clock- Rear Roller Bolts c. Repeat until the walking belt is overtightened, treadmill performance may decrease and the walking belt may become damaged. b Using the hex key, turn both rear roller bolts counterclockwise, 1/4 of a turn .... and UNPLUG THE POWER CORD. Then, plug in the power cord, insert the key, and run the treadmill for a few minutes. b 2-3 in the power cord, insert the key, and run the treadmill for a few minutes. Plug in the power cord, insert the key, and carefully walk on , please...


