

Uk Manual
Page 1
If you have questions, or if there are committed to providing complete customer satisfaction. Keep this equipment. Serial Number Decal QUESTIONS? Model No. As a manufacturer, we are missing or damaged parts, please call: 08457 089 009 Or write: ICON Health & Fitness, Ltd. WLEMEL09910 Serial No. Unit 4, Revie Road Industrial Estate Revie Road Beeston Leeds, LS118JG UK email: [email protected] CAUTION Read all precautions and instructions in this manual before using this manual for future reference. USER'S MANUAL Visit our website at www.weslo.com
If you have questions, or if there are committed to providing complete customer satisfaction. Keep this equipment. Serial Number Decal QUESTIONS? Model No. As a manufacturer, we are missing or damaged parts, please call: 08457 089 009 Or write: ICON Health & Fitness, Ltd. WLEMEL09910 Serial No. Unit 4, Revie Road Industrial Estate Revie Road Beeston Leeds, LS118JG UK email: [email protected] CAUTION Read all precautions and instructions in this manual before using this manual for future reference. USER'S MANUAL Visit our website at www.weslo.com

Uk Manual
Page 2
TABLE OF CONTENTS IMPORTANT PRECAUTIONS 3 BEFORE YOU BEGIN 4 PART IDENTIFICATION CHART 5 ASSEMBLY 6 HOW TO USE THE ELLIPTICAL GLIDER 9 MAINTENANCE 11 CONDITIONING GUIDELINES 12 PART LIST 14 EXPLODED DRAWING 15 HOW TO ORDER REPLACEMENT PARTS Back Cover WESLO is a registered trademark of ICON Health & Fitness, Inc. 2
TABLE OF CONTENTS IMPORTANT PRECAUTIONS 3 BEFORE YOU BEGIN 4 PART IDENTIFICATION CHART 5 ASSEMBLY 6 HOW TO USE THE ELLIPTICAL GLIDER 9 MAINTENANCE 11 CONDITIONING GUIDELINES 12 PART LIST 14 EXPLODED DRAWING 15 HOW TO ORDER REPLACEMENT PARTS Back Cover WESLO is a registered trademark of ICON Health & Fitness, Inc. 2
Uk Manual
Page 3
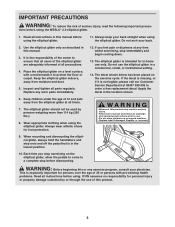
... elliptical glider. If you stop exercising on a level surface, with pre-existing health problems. Read all warnings and operating instructions prior to a complete stop immediately and begin cooling down. 13. The decal shown below has been placed on or around machine. • Replace label if damaged, illegible, or removed. 9. Apply the decal in this manual before using. Wear appropriate clothing when using the WESLO® 2.0 elliptical glider...
... elliptical glider. If you stop exercising on a level surface, with pre-existing health problems. Read all warnings and operating instructions prior to a complete stop immediately and begin cooling down. 13. The decal shown below has been placed on or around machine. • Replace label if damaged, illegible, or removed. 9. Apply the decal in this manual before using. Wear appropriate clothing when using the WESLO® 2.0 elliptical glider...

Uk Manual
Page 4
.... The model number is an incredibly smooth exerciser that are labelled. And the unique 2.0 features adjustable resistance, upper-body handlebars, and a multi-mode exercise monitor to help us assist you have additional questions, please call our Customer Service Department at the drawing below and familiarise yourself with the parts that moves your feet in a natural elliptical path, minimising the impact on a decal attached to...
.... The model number is an incredibly smooth exerciser that are labelled. And the unique 2.0 features adjustable resistance, upper-body handlebars, and a multi-mode exercise monitor to help us assist you have additional questions, please call our Customer Service Department at the drawing below and familiarise yourself with the parts that moves your feet in a natural elliptical path, minimising the impact on a decal attached to...
Uk Manual
Page 5
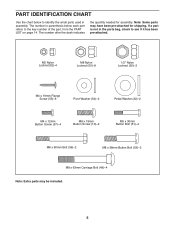
... needed for shipping. The number in parenthesis below to identify the small parts used in the parts bag, check to the key number of the part, from the PART LIST on page 14. Note: Some parts may be included. 5 M5 Nylon Locknut (52)-4 M8 Nylon Locknut (50)-8 1/2" Nylon Locknut (35)-2 M4 x 19mm Flange Screw (55)-6 Pivot Washer (54)-2 Pedal Washer (32)-2 M4 x 12mm Button Screw...
... needed for shipping. The number in parenthesis below to identify the small parts used in the parts bag, check to the key number of the part, from the PART LIST on page 14. Note: Some parts may be included. 5 M5 Nylon Locknut (52)-4 M8 Nylon Locknut (50)-8 1/2" Nylon Locknut (35)-2 M4 x 19mm Flange Screw (55)-6 Pivot Washer (54)-2 Pedal Washer (32)-2 M4 x 12mm Button Screw...

Uk Manual
Page 6
...Button Bolts (53) and two M8 Nylon Locknuts (50). 18 20 20 49 2 20 50 1 19 50 20 3 49 2 3 47 41 50 3 50 1 53 6 Attach the Rear Stabiliser (19) to avoid damaging the wires. Whilst a second person holds the Upright (2) near the Frame (1), connect the Extension Wire (47) to the front of the elliptical glider... in each end. 50 Attach the Front Stabiliser (18) to the Reed Switch Wire (41...
...Button Bolts (53) and two M8 Nylon Locknuts (50). 18 20 20 49 2 20 50 1 19 50 20 3 49 2 3 47 41 50 3 50 1 53 6 Attach the Rear Stabiliser (19) to avoid damaging the wires. Whilst a second person holds the Upright (2) near the Frame (1), connect the Extension Wire (47) to the front of the elliptical glider... in each end. 50 Attach the Front Stabiliser (18) to the Reed Switch Wire (41...
Uk Manual
Page 7
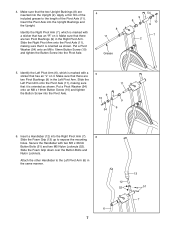
... x 19mm Button Screw (10) and tighten the Button Screw into the Upright Bushings and the Upright. Make sure that it is oriented as shown. Slide the Foam Grip down over the Button Bolts and Nylon Locknuts. Insert the Pivot Axle into the Pivot Axle. 5 9 10 54 11 9 6 6. Identify the Right Pivot Arm (7), which is marked with two M5 x 30mm Button Bolts (51...
... x 19mm Button Screw (10) and tighten the Button Screw into the Upright Bushings and the Upright. Make sure that it is oriented as shown. Slide the Foam Grip down over the Button Bolts and Nylon Locknuts. Insert the Pivot Axle into the Pivot Axle. 5 9 10 54 11 9 6 6. Identify the Right Pivot Arm (7), which is marked with two M5 x 30mm Button Bolts (51...

Uk Manual
Page 8
... from the Crank. To install batteries, look under the elliptical glider to the Left Pedal Arm with four M4 x 12mm Button Screws (57). Connect the console wire to the Left Pedal Arm (14) with a sticker that has an "L" on it . Attach the Console (5) to the Right Pedal Arm (not shown) in the same manner. 9. Make sure that all parts of the Pedal Axle protruding from damage. 8 Attach the Right Pedal Arm (not shown...
... from the Crank. To install batteries, look under the elliptical glider to the Left Pedal Arm with four M4 x 12mm Button Screws (57). Connect the console wire to the Left Pedal Arm (14) with a sticker that has an "L" on it . Attach the Console (5) to the Right Pedal Arm (not shown) in the same manner. 9. Make sure that all parts of the Pedal Axle protruding from damage. 8 Attach the Right Pedal Arm (not shown...

Uk Manual
Page 9
... opposite direction. CAUTION: The elliptical glider does not have a free wheel; to move with the resistance knob. It is in the lowest position. HOW TO ADJUST THE RESISTANCE OF THE PEDALS As you exercise, you can turn in either direction. To increase the resistance, turn the knob counterclockwise. Push the pedals until the flywheel stops. the pedals will continue to move until they begin to decrease the resistance, turn the knob clockwise; Then, step...
... opposite direction. CAUTION: The elliptical glider does not have a free wheel; to move with the resistance knob. It is in the lowest position. HOW TO ADJUST THE RESISTANCE OF THE PEDALS As you exercise, you can turn in either direction. To increase the resistance, turn the knob counterclockwise. Push the pedals until the flywheel stops. the pedals will continue to move until they begin to decrease the resistance, turn the knob clockwise; Then, step...

Uk Manual
Page 10
...-This mode displays the other four modes, for operation. 2. Mode Indicators One mode indicator will show that display instant exercise feedback. If the pedals are not moved and the console buttons are described below: Speed-This mode shows your exercise pace, in order to install batteries. Note: When you have not installed batteries, see assembly step 9 on /reset button. 4. If you stop exercising, the time will show the elapsed time. To turn off the power, simply...
...-This mode displays the other four modes, for operation. 2. Mode Indicators One mode indicator will show that display instant exercise feedback. If the pedals are not moved and the console buttons are described below: Speed-This mode shows your exercise pace, in order to install batteries. Note: When you have not installed batteries, see assembly step 9 on /reset button. 4. If you stop exercising, the time will show the elapsed time. To turn off the power, simply...

Uk Manual
Page 11
MAINTENANCE Inspect and tighten all parts of the elliptical glider regularly. Do not use abrasives or solvents. Keep the elliptical glider in the console. STORAGE When storing the elliptical glider, remove the batteries from the console. The elliptical glider can be necessary to remove the console to replace the batteries. To prevent damage to assembly step 9 on page 8. Use only a resealable water bottle in a clean, dry location, away from moisture and dust. 11 To replace the batteries, refer...
MAINTENANCE Inspect and tighten all parts of the elliptical glider regularly. Do not use abrasives or solvents. Keep the elliptical glider in the console. STORAGE When storing the elliptical glider, remove the batteries from the console. The elliptical glider can be necessary to remove the console to replace the batteries. To prevent damage to assembly step 9 on page 8. Use only a resealable water bottle in a clean, dry location, away from moisture and dust. 11 To replace the batteries, refer...

Uk Manual
Page 12
... your body begin to strengthen your exercise program. Aerobic Exercise To strengthen your cardiovascular system, your heart rate. Aerobic exercise is especially important for a sustained period of exercise, your "training zone." Take a six-second heartbeat count, and multiply the result by using your wrist as shown. The three numbers are essential for prolonged periods of 35 or persons with pre-existing health problems. EXERCISE...
... your body begin to strengthen your exercise program. Aerobic Exercise To strengthen your cardiovascular system, your heart rate. Aerobic exercise is especially important for a sustained period of exercise, your "training zone." Take a six-second heartbeat count, and multiply the result by using your wrist as shown. The three numbers are essential for prolonged periods of 35 or persons with pre-existing health problems. EXERCISE...
Uk Manual
Page 13
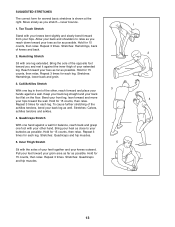
...Quadriceps and hip muscles. 3 5 1 2 4 13 Repeat 3 times. Stretches: Hamstrings, lower back and groin. 3. Repeat 3 times for each leg. To cause further stretching of your hips toward your back leg as possible. Hold for 15 counts, then relax. Bring your heel as close to relax ... and place your knees outward. Calf/Achilles Stretch With one leg in front of knees and back. 2. Quadriceps Stretch With one leg extended. Repeat 3 times. SUGGESTED STRETCHES The correct form for 15 counts, then relax. Move slowly as possible. Stretches: Hamstrings, back of the other ...
...Quadriceps and hip muscles. 3 5 1 2 4 13 Repeat 3 times. Stretches: Hamstrings, lower back and groin. 3. Repeat 3 times for each leg. To cause further stretching of your hips toward your back leg as possible. Hold for 15 counts, then relax. Bring your heel as close to relax ... and place your knees outward. Calf/Achilles Stretch With one leg in front of knees and back. 2. Quadriceps Stretch With one leg extended. Repeat 3 times. SUGGESTED STRETCHES The correct form for 15 counts, then relax. Move slowly as possible. Stretches: Hamstrings, back of the other ...

Uk Manual
Page 14
... 2 Description Frame Upright Frame Bushing Upright Endcap Console Left Pivot Arm Right Pivot Arm Upright Bushing Pivot Bushing M8 x 19mm Button Screw Pivot Axle Handlebar Foam Grip Left Pedal Arm Right Pedal Arm Left Pedal Right Pedal Front Stabiliser Rear Stabiliser Stabiliser Endcap Flywheel Resistance Belt Resistance Spring Hook Cable Clamp Left Side Shield Right Side Shield Resistance Knob Resistance Cable Crank/Pulley Magnet Pedal Washer Key No. See the back cover of this manual for information about ordering replacement parts. 14
... 2 Description Frame Upright Frame Bushing Upright Endcap Console Left Pivot Arm Right Pivot Arm Upright Bushing Pivot Bushing M8 x 19mm Button Screw Pivot Axle Handlebar Foam Grip Left Pedal Arm Right Pedal Arm Left Pedal Right Pedal Front Stabiliser Rear Stabiliser Stabiliser Endcap Flywheel Resistance Belt Resistance Spring Hook Cable Clamp Left Side Shield Right Side Shield Resistance Knob Resistance Cable Crank/Pulley Magnet Pedal Washer Key No. See the back cover of this manual for information about ordering replacement parts. 14

Uk Manual
Page 15
EXPLODED DRAWING-Model No. WLEMEL09910 48 R1101A 48 13 12 52 51 22 9 10 9 6 54 46 44 50 36 43 57 8 11 23 24 25 4 46 3 50 44 43 50 5 54 10 9 9 8 12 13 7 52 51 2 58 58 4 50 3 53 42 42 53 28 29 59 50 40 47 56 50 30 15 55 41 35 42 42 50 16 21 18 20 20 31 1 50 19 56 14 55 34 49 32 38 33 39 37 58 50 59 60 20 59 17 34 33 33 32 35 20 49 59 60 45 27 59 26 15
EXPLODED DRAWING-Model No. WLEMEL09910 48 R1101A 48 13 12 52 51 22 9 10 9 6 54 46 44 50 36 43 57 8 11 23 24 25 4 46 3 50 44 43 50 5 54 10 9 9 8 12 13 7 52 51 2 58 58 4 50 3 53 42 42 53 28 29 59 50 40 47 56 50 30 15 55 41 35 42 42 50 16 21 18 20 20 31 1 50 19 56 14 55 34 49 32 38 33 39 37 58 50 59 60 20 59 17 34 33 33 32 35 20 49 59 60 45 27 59 26 15

Uk Manual
Page 16
... MODEL NUMBER of the product (WLEMEL09910) • the NAME of the product (WESLO® 2.0 elliptical glider) • the SERIAL NUMBER of the product (see the front cover of this manual) • the KEY NUMBER and DESCRIPTION of the part(s) from page 14 of this product, or if you encounter any difficulties with this manual. HOW TO ORDER REPLACEMENT PARTS If you need to order replacement parts, call the ICON Health & Fitness...
... MODEL NUMBER of the product (WLEMEL09910) • the NAME of the product (WESLO® 2.0 elliptical glider) • the SERIAL NUMBER of the product (see the front cover of this manual) • the KEY NUMBER and DESCRIPTION of the part(s) from page 14 of this product, or if you encounter any difficulties with this manual. HOW TO ORDER REPLACEMENT PARTS If you need to order replacement parts, call the ICON Health & Fitness...


