
Canadian English Manual
Page 1
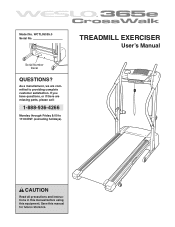
As a manufacturer, we are missing parts, please call: 1-888-936-4266 Monday through Friday 8:00 to providing complete customer satisfaction. If you have questions, or if there are committed to 17:00 EST (excluding holidays). TREADMILL EXERCISER User's Manual CAUTION Read all precautions and instructions in this manual before using this manual for future reference. WCTL95335.0 Serial No. Serial Number Decal QUESTIONS? Save this equipment. Model No.
As a manufacturer, we are missing parts, please call: 1-888-936-4266 Monday through Friday 8:00 to providing complete customer satisfaction. If you have questions, or if there are committed to 17:00 EST (excluding holidays). TREADMILL EXERCISER User's Manual CAUTION Read all precautions and instructions in this manual before using this manual for future reference. WCTL95335.0 Serial No. Serial Number Decal QUESTIONS? Save this equipment. Model No.
Canadian English Manual
Page 2
TABLE OF CONTENTS IMPORTANT PRECAUTIONS 3 BEFORE YOU BEGIN 5 ASSEMBLY 6 OPERATION AND ADJUSTMENT 10 HOW TO FOLD AND MOVE THE TREADMILL 14 TROUBLESHOOTING 16 CONDITIONING GUIDELINES 18 ORDERING REPLACEMENT PARTS Back Cover LIMITED WARRANTY Back Cover Note: An EXPLODED DRAWING and a PART LIST are attached in the center of ICON IP, Inc. 2 WESLO is a registered trademark of this manual.
TABLE OF CONTENTS IMPORTANT PRECAUTIONS 3 BEFORE YOU BEGIN 5 ASSEMBLY 6 OPERATION AND ADJUSTMENT 10 HOW TO FOLD AND MOVE THE TREADMILL 14 TROUBLESHOOTING 16 CONDITIONING GUIDELINES 18 ORDERING REPLACEMENT PARTS Back Cover LIMITED WARRANTY Back Cover Note: An EXPLODED DRAWING and a PART LIST are attached in the center of ICON IP, Inc. 2 WESLO is a registered trademark of this manual.
Canadian English Manual
Page 3
... damaged, the walking belt may change speed, accelerate, or stop unexpectedly, which may compromise your ability to use the treadmill with at all users of heart rate readings. Use only a single-outlet surge suppressor that all times. 7. Various factors, including your balance. Always remove the key and unplug the power cord when the treadmill is properly assembled. (See ASSEMBLY on page 6, and HOW TO FOLD AND MOVE THE TREADMILL on page...
... damaged, the walking belt may change speed, accelerate, or stop unexpectedly, which may compromise your ability to use the treadmill with at all users of heart rate readings. Use only a single-outlet surge suppressor that all times. 7. Various factors, including your balance. Always remove the key and unplug the power cord when the treadmill is properly assembled. (See ASSEMBLY on page 6, and HOW TO FOLD AND MOVE THE TREADMILL on page...
Canadian English Manual
Page 4
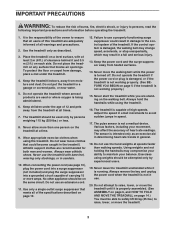
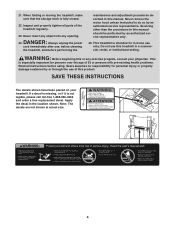
... remove the motor hood unless instructed to do so by an authorized service representative only. 25. WARNING: Before beginning this product. Note: The decals are not shown at actual size. 4 Inspect and properly tighten all parts of 35 or persons with pre-existing health problems. Read all instructions before performing the maintenance and adjustment procedures described in a commercial, rental, or institutional setting. This treadmill is...
... remove the motor hood unless instructed to do so by an authorized service representative only. 25. WARNING: Before beginning this product. Note: The decals are not shown at actual size. 4 Inspect and properly tighten all parts of 35 or persons with pre-existing health problems. Read all instructions before performing the maintenance and adjustment procedures described in a commercial, rental, or institutional setting. This treadmill is...
Canadian English Manual
Page 5
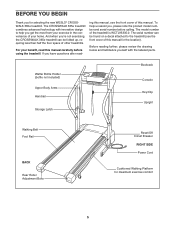
... CROSSWALK 365e treadmill can be folded up, requiring less than half the floor space of other treadmills. Before reading further, please review the drawing below and familiarize yourself with innovative design to the treadmill (see the front cover of this manual. Watter Bottle Holder (bottle not included) Upper Body Arms Handrail Storage Latch Bookrack Console Key/Clip Upright Walking Belt Foot Rail BACK Rear Roller Adjustment Bolts Reset/Off Circuit Breaker RIGHT SIDE Power Cord Cushioned Walking...
... CROSSWALK 365e treadmill can be folded up, requiring less than half the floor space of other treadmills. Before reading further, please review the drawing below and familiarize yourself with innovative design to the treadmill (see the front cover of this manual. Watter Bottle Holder (bottle not included) Upper Body Arms Handrail Storage Latch Bookrack Console Key/Clip Upright Walking Belt Foot Rail BACK Rear Roller Adjustment Bolts Reset/Off Circuit Breaker RIGHT SIDE Power Cord Cushioned Walking...
Canadian English Manual
Page 6
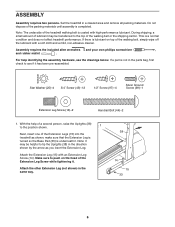
...-assembled. Do not dispose of the walking belt or the shipping carton. Star Washer (25)-4 3/4" Screw (43)-12 1/2" Screw (97)-4 Silver Ground Screw (99)-1 Extension Leg Screw (14)-2 Handrail Bolt (44)-2 1. make sure that the Extension Leg is turned so the Base Pad (33) is completed. With the help identifying the assembly hardware, see if it . Attach the Extension Leg (15) with high-performance lubricant...
...-assembled. Do not dispose of the walking belt or the shipping carton. Star Washer (25)-4 3/4" Screw (43)-12 1/2" Screw (97)-4 Silver Ground Screw (99)-1 Extension Leg Screw (14)-2 Handrail Bolt (44)-2 1. make sure that the Extension Leg is turned so the Base Pad (33) is completed. With the help identifying the assembly hardware, see if it . Attach the Extension Leg (15) with high-performance lubricant...
Canadian English Manual
Page 7
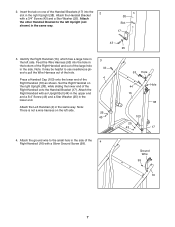
...(16), which has a large hole in the lower end. Attach the Right Handrail with a 3/4" Screw (43) and a Star Washer (25). Note: There is not a wire harness on the left side. Attach the Handrail Bracket 2 with an Upright Bolt (44) in the upper end and a 3/4" Screw (43) and a Star Washer (25) in...Upright (not shown) in the same way. Set the Right Handrail on one of the Handrail Brackets (17) into the hole in the side of the 4 Right Handrail (16) with a Silver Ground Screw (99). Feed the Wire Harness (53) into the slot in the side. Press a Handrail Cap (103) onto the lower...
...(16), which has a large hole in the lower end. Attach the Right Handrail with a 3/4" Screw (43) and a Star Washer (25). Note: There is not a wire harness on the left side. Attach the Handrail Bracket 2 with an Upright Bolt (44) in the upper end and a 3/4" Screw (43) and a Star Washer (25) in...Upright (not shown) in the same way. Set the Right Handrail on one of the Handrail Brackets (17) into the hole in the side of the 4 Right Handrail (16) with a Silver Ground Screw (99). Feed the Wire Harness (53) into the slot in the side. Press a Handrail Cap (103) onto the lower...
Canadian English Manual
Page 8
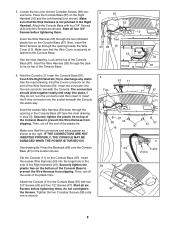
... the large hole in the location shown. See drawing 6a. Set the Console (11) on the Console Base (87). Attach the Console (11) to discharge any static. Start all four 3/4" Screws before tightening them . Next, insert the Wire Harness up through the opening beside the Wire Cover (10). Look at the ...plastic ties on the Console Base (87). Tighten the two Crossbar Screws (98) (only one shown) Crossbar Screws (98) several turns. 5. Hold the Console (11) near the Console Base (87). Press the Bookrack (85) onto the Console Base (87) in the side of the Console Base. 5 87 53...
... the large hole in the location shown. See drawing 6a. Set the Console (11) on the Console Base (87). Attach the Console (11) to discharge any static. Start all four 3/4" Screws before tightening them . Next, insert the Wire Harness up through the opening beside the Wire Cover (10). Look at the ...plastic ties on the Console Base (87). Tighten the two Crossbar Screws (98) (only one shown) Crossbar Screws (98) several turns. 5. Hold the Console (11) near the Console Base (87). Press the Bookrack (85) onto the Console Base (87) in the side of the Console Base. 5 87 53...
Canadian English Manual
Page 9
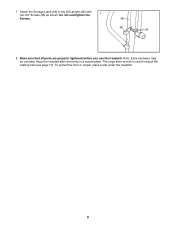
Note: Extra hardware may be included. 7. Keep the included allen wrenches in a secure place. The large allen wrench is used to the left Upright (38) with 7 two 3/4" Screws (43) as shown. Do not overtighten the Screws. 38 66 43 8. Attach the Storage Latch (66) to adjust the walking belt (see page 17). Make sure that all parts are properly tightened before you use the treadmill. To protect the floor or carpet, place a mat under the treadmill. 9
Note: Extra hardware may be included. 7. Keep the included allen wrenches in a secure place. The large allen wrench is used to the left Upright (38) with 7 two 3/4" Screws (43) as shown. Do not overtighten the Screws. 38 66 43 8. Attach the Storage Latch (66) to adjust the walking belt (see page 17). Make sure that all parts are properly tightened before you use the treadmill. To protect the floor or carpet, place a mat under the treadmill. 9
Canadian English Manual
Page 10
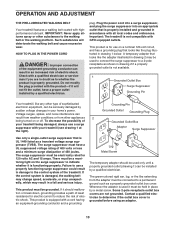
... walking belt may change speed, accelerate, or stop unexpectedly, which may be installed by a qualified electrician. Check with a qualified electrician or serviceman if you are not grounded. Do not modify the plug provided with a cord having an equipment-grounding conductor and a grounding Lug Metal Screw The temporary adapter should malfunction or break down, grounding provides a path of your treadmill being turned on...
... walking belt may change speed, accelerate, or stop unexpectedly, which may be installed by a qualified electrician. Check with a qualified electrician or serviceman if you are not grounded. Do not modify the plug provided with a cord having an equipment-grounding conductor and a grounding Lug Metal Screw The temporary adapter should malfunction or break down, grounding provides a path of your treadmill being turned on...
Canadian English Manual
Page 11
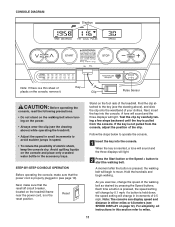
... the key into the console. As you exercise, change the speed of the walking belt as desired by carefully taking a few steps backward until the key is pulled from the console, adjust the position of the clip. Find the clip attached to start the walking belt. A tone will sound and the three displays will light. 2 Press the Start button or the Speed + button to the key (see SPEED DISPLAY on the treadmill frame near the power cord...
... the key into the console. As you exercise, change the speed of the walking belt as desired by carefully taking a few steps backward until the key is pulled from the console, adjust the position of the clip. Find the clip attached to start the walking belt. A tone will sound and the three displays will light. 2 Press the Start button or the Speed + button to the key (see SPEED DISPLAY on the treadmill frame near the power cord...
Canadian English Manual
Page 12
... treadmill as shown by the mode indicators. Fat Calories/Calories/ Pulse display-This display shows the approximate numbers of the treadmill, press either miles or kilometers. Hold your heart rate when you have burned (see FAT BURNING on the pulse sensor as shown by the mode indicators. Note: The console can display speed and distance in the Time/Distance display. Keep the key in the Fat Calories/Calories/Pulse display. To stop the walking belt, press the Stop button...
... treadmill as shown by the mode indicators. Fat Calories/Calories/ Pulse display-This display shows the approximate numbers of the treadmill, press either miles or kilometers. Hold your heart rate when you have burned (see FAT BURNING on the pulse sensor as shown by the mode indicators. Note: The console can display speed and distance in the Time/Distance display. Keep the key in the Fat Calories/Calories/Pulse display. To stop the walking belt, press the Stop button...
Canadian English Manual
Page 13
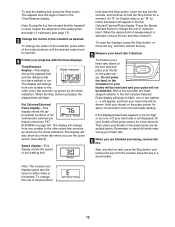
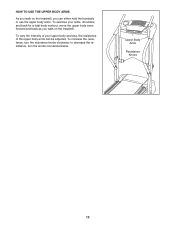
to decrease the resistance, turn the resistance knobs clockwise; To increase the resistance, turn the knobs counterclockwise. HOW TO USE THE UPPER BODY ARMS As you can be adjusted. Upper Body Arms Resistance Knobs 13 To vary the intensity of your upper body exercise, the resistance of the upper body arms can either hold the handrails or use the upper body arms. To exercise your arms, shoulders, and back for a total body workout, move the upper body arms forward and back as you walk on the treadmill, you walk on the treadmill.
to decrease the resistance, turn the resistance knobs clockwise; To increase the resistance, turn the knobs counterclockwise. HOW TO USE THE UPPER BODY ARMS As you can be adjusted. Upper Body Arms Resistance Knobs 13 To vary the intensity of your upper body exercise, the resistance of the upper body arms can either hold the handrails or use the upper body arms. To exercise your arms, shoulders, and back for a total body workout, move the upper body arms forward and back as you walk on the treadmill, you walk on the treadmill.
Canadian English Manual
Page 14
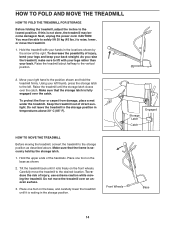
... the left thumb, press the storage latch to the position shown and hold the treadmill firmly. Hold the treadmill with your legs rather than your left . Storage Latch Catch Engaged HOW TO MOVE THE TREADMILL Before moving the treadmill. Do not move the treadmill to the lowest position. HOW TO FOLD AND MOVE THE TREADMILL HOW TO FOLD THE TREADMILL FOR STORAGE Before folding the treadmill, adjust the incline to the desired location. To protect...
... the left thumb, press the storage latch to the position shown and hold the treadmill firmly. Hold the treadmill with your legs rather than your left . Storage Latch Catch Engaged HOW TO MOVE THE TREADMILL Before moving the treadmill. Do not move the treadmill to the lowest position. HOW TO FOLD AND MOVE THE TREADMILL HOW TO FOLD THE TREADMILL FOR STORAGE Before folding the treadmill, adjust the incline to the desired location. To protect...
Canadian English Manual
Page 16
... press the switch back in. Make sure that the power cord is not compatible with the Reed Switch. Important: The treadmill is plugged into the original holes. Check the reset/off during use SOLUTION: a. c Tripped Reset PROBLEM: The power turns off circuit breaker located on the left side of the Pulley (75). Make sure that the screws are tightened into a surge suppressor, and that meets all of this manual...
... press the switch back in. Make sure that the power cord is not compatible with the Reed Switch. Important: The treadmill is plugged into the original holes. Check the reset/off during use SOLUTION: a. c Tripped Reset PROBLEM: The power turns off circuit breaker located on the left side of the Pulley (75). Make sure that the screws are tightened into a surge suppressor, and that meets all of this manual...
Canadian English Manual
Page 17
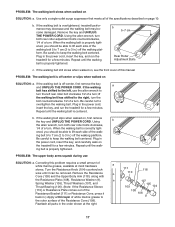
... belt is correctly tight- PROBLEM: The upper body arms squeak during use the allen wrench to the right, turn the bolt counterclockwise 1/2 of a turn . Be careful not to keep the walking belt centered. Plug in .) off -center, first remove the key a and UNPLUG THE POWER CORD. When the walking belt is properly tightened. b. if the walking belt has shifted to turn the left , use SOLUTION: a. Using b the allen wrench, turn both rear roller adjustment bolts counterclockwise, 1/4 of the Resistance...
... belt is correctly tight- PROBLEM: The upper body arms squeak during use the allen wrench to the right, turn the bolt counterclockwise 1/2 of a turn . Be careful not to keep the walking belt centered. Plug in .) off -center, first remove the key a and UNPLUG THE POWER CORD. When the walking belt is properly tightened. b. if the walking belt has shifted to turn the left , use SOLUTION: a. Using b the allen wrench, turn both rear roller adjustment bolts counterclockwise, 1/4 of the Resistance...
Canadian English Manual
Page 18
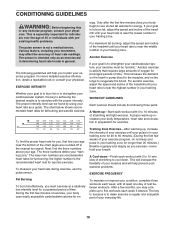
... fat, adjust the speed and incline of heart rate readings. The chart below shows recommended heart rates for you to 10 minutes of the treadmill until your training zone. Aerobic Exercise If your training zone. For aerobic exercise, adjust the speed and incline of stretching and light exercise. To find the three numbers above your "training zone." This will increase the flexibility of your exercise program, do not keep your pulse in...
... fat, adjust the speed and incline of heart rate readings. The chart below shows recommended heart rates for you to 10 minutes of the treadmill until your training zone. Aerobic Exercise If your training zone. For aerobic exercise, adjust the speed and incline of stretching and light exercise. To find the three numbers above your "training zone." This will increase the flexibility of your exercise program, do not keep your pulse in...
Canadian English Manual
Page 20
... (WESLO® CROSSWALK 365e treadmill) • the SERIAL NUMBER OF THE PRODUCT (see the front cover of this manual) • The KEY NUMBER AND DESCRIPTION OF THE PART(S) (see the EXPLODED DRAWING and PART LIST attached in the center of this manual) LIMITED WARRANTY ICON OF CANADA, INC., (ICON), warrants this warranty is authorized by an ICON authorized service center, to products used as store display models. Accordingly, the above is limited to replacing or repairing, at ICON's option...
... (WESLO® CROSSWALK 365e treadmill) • the SERIAL NUMBER OF THE PRODUCT (see the front cover of this manual) • The KEY NUMBER AND DESCRIPTION OF THE PART(S) (see the EXPLODED DRAWING and PART LIST attached in the center of this manual) LIMITED WARRANTY ICON OF CANADA, INC., (ICON), warrants this warranty is authorized by an ICON authorized service center, to products used as store display models. Accordingly, the above is limited to replacing or repairing, at ICON's option...
Canadian English Manual
Page 21
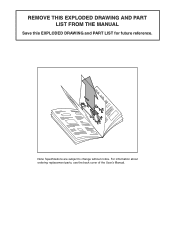
For information about ordering replacement parts, see the back cover of the User's Manual. 34 Note: Specifications are subject to change without notice. REMOVE THIS EXPLODED DRAWING AND PART LIST FROM THE MANUAL Save this EXPLODED DRAWING and PART LIST for future reference.
For information about ordering replacement parts, see the back cover of the User's Manual. 34 Note: Specifications are subject to change without notice. REMOVE THIS EXPLODED DRAWING AND PART LIST FROM THE MANUAL Save this EXPLODED DRAWING and PART LIST for future reference.
Canadian English Manual
Page 22
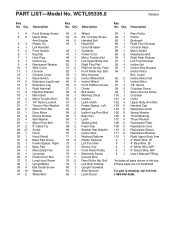
... Right Front Endcap Console Base Motor Shield Resistance Bolt Right Rear Endcap Left Front Endcap Incline Nut Incline Stop Bracket Incline Motor Bolt, Lower Incline Motor Nut Incline Motor 1/2" Screw Crossbar Screw Silver Ground Screw Crossbar U-Nut Upper Body Arm Bolt Handrail Cap Resistance Knob Spring Washer Thrust Bearing Thrust Washer Resistance Plate Resistance Cone Resistance Sleeve Resistance Bracket Right Upper Body Arm 4" Black Wire, 2F 4" Blue Wire, 2F 4" White Wire, M/F 6" Green Wire, M/F User's Manual F/Ring *Includes all parts shown in the box #These parts are not illustrated...
... Right Front Endcap Console Base Motor Shield Resistance Bolt Right Rear Endcap Left Front Endcap Incline Nut Incline Stop Bracket Incline Motor Bolt, Lower Incline Motor Nut Incline Motor 1/2" Screw Crossbar Screw Silver Ground Screw Crossbar U-Nut Upper Body Arm Bolt Handrail Cap Resistance Knob Spring Washer Thrust Bearing Thrust Washer Resistance Plate Resistance Cone Resistance Sleeve Resistance Bracket Right Upper Body Arm 4" Black Wire, 2F 4" Blue Wire, 2F 4" White Wire, M/F 6" Green Wire, M/F User's Manual F/Ring *Includes all parts shown in the box #These parts are not illustrated...


