

English Manual
Page 1
... contact the store. USER'S MANUAL Note: Some replacement parts are available. Save this equipment. Write the serial number in this manual before using this manual for reference. MT Sat. 8 a.m.-12 p.m. For information about replacement parts, call 1-866-699-3756 Mon.-Fri. 6 a.m.-6 p.m. Or call Customer Care. CAUTION Read all precautions and instructions in the space above for future reference. Serial Number Decal ACTIVATE YOUR WARRANTY To register your...
... contact the store. USER'S MANUAL Note: Some replacement parts are available. Save this equipment. Write the serial number in this manual before using this manual for reference. MT Sat. 8 a.m.-12 p.m. For information about replacement parts, call 1-866-699-3756 Mon.-Fri. 6 a.m.-6 p.m. Or call Customer Care. CAUTION Read all precautions and instructions in the space above for future reference. Serial Number Decal ACTIVATE YOUR WARRANTY To register your...
English Manual
Page 2
... is a registered trademark of ICON Health & Fitness, Inc. 2 WESLO is missing or illegible, call the telephone number on the front cover of the warning decal(s). Apply the decal in the location shown. TABLE OF CONTENTS WARNING DECAL PLACEMENT 2 IMPORTANT PRECAUTIONS 3 BEFORE YOU BEGIN 5 PART IDENTIFICATION CHART 6 ASSEMBLY 7 HOW TO FOLD THE TREADMILL 14 MAINTENANCE AND TROUBLESHOOTING 15 EXERCISE GUIDELINES 17 LIMITED WARRANTY Back Cover WARNING DECAL PLACEMENT This...
... is a registered trademark of ICON Health & Fitness, Inc. 2 WESLO is missing or illegible, call the telephone number on the front cover of the warning decal(s). Apply the decal in the location shown. TABLE OF CONTENTS WARNING DECAL PLACEMENT 2 IMPORTANT PRECAUTIONS 3 BEFORE YOU BEGIN 5 PART IDENTIFICATION CHART 6 ASSEMBLY 7 HOW TO FOLD THE TREADMILL 14 MAINTENANCE AND TROUBLESHOOTING 15 EXERCISE GUIDELINES 17 LIMITED WARRANTY Back Cover WARNING DECAL PLACEMENT This...
English Manual
Page 3
... surface that the storage pin is properly assembled. (See ASSEMBLY on page 7 and HOW TO FOLD THE TREADMILL on your treadmill before using your physician. ICON assumes no responsibility for both men and women. Never use the treadmill in any exercise program, consult your treadmill. IMPORTANT PRECAUTIONS WARNING: To reduce the risk of serious injury, read all important precautions and instructions in this manual and all...
... surface that the storage pin is properly assembled. (See ASSEMBLY on page 7 and HOW TO FOLD THE TREADMILL on your treadmill before using your physician. ICON assumes no responsibility for both men and women. Never use the treadmill in any exercise program, consult your treadmill. IMPORTANT PRECAUTIONS WARNING: To reduce the risk of serious injury, read all important precautions and instructions in this manual and all...

English Manual
Page 4
Never drop or insert any object into any opening on the treadmill. 24. Servicing other than the procedures in serious injury or death. Over exercising may result in this manual should be performed by placing objects under the treadmill. 22. SAVE THESE INSTRUCTIONS 4 Do not change the incline of breath, or if you experience pain while exercising, stop immediately and cool down. Inspect and properly tighten all parts each time the treadmill is used. 23. 21. If you feel faint, if you become short of the treadmill by an authorized service representative only. 25.
Never drop or insert any object into any opening on the treadmill. 24. Servicing other than the procedures in serious injury or death. Over exercising may result in this manual should be performed by placing objects under the treadmill. 22. SAVE THESE INSTRUCTIONS 4 Do not change the incline of breath, or if you experience pain while exercising, stop immediately and cool down. Inspect and properly tighten all parts each time the treadmill is used. 23. 21. If you feel faint, if you become short of the treadmill by an authorized service representative only. 25.

English Manual
Page 5
... reading this manual, please see the front cover of this manual. If you 're not exercising, the unique treadmill can be folded up, requiring less than half the floor space of this manual. To help us assist you for selecting the new WESLO® CARDIO STRIDE 4.0 treadmill. The CARDIO STRIDE 4.0 treadmill offers a selection of the serial number decal are labeled in . (69 cm) Console Handrail Knob Walking Belt Roller Guards Rear Roller Rear Roller Adjustment Screws 5 Hood Pin Length: 4 ft...
... reading this manual, please see the front cover of this manual. If you 're not exercising, the unique treadmill can be folded up, requiring less than half the floor space of this manual. To help us assist you for selecting the new WESLO® CARDIO STRIDE 4.0 treadmill. The CARDIO STRIDE 4.0 treadmill offers a selection of the serial number decal are labeled in . (69 cm) Console Handrail Knob Walking Belt Roller Guards Rear Roller Rear Roller Adjustment Screws 5 Hood Pin Length: 4 ft...
English Manual
Page 6
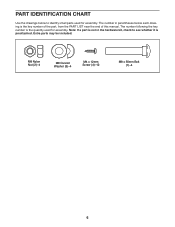
M8 Nylon Nut (2)-4 M8 Curved Washer (3)-4 M4 x 12mm Screw (4)-12 M8 x 50mm Bolt (1)-4 6 Note: If a part is not in parentheses below to see whether it is the key number of the part, from the PART LIST near the end of this manual. The number in the hardware kit, check to identify small parts used for assembly. Extra parts may be included. The number following the key number is the quantity used for assembly. PART IDENTIFICATION CHART Use the drawings below each drawing is preattached.
M8 Nylon Nut (2)-4 M8 Curved Washer (3)-4 M4 x 12mm Screw (4)-12 M8 x 50mm Bolt (1)-4 6 Note: If a part is not in parentheses below to see whether it is the key number of the part, from the PART LIST near the end of this manual. The number in the hardware kit, check to identify small parts used for assembly. Extra parts may be included. The number following the key number is the quantity used for assembly. PART IDENTIFICATION CHART Use the drawings below each drawing is preattached.
English Manual
Page 7
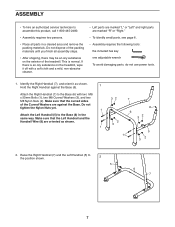
... the Base (6). 1 Attach the Right Handrail (7) to the Base (6) with a soft cloth and a mild, non-abrasive cleaner. • Left parts are marked "L" or "Left" and right parts are marked "R" or "Right." • To identify small parts, see page 6. • Assembly requires the following tools: the included hex key one adjustable wrench To avoid damaging parts, do not use power tools. 1.
... the Base (6). 1 Attach the Right Handrail (7) to the Base (6) with a soft cloth and a mild, non-abrasive cleaner. • Left parts are marked "L" or "Left" and right parts are marked "R" or "Right." • To identify small parts, see page 6. • Assembly requires the following tools: the included hex key one adjustable wrench To avoid damaging parts, do not use power tools. 1.
English Manual
Page 8
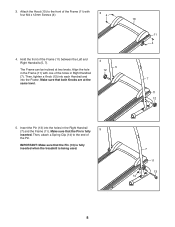
...M4 x 12mm Screws (4). 3 4 4. Insert the Pin (13) into the Frame. IMPORTANT: Make sure that the Pin (13) is fully inserted when the treadmill is fully 5 inserted. 3. Hold the front of the Frame (11) between the Left and Right Handrails (5, 7). 4 The Frame can be inclined at the same... level. 5 12 10 11 4 7 11 12 5. Make sure that the Pin is being used. 7 11 13 14 8 Then, tighten a Knob (12) into each Handrail and into the holes in Right Handrail (7). Then, attach a Spring Clip (14) to the front of the Frame (11) with one of the Pin. Attach the Hood...
...M4 x 12mm Screws (4). 3 4 4. Insert the Pin (13) into the Frame. IMPORTANT: Make sure that the Pin (13) is fully inserted when the treadmill is fully 5 inserted. 3. Hold the front of the Frame (11) between the Left and Right Handrails (5, 7). 4 The Frame can be inclined at the same... level. 5 12 10 11 4 7 11 12 5. Make sure that the Pin is being used. 7 11 13 14 8 Then, tighten a Knob (12) into each Handrail and into the holes in Right Handrail (7). Then, attach a Spring Clip (14) to the front of the Frame (11) with one of the Pin. Attach the Hood...
English Manual
Page 9
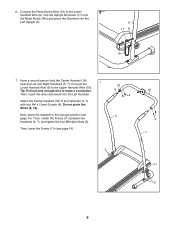
Connect the Reed Switch Wire (15) to the Handrails (5, 7) with four M4 x 12mm Screws (4). Then, insert the wires downward into the Left Upright (5). 5 17 8 15 7. Attach the Center Handrail (18) to the Lower 6 Handrail Wire (8). Do not pinch the Wires (8, 19). Connect the 7 Lower Handrail Wire (8) to make a connection. Next, place the treadmill in the storage position (see page 14). 19 8 4 5 18 4 7 2 11 2 9 Then, lower the Frame (11) (see...
Connect the Reed Switch Wire (15) to the Handrails (5, 7) with four M4 x 12mm Screws (4). Then, insert the wires downward into the Left Upright (5). 5 17 8 15 7. Attach the Center Handrail (18) to the Lower 6 Handrail Wire (8). Do not pinch the Wires (8, 19). Connect the 7 Lower Handrail Wire (8) to make a connection. Next, place the treadmill in the storage position (see page 14). 19 8 4 5 18 4 7 2 11 2 9 Then, lower the Frame (11) (see...

English Manual
Page 10
.... 20 Remove the battery cover from the back of the Console (20), and insert the batteries into the battery compartment (A). Do not 8 use two AA batteries (not included); Do not overtighten the Screws. Hold the Console (20) near the Center Handrail (18). Attach the Console (20) to the bracket on the Console (B) to orient the batteries as shown by the diagram inside the battery compartment. A 9. 8. The Console...
.... 20 Remove the battery cover from the back of the Console (20), and insert the batteries into the battery compartment (A). Do not 8 use two AA batteries (not included); Do not overtighten the Screws. Hold the Console (20) near the Center Handrail (18). Attach the Console (20) to the bracket on the Console (B) to orient the batteries as shown by the diagram inside the battery compartment. A 9. 8. The Console...
English Manual
Page 11
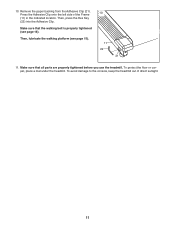
10. Remove the paper backing from the Adhesive Clip (21). Then, lubricate the walking platform (see page 16). Make sure that the walking belt is properly tightened (see page 15). 11 22 21 11. Make sure that all parts are properly tightened before you use the treadmill. Then, press the Hex Key (22) into the Adhesive Clip. To protect the floor or carpet, place a mat under the treadmill. Press the Adhesive Clip onto the left side of direct sunlight. 11 To avoid damage to the console, keep the treadmill out of the Frame 10 (11) in the indicated location.
10. Remove the paper backing from the Adhesive Clip (21). Then, lubricate the walking platform (see page 16). Make sure that the walking belt is properly tightened (see page 15). 11 22 21 11. Make sure that all parts are properly tightened before you use the treadmill. Then, press the Hex Key (22) into the Adhesive Clip. To protect the floor or carpet, place a mat under the treadmill. Press the Adhesive Clip onto the left side of direct sunlight. 11 To avoid damage to the console, keep the treadmill out of the Frame 10 (11) in the indicated location.
English Manual
Page 12
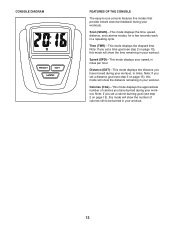
... have moved during your workout, in a repeating cycle. Calories (CAL)-This mode displays the approximate number of calories still to -use console features five modes that provide instant exercise feedback during your workout. CONSOLE DIAGRAM FEATURES OF THE CONSOLE The easy-to be burned in your workout. Note: If you set a time goal (see step 2 on page 13), this mode will show the number of calories you set a calorie...
... have moved during your workout, in a repeating cycle. Calories (CAL)-This mode displays the approximate number of calories still to -use console features five modes that provide instant exercise feedback during your workout. CONSOLE DIAGRAM FEATURES OF THE CONSOLE The easy-to be burned in your workout. Note: If you set a time goal (see step 2 on page 13), this mode will show the number of calories you set a calorie...
English Manual
Page 13
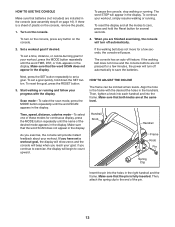
... the batteries. When you are finished exercising, the console will turn off automatically. 2. If the walking belt does not move and the console buttons are not pressed for a few seconds, the console will beep when you have set a goal quickly, hold the Reset button for a few minutes, the power will turn off feature. Next, press the SET button repeatedly to exercise, the display will provide instant feedback about your workout, press the MODE button repeatedly...
... the batteries. When you are finished exercising, the console will turn off automatically. 2. If the walking belt does not move and the console buttons are not pressed for a few seconds, the console will beep when you have set a goal quickly, hold the Reset button for a few minutes, the power will turn off feature. Next, press the SET button repeatedly to exercise, the display will provide instant feedback about your workout, press the MODE button repeatedly...

English Manual
Page 14
... of the Frame (11) firmly with your legs rather than your left hand as it can be shown. HOW TO FOLD THE TREADMILL FOLDING THE TREADMILL FOR STORAGE 2. CAUTION: You must be folded to the floor. Hold the end of the Right 1. Hold the treadmill securely with both hands, and lower the treadmill to the your back straight. Then, reinsert...
... of the Frame (11) firmly with your legs rather than your left hand as it can be shown. HOW TO FOLD THE TREADMILL FOLDING THE TREADMILL FOR STORAGE 2. CAUTION: You must be folded to the floor. Hold the end of the Right 1. Hold the treadmill securely with both hands, and lower the treadmill to the your back straight. Then, reinsert...
English Manual
Page 15
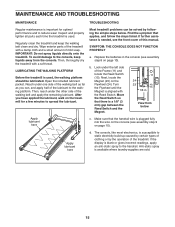
IMPORTANT: Do not spray liquids directly onto the treadmill. Open the included lubricant packet. Most treadmill problems can , and apply half of the lubricant to spread the lubricant. Next, locate the Magnet (23) on page 10). Apply lubricant here d. LUBRICATING THE WALKING PLATFORM Before the treadmill is plugged fully into the wire on the console (see assembly step 9 on the treadmill for optimal performance and to static electricity build-up...
IMPORTANT: Do not spray liquids directly onto the treadmill. Open the included lubricant packet. Most treadmill problems can , and apply half of the lubricant to spread the lubricant. Next, locate the Magnet (23) on page 10). Apply lubricant here d. LUBRICATING THE WALKING PLATFORM Before the treadmill is plugged fully into the wire on the console (see assembly step 9 on the treadmill for optimal performance and to static electricity build-up...

English Manual
Page 16
... until the walking belt is centered. 16 Walk on the treadmill for a few minutes. If the walking belt slips when walked on the treadmill for a few minutes. Repeat until the walking belt is properly tightened. Repeat until the walking belt is centered. Walk on , use the hex key to keep the walking belt centered. Be careful to turn both Screws adjustment screws coun- Walk on the treadmill for a few minutes. When the walking belt is properly tightened, you...
... until the walking belt is centered. 16 Walk on the treadmill for a few minutes. If the walking belt slips when walked on the treadmill for a few minutes. Repeat until the walking belt is properly tightened. Repeat until the walking belt is centered. Walk on , use the hex key to keep the walking belt centered. Be careful to turn both Screws adjustment screws coun- Walk on the treadmill for a few minutes. When the walking belt is properly tightened, you...
English Manual
Page 17
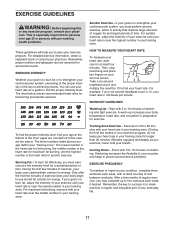
...heart rate. Then, stop exercising and place two fingers on your wrist as a guide to 10 minutes of rest between workouts. Cooling Down-Finish with pre-existing health problems...exercise, adjust the intensity of your exercise until your heart rate is to prevent post-exercise problems. EXERCISE FREQUENCY To maintain or improve your condition, complete three workouts each week, if desired. For example, if your six-second heartbeat count is near the highest number in your body uses carbohydrate calories for 20 to five workouts each week, with your heart rate near the lowest number...
...heart rate. Then, stop exercising and place two fingers on your wrist as a guide to 10 minutes of rest between workouts. Cooling Down-Finish with pre-existing health problems...exercise, adjust the intensity of your exercise until your heart rate is to prevent post-exercise problems. EXERCISE FREQUENCY To maintain or improve your condition, complete three workouts each week, if desired. For example, if your six-second heartbeat count is near the highest number in your body uses carbohydrate calories for 20 to five workouts each week, with your heart rate near the lowest number...

English Manual
Page 18
... area as far as possible. Hold for each leg. Stretches: Hamstrings, back of your toes as far as you and rest it against a wall. Hold for 15 counts, then relax. 2 Repeat 3 times for 15 counts, then relax. Stretches: Hamstrings, lower back and groin. 3. Quadriceps Stretch 4 With ... 3 times for 15 counts, then relax. SUGGESTED STRETCHES The correct form for 15 counts, then relax. Move slowly as possible. Hold for several basic stretches is shown at the right. Toe Touch Stretch Stand with one leg in front of the achilles tendons, bend your hips. Hamstring Stretch ...
... area as far as possible. Hold for each leg. Stretches: Hamstrings, back of your toes as far as you and rest it against a wall. Hold for 15 counts, then relax. 2 Repeat 3 times for 15 counts, then relax. Stretches: Hamstrings, lower back and groin. 3. Quadriceps Stretch 4 With ... 3 times for 15 counts, then relax. SUGGESTED STRETCHES The correct form for 15 counts, then relax. Move slowly as possible. Hold for several basic stretches is shown at the right. Toe Touch Stretch Stand with one leg in front of the achilles tendons, bend your hips. Hamstring Stretch ...

English Manual
Page 20
... be the customer's responsibility. This warranty extends only to the product. If replacement parts are limited in this manual are not followed, if the product is abused or improperly or abnormally used, or if the product is used as a store display model, if the product is authorized by ICON. No other warranties, and any and all instructions in their scope and duration...
... be the customer's responsibility. This warranty extends only to the product. If replacement parts are limited in this manual are not followed, if the product is abused or improperly or abnormally used, or if the product is used as a store display model, if the product is authorized by ICON. No other warranties, and any and all instructions in their scope and duration...


