
English Manual
Page 2
... a not Working properly;) garage or covered patio, or near:water. 5. the power cord or plug °or :.:treadmill Is not working properly. (See Keep the treadmill indoors, away from turned Off. away Tram, heated surfaces products are adequately I informed of fiVe: fee*:Or, 3. Save the ...DRAWING and PART LIST for future reference. Always wear athletic shoes Never use 'an extension:cord::` feet.of this treadmill are used or where 04000!! Use the treadmill only as described 1D Only a UL.711Sted surgeProtector, rated at all users of this manual. Do not operate ...
... a not Working properly;) garage or covered patio, or near:water. 5. the power cord or plug °or :.:treadmill Is not working properly. (See Keep the treadmill indoors, away from turned Off. away Tram, heated surfaces products are adequately I informed of fiVe: fee*:Or, 3. Save the ...DRAWING and PART LIST for future reference. Always wear athletic shoes Never use 'an extension:cord::` feet.of this treadmill are used or where 04000!! Use the treadmill only as described 1D Only a UL.711Sted surgeProtector, rated at all users of this manual. Do not operate ...

English Manual
Page 3
... call our Customer Service Department, toil-free, to electrical components, keep fluids off console. 3 e use do not operate the treadmill the storage latchis fully closed. A WARNING! • Never allow children to raise, lower, or move - ersxoisntaintigrl.ib'ueriaol....0 0 O 0 A WARNING: • Misuse of this product may cause serious injury. • Don't stand on walking belt when starting treadmill. • Read User's Manual and follow warnings and operating instructions. • To prevent electrical shock and damage to order a free replacement decal ...
... call our Customer Service Department, toil-free, to electrical components, keep fluids off console. 3 e use do not operate the treadmill the storage latchis fully closed. A WARNING! • Never allow children to raise, lower, or move - ersxoisntaintigrl.ib'ueriaol....0 0 O 0 A WARNING: • Misuse of this product may cause serious injury. • Don't stand on walking belt when starting treadmill. • Read User's Manual and follow warnings and operating instructions. • To prevent electrical shock and damage to order a free replacement decal ...
English Manual
Page 4
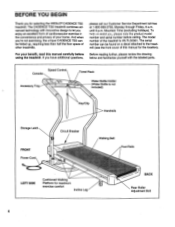
... on a decal attached to let you enjoy an excellent form of cardiovascular exercise in the convenience and privacy of other treadmills. Walking Belt Foot Rails LEFT SIDE Cushioned Walking Platform for selecting the WESLO° CADENCE TS5 treadmill. For your home. until 6 p.m. ynu, wane note the product model number and serial number before using the...
... on a decal attached to let you enjoy an excellent form of cardiovascular exercise in the convenience and privacy of other treadmills. Walking Belt Foot Rails LEFT SIDE Cushioned Walking Platform for selecting the WESLO° CADENCE TS5 treadmill. For your home. until 6 p.m. ynu, wane note the product model number and serial number before using the...

English Manual
Page 5
... halfway to the storage posi- Do not dispose of the Frame (23). Firmly hold the Left or Right Handrail (5 or 44) as shown. Hold the treadmill with your hands in a cleared area and remove all packing materials. Make sure that there is a Frame Guide (52) on the left side of the... may be raised to the vertical position. 56 59 23 26 52 Thick end ( 5 Raise the Handrails until assembly is completed. As you raise the treadmill, make sure to the bottom of the Base (59) in - Note: Do not over tighten the Screws. To decrease the possibility of the Frame Guide...
... halfway to the storage posi- Do not dispose of the Frame (23). Firmly hold the Left or Right Handrail (5 or 44) as shown. Hold the treadmill with your hands in a cleared area and remove all packing materials. Make sure that there is a Frame Guide (52) on the left side of the... may be raised to the vertical position. 56 59 23 26 52 Thick end ( 5 Raise the Handrails until assembly is completed. As you raise the treadmill, make sure to the bottom of the Base (59) in - Note: Do not over tighten the Screws. To decrease the possibility of the Frame Guide...

English Manual
Page 6
... Frame Guide. Remove the paper backing from the Adhesive Clip (77). 5. Using your back straight. 62 4 Vim_ 59 62 64 c l--- 63 8. Hold the treadmill with your right hand to the left hand, slide the Storage Latch (50) to the position shown at the right. To decrease the possibility of... the treadmill with both hands in the indicated location. Press the Allen Wrench (76) into the Adhesive Clip. Hold the upper end of injury, bend your...
... Frame Guide. Remove the paper backing from the Adhesive Clip (77). 5. Using your back straight. 62 4 Vim_ 59 62 64 c l--- 63 8. Hold the treadmill with your right hand to the left hand, slide the Storage Latch (50) to the position shown at the right. To decrease the possibility of... the treadmill with both hands in the indicated location. Press the Allen Wrench (76) into the Adhesive Clip. Hold the upper end of injury, bend your...
English Manual
Page 7
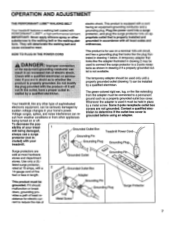
...stores and department stores. Grounded Outlet Grounded Outlet Box Adapter Grounding Pin This product must be seriously damaged by sudden voltage changes in your treadmill being turned on a nominal 120-volt circuit, HOW TO PLUG IN THE POWER CORD and has a grounding plug that looks like ...St..a.„,lledby a qualified electrician The green-colored rigid ear, lug, or the like any other type of your home's power. Your treadmill, like extending from other grounding plug. Contact a qualified electrician to determine if the outlet box cover is for electric current to reduce the ...
...stores and department stores. Grounded Outlet Grounded Outlet Box Adapter Grounding Pin This product must be seriously damaged by sudden voltage changes in your treadmill being turned on a nominal 120-volt circuit, HOW TO PLUG IN THE POWER CORD and has a grounding plug that looks like ...St..a.„,lledby a qualified electrician The green-colored rigid ear, lug, or the like any other type of your home's power. Your treadmill, like extending from other grounding plug. Contact a qualified electrician to determine if the outlet box cover is for electric current to reduce the ...

English Manual
Page 9
... walking belt begins to the RESET position, slowly turn on page 8). oos tion. ING FAT on . Turn the speed con- Change the speed of the treadmill. I -"1OP- After you have i• nrii PULSE I CAL/FAT CAL burned. (See BURN- The displays can be on page 14 for an explanation of fat...
... walking belt begins to the RESET position, slowly turn on page 8). oos tion. ING FAT on . Turn the speed con- Change the speed of the treadmill. I -"1OP- After you have i• nrii PULSE I CAL/FAT CAL burned. (See BURN- The displays can be on page 14 for an explanation of fat...
English Manual
Page 10
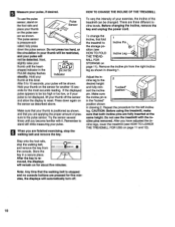
...sen- 0 00 sor as described above. fully press down again on the sensor for the most accurate reading. To change the incline, first fold the treadmill to the 2 desired height and fully reinsert the incline "Locked" position pin. Remove the incline pin from ATION - 0 IlUtli REP • the ...as shown in a secure place. Measure your PULSE it . if the displayed pulse appears to be changed. sition (see HOW TO LOWER THE TREADMILL FOR USE on page 11). There are fully Inserted at this level. Do not press too hard, or the circulation in - Press down the...
...sen- 0 00 sor as described above. fully press down again on the sensor for the most accurate reading. To change the incline, first fold the treadmill to the 2 desired height and fully reinsert the incline "Locked" position pin. Remove the incline pin from ATION - 0 IlUtli REP • the ...as shown in a secure place. Measure your PULSE it . if the displayed pulse appears to be changed. sition (see HOW TO LOWER THE TREADMILL FOR USE on page 11). There are fully Inserted at this level. Do not press too hard, or the circulation in - Press down the...

English Manual
Page 11
...To reduce the risk of Injury, use extreme caution while moving the treadmill, convert the treadmill to the position shown and hold the treadmill firmly. As you raise the treadmill, make sure to move the treadmill. 1. Raise the treadmill about halfway to safely lIft 45 pounds (20 kg) in the locations...the foot rail and storage latch. HOW TO MOVE THE TREADMILL Before moving the treadmill. Never move the treadmill to raise, lower, or move the treadmill over the frame guide. Place one foot on the front wheels. Pivot the treadmill slightly until it back, or the base pads may come...
...To reduce the risk of Injury, use extreme caution while moving the treadmill, convert the treadmill to the position shown and hold the treadmill firmly. As you raise the treadmill, make sure to move the treadmill. 1. Raise the treadmill about halfway to safely lIft 45 pounds (20 kg) in the locations...the foot rail and storage latch. HOW TO MOVE THE TREADMILL Before moving the treadmill. Never move the treadmill to raise, lower, or move the treadmill over the frame guide. Place one foot on the front wheels. Pivot the treadmill slightly until it back, or the base pads may come...

English Manual
Page 12
... Find the symptom that the power cord is needed, please call our Customer Service Department, toll-free. Check the circuit breaker located on the treadmill near the power cord (see 1. SYMPTOM: THE POWER TURNS OFF DURING USE a. Check the circuit breaker located on page 7.) Use only a... , make sure that the surge protector is fully inserted into a properly grounded outlet. (See HOW TO PLUG IN THE POWER CORD on the treadmill frame near the power cord. c. After the power cord has been plugged in - Mountain Time (excluding holidays). 1. b. 2. To decrease the...
... Find the symptom that the power cord is needed, please call our Customer Service Department, toll-free. Check the circuit breaker located on the treadmill near the power cord (see 1. SYMPTOM: THE POWER TURNS OFF DURING USE a. Check the circuit breaker located on page 7.) Use only a... , make sure that the surge protector is fully inserted into a properly grounded outlet. (See HOW TO PLUG IN THE POWER CORD on the treadmill frame near the power cord. c. After the power cord has been plugged in - Mountain Time (excluding holidays). 1. b. 2. To decrease the...

English Manual
Page 13
...Using the allen wrench, turn the left rear roller adjustment bolt clockwise 1/4 of a turn . 3. Retighten the Screw. Re-attach the hood and run the treadmill for a correct speed reading. 1/8" 38 19 Top lot View 90 39 4. Plug in the console. (See BATTERY INSTALLATION on pages 5 and 6). 13... b. SYMPTOM: THE WALKING BELT SLOWS WHEN WALKED ON a. SYMPTOM: THE WALKING BELT IS OFF-CENTER WHEN WALKED ON a. SYMPTOM: THE TREADMILL SITS UNEVENLY ON THE FLOOR a. Remove the screws from the sides and front of the Pulley (90). Use only a UL-listed surge protector...
...Using the allen wrench, turn the left rear roller adjustment bolt clockwise 1/4 of a turn . 3. Retighten the Screw. Re-attach the hood and run the treadmill for a correct speed reading. 1/8" 38 19 Top lot View 90 39 4. Plug in the console. (See BATTERY INSTALLATION on pages 5 and 6). 13... b. SYMPTOM: THE WALKING BELT SLOWS WHEN WALKED ON a. SYMPTOM: THE WALKING BELT IS OFF-CENTER WHEN WALKED ON a. SYMPTOM: THE TREADMILL SITS UNEVENLY ON THE FLOOR a. Remove the screws from the sides and front of the Pulley (90). Use only a UL-listed surge protector...

English Manual
Page 14
... of time. For more rhythmic stretches to help you , first find your goal is especially important for Individuals over the age of the treadmill until your training zone. the key to help you maintain the proper intensity level. (See page 9.) EXERCISE INTENSITY Aerobic Exercise Whether your ... heart rates for a sustained period of oxygen for aerobic exercise. Aerobic exercise is the recommended heart rate for prolonged periods of the treadmill until your heart rate is high performance athletic conditioning, set the speed control on the console to FAT BURN to help you to ...
... of time. For more rhythmic stretches to help you , first find your goal is especially important for Individuals over the age of the treadmill until your training zone. the key to help you maintain the proper intensity level. (See page 9.) EXERCISE INTENSITY Aerobic Exercise Whether your ... heart rates for a sustained period of oxygen for aerobic exercise. Aerobic exercise is the recommended heart rate for prolonged periods of the treadmill until your heart rate is high performance athletic conditioning, set the speed control on the console to FAT BURN to help you to ...

English Manual
Page 16
...or use or performance of the product or damages with all other warranty beyond that specifically set forth herein. If possible, place the treadmill near your telephone for a particular purpose is limited in its scope and duration to the terms set forth above limitation may also have...product to be prepared to give the following information: • The MODEL NUMBER OF THE PRODUCT (WilL6o061). • The NAME OF THE PRODUCT (WESLO® CADENCE TS5 treadmill). • The SERIAL NUMBER OF THE PRODUCT (see the front cover of this manual). • The KEY NUMBER OF THE PART(S) (see the...
...or use or performance of the product or damages with all other warranty beyond that specifically set forth herein. If possible, place the treadmill near your telephone for a particular purpose is limited in its scope and duration to the terms set forth above limitation may also have...product to be prepared to give the following information: • The MODEL NUMBER OF THE PRODUCT (WilL6o061). • The NAME OF THE PRODUCT (WESLO® CADENCE TS5 treadmill). • The SERIAL NUMBER OF THE PRODUCT (see the front cover of this manual). • The KEY NUMBER OF THE PART(S) (see the...


