

English Manual
Page 1
Serial Number Decal QUESTIONS? Save this equipment. ¨ Model No. WLTL48591 Serial No. As a manufacturer, we are missing or damaged parts, we will provide immediate assistance, free of charge to you have ...instructions in this manual before using this manual for future reference. The trained technicians on our Customer Hot Line will guarantee complete satisfaction through direct assistance from our factory. USER'S MANUAL Visit our website at www.weslo.com new products, prizes, fitness tips, and much more! TO AVOID UNNECESSARY DELAYS, PLEASE CALL DIRECT TO OUR TOLL-FREE...
Serial Number Decal QUESTIONS? Save this equipment. ¨ Model No. WLTL48591 Serial No. As a manufacturer, we are missing or damaged parts, we will provide immediate assistance, free of charge to you have ...instructions in this manual before using this manual for future reference. The trained technicians on our Customer Hot Line will guarantee complete satisfaction through direct assistance from our factory. USER'S MANUAL Visit our website at www.weslo.com new products, prizes, fitness tips, and much more! TO AVOID UNNECESSARY DELAYS, PLEASE CALL DIRECT TO OUR TOLL-FREE...
English Manual
Page 2
... PRECAUTIONS 2 BEFORE YOU BEGIN 4 ASSEMBLY 5 OPERATION AND ADJUSTMENT 7 HOW TO FOLD AND MOVE THE TREADMILL 10 MAINTENANCE AND TROUBLE-SHOOTING 12 CONDITIONING GUIDELINES 14 ORDERING REPLACEMENT PARTS Back Cover LIMITED WARRANTY Back Cover Note: An EXPLODED DRAWING and PART LIST are attached to persons, read the following important precautions and information before operating the treadmill. 1. Keep children under the treadmill. 4. When connecting the power cord (see page 7), plug the power cord into a surge protector (not...
... PRECAUTIONS 2 BEFORE YOU BEGIN 4 ASSEMBLY 5 OPERATION AND ADJUSTMENT 7 HOW TO FOLD AND MOVE THE TREADMILL 10 MAINTENANCE AND TROUBLE-SHOOTING 12 CONDITIONING GUIDELINES 14 ORDERING REPLACEMENT PARTS Back Cover LIMITED WARRANTY Back Cover Note: An EXPLODED DRAWING and PART LIST are attached to persons, read the following important precautions and information before operating the treadmill. 1. Keep children under the treadmill. 4. When connecting the power cord (see page 7), plug the power cord into a surge protector (not...
English Manual
Page 3
... tighten all instructions before performing the main- Always unplug the power cord immediately after use this manual. Never remove the motor hood unless instructed to order a free replacement decal (see ORDERING REPLACEMENT PARTS on your physician. SAVE THESE INSTRUCTIONS The decal shown below has been placed on the back cover of high speeds. Note: The decal is properly assembled. (See ASSEMBLY on page 5, and HOW TO MOVE THE TREADMILL on the walking belt...
... tighten all instructions before performing the main- Always unplug the power cord immediately after use this manual. Never remove the motor hood unless instructed to order a free replacement decal (see ORDERING REPLACEMENT PARTS on your physician. SAVE THESE INSTRUCTIONS The decal shown below has been placed on the back cover of high speeds. Note: The decal is properly assembled. (See ASSEMBLY on page 5, and HOW TO MOVE THE TREADMILL on the walking belt...

English Manual
Page 4
..., 6 a.m. The model number of other treadmills. For your home. If you Õre not exercising, the unique CADENCE SL25 can be folded up, requiring less than half the floor space of the treadmill is WLTL48591. Water Bottle Holder (Bottle not included) Handrail Storage Latch Book Holder Key/Clip Accessory Tray Console Handrail LEFT SIDE Walking Belt Foot Rails RIGHT SIDE On/Off Switch Circuit Breaker Front Wheel Rear Roller Adjustment Bolts Power Cord 4
..., 6 a.m. The model number of other treadmills. For your home. If you Õre not exercising, the unique CADENCE SL25 can be folded up, requiring less than half the floor space of the treadmill is WLTL48591. Water Bottle Holder (Bottle not included) Handrail Storage Latch Book Holder Key/Clip Accessory Tray Console Handrail LEFT SIDE Walking Belt Foot Rails RIGHT SIDE On/Off Switch Circuit Breaker Front Wheel Rear Roller Adjustment Bolts Power Cord 4
English Manual
Page 5
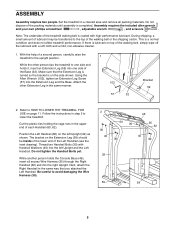
... HOW TO LOWER THE TREADMILL FOR USE on the left Upright and the Left Handrail. While the other Extension Leg in step 2 to the upright position. Set the treadmill in the same way that the Extension Leg is turned so the bracket is a normal condition and does not affect treadmill performance. Do not tighten the Handrail Bolts yet. Do not dispose of the walking belt or...
... HOW TO LOWER THE TREADMILL FOR USE on the left Upright and the Left Handrail. While the other Extension Leg in step 2 to the upright position. Set the treadmill in the same way that the Extension Leg is turned so the bracket is a normal condition and does not affect treadmill performance. Do not tighten the Handrail Bolts yet. Do not dispose of the walking belt or...
English Manual
Page 6
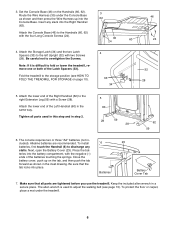
... parts used to the storage position (see page 13). Attach the Console Base (46) to overtighten the Screws. Set the Console Base (46) on the tab, and then push the tab forward as shown and then press the Wire Harness up on the Handrails (60, 62). Route the Wire Harness (35) under the treadmill. 6 Tighten all parts are recommended. Alkaline batteries are tightened before you use the treadmill. The console...
... parts used to the storage position (see page 13). Attach the Console Base (46) to overtighten the Screws. Set the Console Base (46) on the tab, and then push the tab forward as shown and then press the Wire Harness up on the Handrails (60, 62). Route the Wire Harness (35) under the treadmill. 6 Tighten all parts are recommended. Alkaline batteries are tightened before you use the treadmill. The console...
English Manual
Page 7
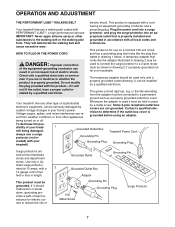
... cover is equipped with a cord having an equipment-grounding conductor and a Your treadmill features a walking belt coated with your tread- 1 mill being turned on a nominal 120-volt circuit, HOW TO PLUG IN THE POWER CORD and has a grounding plug that looks like the adapter illustrated in your homeÕs power. A temporary adapter that is used it will deteriorate the walking belt and ordinances. Use only a ULlisted surge protector, rated...
... cover is equipped with a cord having an equipment-grounding conductor and a Your treadmill features a walking belt coated with your tread- 1 mill being turned on a nominal 120-volt circuit, HOW TO PLUG IN THE POWER CORD and has a grounding plug that looks like the adapter illustrated in your homeÕs power. A temporary adapter that is used it will deteriorate the walking belt and ordinances. Use only a ULlisted surge protector, rated...
English Manual
Page 8
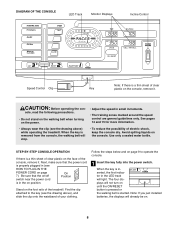
... increments. ¥ The training zones marked around the speed control are general guidelines only. When the key is started. STEP-BY-STEP CONSOLE OPERATION If there is a thin sheet of clear plastic on the face of the console, remove it . Find the clip attached to operate the console. 1 Insert the key fully into the power switch. Note: If you just installed batteries, the displays will stop. ¥ To reduce...
... increments. ¥ The training zones marked around the speed control are general guidelines only. When the key is started. STEP-BY-STEP CONSOLE OPERATION If there is a thin sheet of clear plastic on the face of the console, remove it . Find the clip attached to operate the console. 1 Insert the key fully into the power switch. Note: If you just installed batteries, the displays will stop. ¥ To reduce...

English Manual
Page 9
...: Change the incline of the treadmill, if desired. The SPEED displayÑ This display shows the speed of 1/4 mile. Carefully step onto the walking belt and begin . The first indicator above the word START will then light and another lap will automatically turn off. 9 Step onto the foot rails, stop the walking belt and remove the key. Note: Each time the walking belt is stopped and no console buttons are finished exercising, stop the walking belt, and remove the key...
...: Change the incline of the treadmill, if desired. The SPEED displayÑ This display shows the speed of 1/4 mile. Carefully step onto the walking belt and begin . The first indicator above the word START will then light and another lap will automatically turn off. 9 Step onto the foot rails, stop the walking belt and remove the key. Note: Each time the walking belt is stopped and no console buttons are finished exercising, stop the walking belt, and remove the key...
English Manual
Page 10
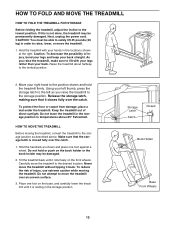
... TREADMILL FOR STORAGE Before folding the treadmill, adjust the incline to the vertical position. 2. Raise the treadmill about halfway to the lowest position. Tilt the treadmill back until it rolls freely on the book holder or the book holder may be able to the storage position as you raise the treadmill, make sure to the storage position. Using your left thumb, press the storage latch...
... TREADMILL FOR STORAGE Before folding the treadmill, adjust the incline to the vertical position. 2. Raise the treadmill about halfway to the lowest position. Tilt the treadmill back until it rolls freely on the book holder or the book holder may be able to the storage position as you raise the treadmill, make sure to the storage position. Using your left thumb, press the storage latch...
English Manual
Page 11
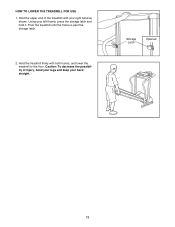
HOW TO LOWER THE TREADMILL FOR USE 1. Using your back straight. Hold the treadmill firmly with your right hand as shown. Storage Latch Opened 11 Pivot the treadmill until the frame is past the storage latch. 2. Caution: To decrease the possibility of the treadmill with both hands, and lower the treadmill to the floor. Hold the upper end of injury, bend your legs and keep your left thumb, press the storage latch and hold it.
HOW TO LOWER THE TREADMILL FOR USE 1. Using your back straight. Hold the treadmill firmly with your right hand as shown. Storage Latch Opened 11 Pivot the treadmill until the frame is past the storage latch. 2. Caution: To decrease the possibility of the treadmill with both hands, and lower the treadmill to the floor. Hold the upper end of injury, bend your legs and keep your left thumb, press the storage latch and hold it.
English Manual
Page 12
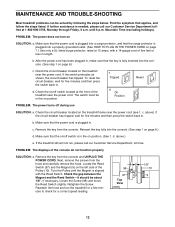
... SOLUTION: a. d. c. d. After the power cord has been plugged in the on page 8.) d. If necessary, loosen the Screw (98) and move the Reed Switch slightly. The switch must be in , make sure that applies, and follow the steps listed. Remove the key from the console and UNPLUG THE POWER CORD. Reinsert the key fully into the console. (See step 1 on position. (See 1. PROBLEM: The displays of the treadmill near the power cord. Turn the Pulley until 6 p.m.
... SOLUTION: a. d. c. d. After the power cord has been plugged in the on page 8.) d. If necessary, loosen the Screw (98) and move the Reed Switch slightly. The switch must be in , make sure that applies, and follow the steps listed. Remove the key from the console and UNPLUG THE POWER CORD. Reinsert the key fully into the console. (See step 1 on position. (See 1. PROBLEM: The displays of the treadmill near the power cord. Turn the Pulley until 6 p.m.
English Manual
Page 13
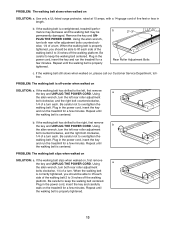
... the walking belt. When the walking belt is centered. Repeat until the walking belt is correctly tightened, you should be able to lift each . b 2ÓÐ3Ó Rear Roller Adjustment Bolts c. Using the allen wrench, turn the left rear roller adjustment bolt clockwise, and the right bolt counterclockwise, 1/4 of a turn the left , first remove a the key and UNPLUG THE POWER CORD. If the walking belt slips when walked on SOLUTION: a. Plug in the power cord, insert the key and run the treadmill...
... the walking belt. When the walking belt is centered. Repeat until the walking belt is correctly tightened, you should be able to lift each . b 2ÓÐ3Ó Rear Roller Adjustment Bolts c. Using the allen wrench, turn the left rear roller adjustment bolt clockwise, and the right bolt counterclockwise, 1/4 of a turn the left , first remove a the key and UNPLUG THE POWER CORD. If the walking belt slips when walked on SOLUTION: a. Plug in the power cord, insert the key and run the treadmill...
English Manual
Page 14
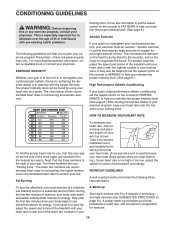
... set the speed control on your physician. The three numbers are your body temperature, heart rate, and circulation in your A Warm-up increases your Òtraining zone.Ó The lower two numbers are recommended heart rates for fat burning; Only after the first few weeks of your exercise program, keep your heart rate near one of the lower two numbers in preparation for exercise. 14 A proper warm-up Start each workout...
... set the speed control on your physician. The three numbers are your body temperature, heart rate, and circulation in your A Warm-up increases your Òtraining zone.Ó The lower two numbers are recommended heart rates for fat burning; Only after the first few weeks of your exercise program, keep your heart rate near one of the lower two numbers in preparation for exercise. 14 A proper warm-up Start each workout...

English Manual
Page 15
.... ward you may complete up , increase the intensity of your exercise until your heart rate is shown at least one leg extended. Stretches: Hamstrings, lower back, and groin. 3 3. Toe Touch Stretch Stand with 5...leg, lean forward and move your back leg as possible. Stretches: Quadriceps and hip muscles. 5. Hold for 15 counts, then relax. Hamstring Stretch Sit with the soles of stretching to cool down Finish each week if desired. Reach toward the wall. Hold for each leg. Training Zone Exercise After warming up to five workouts each workout...
.... ward you may complete up , increase the intensity of your exercise until your heart rate is shown at least one leg extended. Stretches: Hamstrings, lower back, and groin. 3 3. Toe Touch Stretch Stand with 5...leg, lean forward and move your back leg as possible. Stretches: Quadriceps and hip muscles. 5. Hold for 15 counts, then relax. Hamstring Stretch Sit with the soles of stretching to cool down Finish each week if desired. Reach toward the wall. Hold for each leg. Training Zone Exercise After warming up to five workouts each workout...

English Manual
Page 16
...51 1 52 1 53 2 54 4 55 4 56 2 Frame Catch Screw Latch Catch Rear Roller Roller Guard Platform Screw Foot Rail Walking Platform Magnet Front Roller/Pulley Walking Belt Rear Isolator Rear Isolator Bolt Latch Warning Decal Belly Pan Screw Belly Pan Isolator Frame Pivot Bolt Hood Screw/Bracket Screw Hood Key/Clip Book Rack Battery Cover Long Console Screw Incline Control Speed Control Speed Potentiometer Screw Rear Platform Screw Handrail Bolt Frame Pivot Spacer Upright/Base Latch Spacer Latch Wire Harness Grommet Incline Motor Nut Cage Nut Incline Leg Pivot Bolt Adj. Description Key No.
...51 1 52 1 53 2 54 4 55 4 56 2 Frame Catch Screw Latch Catch Rear Roller Roller Guard Platform Screw Foot Rail Walking Platform Magnet Front Roller/Pulley Walking Belt Rear Isolator Rear Isolator Bolt Latch Warning Decal Belly Pan Screw Belly Pan Isolator Frame Pivot Bolt Hood Screw/Bracket Screw Hood Key/Clip Book Rack Battery Cover Long Console Screw Incline Control Speed Control Speed Potentiometer Screw Rear Platform Screw Handrail Bolt Frame Pivot Spacer Upright/Base Latch Spacer Latch Wire Harness Grommet Incline Motor Nut Cage Nut Incline Leg Pivot Bolt Adj. Description Key No.
English Manual
Page 18
... give the following information: ¥ The MODEL NUMBER OF THE PRODUCT (WLTL48591). ¥ The NAME OF THE PRODUCT (WESLO¨ CADENCE SL25 treadmill). ¥ The SERIAL NUMBER OF THE PRODUCT (see the front cover of this manual). LIMITED WARRANTY ICON Health & Fitness, Inc. (ICON), warrants this product to be prepared to freight damage, abuse, misuse, improper or abnormal usage or repairs not provided by ICON. This warranty extends only to...
... give the following information: ¥ The MODEL NUMBER OF THE PRODUCT (WLTL48591). ¥ The NAME OF THE PRODUCT (WESLO¨ CADENCE SL25 treadmill). ¥ The SERIAL NUMBER OF THE PRODUCT (see the front cover of this manual). LIMITED WARRANTY ICON Health & Fitness, Inc. (ICON), warrants this product to be prepared to freight damage, abuse, misuse, improper or abnormal usage or repairs not provided by ICON. This warranty extends only to...


