

Instruction Manual
Page 1
...Beeston Leeds, LS118JG UK email: [email protected] CAUTION Read all precautions and instructions in China © 2006 ICON IP, Inc. USER'S MANUAL If you , please be prepared to providing complete customer satisfaction. Customer Service Department Unit 4, Revie Road Industrial Estate Revie Road Beeston Leeds, ...: • the MODEL NUMBER of the product (WETL13906.0) • the NAME of the product (WESLO CADENCE S5 treadmill) • the SERIAL NUMBER of the product (see the front cover of this manual) • the KEY NUMBER and DESCRIPTION of the needed part(s) (see the PART LIST and the...
...Beeston Leeds, LS118JG UK email: [email protected] CAUTION Read all precautions and instructions in China © 2006 ICON IP, Inc. USER'S MANUAL If you , please be prepared to providing complete customer satisfaction. Customer Service Department Unit 4, Revie Road Industrial Estate Revie Road Beeston Leeds, ...: • the MODEL NUMBER of the product (WETL13906.0) • the NAME of the product (WESLO CADENCE S5 treadmill) • the SERIAL NUMBER of the product (see the front cover of this manual) • the KEY NUMBER and DESCRIPTION of the needed part(s) (see the PART LIST and the...

Instruction Manual
Page 2
WESLO is the recommended heart rate for longer than 20 minutes.) Breathe regularly and deeply as you exercise-never hold your breath. Various factors, including your ... fat burning; The key to success is to use stored fat calories for a sustained period of ICON IP, Inc. 2 CONDITIONING GUIDELINES WARNING: Before beginning this manual. WORKOUT GUIDELINES Each workout should include the following guidelines will help you may affect the accuracy of your muscles and will help prevent postexercise problems...
WESLO is the recommended heart rate for longer than 20 minutes.) Breathe regularly and deeply as you exercise-never hold your breath. Various factors, including your ... fat burning; The key to success is to use stored fat calories for a sustained period of ICON IP, Inc. 2 CONDITIONING GUIDELINES WARNING: Before beginning this manual. WORKOUT GUIDELINES Each workout should include the following guidelines will help you may affect the accuracy of your muscles and will help prevent postexercise problems...

Instruction Manual
Page 3
...platform. To protect the floor or carpet from moisture and dust. Never move the treadmill. 20. Do not put the treadmill in this manual. Always hold the handrails while using the treadmill. When replacing the fuse, an ASTA approved BS1362 type should be fitted to ensure that could... If the walking belt still slows when walked on page 10). 5. b Using the allen wrench, turn both rear roller bolts clockwise, 1/4 of this manual. 12. Do not operate the treadmill if the power cord or plug is damaged, or if the treadmill is not working properly. (See MAINTENANCE AND...
...platform. To protect the floor or carpet from moisture and dust. Never move the treadmill. 20. Do not put the treadmill in this manual. Always hold the handrails while using the treadmill. When replacing the fuse, an ASTA approved BS1362 type should be fitted to ensure that could... If the walking belt still slows when walked on page 10). 5. b Using the allen wrench, turn both rear roller bolts clockwise, 1/4 of this manual. 12. Do not operate the treadmill if the power cord or plug is damaged, or if the treadmill is not working properly. (See MAINTENANCE AND...

Instruction Manual
Page 4
...few minutes to do not function properly SOLUTION: a. Make sure that applies, and follow the steps listed. PROBLEM: The displays of this manual. Do not change the incline of the treadmill regularly. 23. tenance and adjustment procedures described in any exercise program, consult your physician. ...all instructions before performing the main- Never remove the motor hood unless instructed to check for in-home use this treadmill in this manual. Important: The treadmill is missing, or if it back in the location shown. Check the on the treadmill near the power ...
...few minutes to do not function properly SOLUTION: a. Make sure that applies, and follow the steps listed. PROBLEM: The displays of this manual. Do not change the incline of the treadmill regularly. 23. tenance and adjustment procedures described in any exercise program, consult your physician. ...all instructions before performing the main- Never remove the motor hood unless instructed to check for in-home use this treadmill in this manual. Important: The treadmill is missing, or if it back in the location shown. Check the on the treadmill near the power ...

Instruction Manual
Page 5
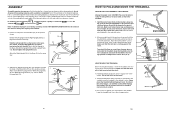
The model number of this manual for selecting the new WESLO® CADENCE S5 treadmill. HOW TO LOWER THE TREADMILL FOR USE 1. Hold the frame firmly with the parts that are labelled in the drawing below. The CADENCE S5 treadmill combines advanced technology with your right hand as shown. Water... the treadmill. If you 're not exercising, the CADENCE S5 treadmill can be folded up, requiring less than half the floor space of this manual carefully before contacting us assist you for the location). ing this manual, please see the front cover of the treadmill is ...
The model number of this manual for selecting the new WESLO® CADENCE S5 treadmill. HOW TO LOWER THE TREADMILL FOR USE 1. Hold the frame firmly with the parts that are labelled in the drawing below. The CADENCE S5 treadmill combines advanced technology with your right hand as shown. Water... the treadmill. If you 're not exercising, the CADENCE S5 treadmill can be folded up, requiring less than half the floor space of this manual carefully before contacting us assist you for the location). ing this manual, please see the front cover of the treadmill is ...
Instruction Manual
Page 6
... position. Raise the frame about halfway to the position shown and hold the Base (52) in the posi- Place one foot against one of this manual. If there is past the latch pin. ASSEMBLY Assembly requires two persons. This does not affect treadmill performance. Make sure to lift with the Upright...
... position. Raise the frame about halfway to the position shown and hold the Base (52) in the posi- Place one foot against one of this manual. If there is past the latch pin. ASSEMBLY Assembly requires two persons. This does not affect treadmill performance. Make sure to lift with the Upright...

Instruction Manual
Page 8
... period of the plas- The program will begin to start the program. See HOW TO TURN ON THE POWER on page 12. 5 When you can manually override the setting by pressing the Speed buttons.
... period of the plas- The program will begin to start the program. See HOW TO TURN ON THE POWER on page 12. 5 When you can manually override the setting by pressing the Speed buttons.

Instruction Manual
Page 9
...position. Then, raise the Handrails back to the floor. Keep the included hex keys in - If you have selected a speed program, reselect the manual mode by pressing the Speed buttons. To stop the walking belt, press the Stop button. Press the Speed in a secure place; Set the ...the treadmill, the indicators around the track will again begin to start four Handrail Bolts (3) with four Console Back Screws (7). HOW TO USE THE MANUAL MODE 1 Insert the key into the Right Upright (54). When either kilome- 6390TL1WE ters or miles. Note: After the buttons are properly ...
...position. Then, raise the Handrails back to the floor. Keep the included hex keys in - If you have selected a speed program, reselect the manual mode by pressing the Speed buttons. To stop the walking belt, press the Stop button. Press the Speed in a secure place; Set the ...the treadmill, the indicators around the track will again begin to start four Handrail Bolts (3) with four Console Back Screws (7). HOW TO USE THE MANUAL MODE 1 Insert the key into the Right Upright (54). When either kilome- 6390TL1WE ters or miles. Note: After the buttons are properly ...

Instruction Manual
Page 10
... three displays will deteriorate the walking belt and cause excessive wear. Outlet IT DANGER: Improper connection of the power cord into the console. While the manual mode of a button. Make sure that the adapter cover is properly installed and earthed in doubt as shown. Then, insert the key into the socket...
... three displays will deteriorate the walking belt and cause excessive wear. Outlet IT DANGER: Improper connection of the power cord into the console. While the manual mode of a button. Make sure that the adapter cover is properly installed and earthed in doubt as shown. Then, insert the key into the socket...

Instruction Manual
Page 11
... # 1 10" Blue Wire, 2F Star Washer 77 2 Platform # 1 6" White Wire, 2F 37 1 Front Roller Cushion, Front # 1 10" White Wire, 2F Star Washer 78 2 Platform # 1 User's Manual 383" Bo2lt (30M)-o4tor Star Washer Cushion, Center 39 2 Outlet Plate Washer 79 1 Drive Motor #These parts are not illustrated 40 1 Ground Star Washer 80...
... # 1 10" Blue Wire, 2F Star Washer 77 2 Platform # 1 6" White Wire, 2F 37 1 Front Roller Cushion, Front # 1 10" White Wire, 2F Star Washer 78 2 Platform # 1 User's Manual 383" Bo2lt (30M)-o4tor Star Washer Cushion, Center 39 2 Outlet Plate Washer 79 1 Drive Motor #These parts are not illustrated 40 1 Ground Star Washer 80...

