

Uk Manual
Page 1
As a manufacturer, we are missing or damaged parts, please call: 08457 089 009 or write: ICON Health & Fitness, Ltd. Customer Service Department Unit 4 Revie Road Industrial Estate Revie Road Beeston Leeds, LS118JG UK email: [email protected] CAUTION Read all precautions and instructions in this manual before using this manual for future reference. USER'S MANUAL Model No. Save this equipment. WETL13706.0 Serial No. Serial Number Decal QUESTIONS? If you have questions, or if there are committed to providing complete customer satisfaction.
As a manufacturer, we are missing or damaged parts, please call: 08457 089 009 or write: ICON Health & Fitness, Ltd. Customer Service Department Unit 4 Revie Road Industrial Estate Revie Road Beeston Leeds, LS118JG UK email: [email protected] CAUTION Read all precautions and instructions in this manual before using this manual for future reference. USER'S MANUAL Model No. Save this equipment. WETL13706.0 Serial No. Serial Number Decal QUESTIONS? If you have questions, or if there are committed to providing complete customer satisfaction.

Uk Manual
Page 2
WESLO is a registered trademark of this manual. TABLE OF CONTENTS IMPORTANT PRECAUTIONS 3 BEFORE YOU BEGIN 5 ASSEMBLY 6 OPERATION AND ADJUSTMENT 10 HOW TO FOLD AND MOVE THE TREADMILL 15 MAINTENANCE AND TROUBLESHOOTING 17 CONDITIONING GUIDELINES 19 ORDERING REPLACEMENT PARTS Back Cover Note: A PART IDENTIFICATION CHART, an EXPLODED DRAWING, and a PART LIST are attached in the center of ICON IP, Inc. 2
WESLO is a registered trademark of this manual. TABLE OF CONTENTS IMPORTANT PRECAUTIONS 3 BEFORE YOU BEGIN 5 ASSEMBLY 6 OPERATION AND ADJUSTMENT 10 HOW TO FOLD AND MOVE THE TREADMILL 15 MAINTENANCE AND TROUBLESHOOTING 17 CONDITIONING GUIDELINES 19 ORDERING REPLACEMENT PARTS Back Cover Note: A PART IDENTIFICATION CHART, an EXPLODED DRAWING, and a PART LIST are attached in the center of ICON IP, Inc. 2

Uk Manual
Page 3
... treadmill only as an exercise aid in determining heart rate trends in small increments to the fuse carrier. Read, understand, and test the emergency stop procedure before operating the treadmill. 1. Athletic support clothes are standing on the walking belt. No other appliance should be used only by the lock pin. 3 Never leave the treadmill unattended while it is not working properly. (See MAINTENANCE AND TROUBLESHOOTING...
... treadmill only as an exercise aid in determining heart rate trends in small increments to the fuse carrier. Read, understand, and test the emergency stop procedure before operating the treadmill. 1. Athletic support clothes are standing on the walking belt. No other appliance should be used only by the lock pin. 3 Never leave the treadmill unattended while it is not working properly. (See MAINTENANCE AND TROUBLESHOOTING...

Uk Manual
Page 4
... number on the treadmill. Never drop or insert any object into any exercise program, consult your physician. Note: The decal is intended for persons over the age of 35 or persons with pre-existing health problems. Read all parts of the treadmill by or through the use only. Servicing other than the procedures in the location shown. Inspect and properly tighten all instructions...
... number on the treadmill. Never drop or insert any object into any exercise program, consult your physician. Note: The decal is intended for persons over the age of 35 or persons with pre-existing health problems. Read all parts of the treadmill by or through the use only. Servicing other than the procedures in the location shown. Inspect and properly tighten all instructions...

Uk Manual
Page 5
... the treadmill (see the front cover of the treadmill is WETL13706.0. The model number of this manual, please see the front cover of other treadmills. For your workouts at home more effective and enjoyable. The CADENCE M6 treadmill combines advanced technology with the parts that are labeled in the drawing below. Accessory Tray Handrail Console Key/Clip Storage Latch Walking Belt Foot Rail Rear Roller Adjustment Bolts Hood On/Off Switch Circuit Breaker Wheel RIGHT SIDE Incline Leg 5
... the treadmill (see the front cover of the treadmill is WETL13706.0. The model number of this manual, please see the front cover of other treadmills. For your workouts at home more effective and enjoyable. The CADENCE M6 treadmill combines advanced technology with the parts that are labeled in the drawing below. Accessory Tray Handrail Console Key/Clip Storage Latch Walking Belt Foot Rail Rear Roller Adjustment Bolts Hood On/Off Switch Circuit Breaker Wheel RIGHT SIDE Incline Leg 5

Uk Manual
Page 6
... key , assembly requires a phillips screwdriver , a spanner , and wire cutters . do not dispose of the Right Handrail (54). 2 98 53 54 Wire 98 54 51 6 98 52 Have a second person hold the Base (52) in a cleared area and remove all packing materials; Some parts may be preassembled. 1. Do not tighten the Handrail Bolts yet. Set the treadmill in the position shown. Attach...
... key , assembly requires a phillips screwdriver , a spanner , and wire cutters . do not dispose of the Right Handrail (54). 2 98 53 54 Wire 98 54 51 6 98 52 Have a second person hold the Base (52) in a cleared area and remove all packing materials; Some parts may be preassembled. 1. Do not tighten the Handrail Bolts yet. Set the treadmill in the position shown. Attach...

Uk Manual
Page 7
... two Crossbar Star Washers (12) (only one of the Console Assembly (91) in the location shown. The end of the treadmill. 54 11 14 1 9 51 4. Do not tighten the Frame Pivot Bolts yet. IF THE CONNECTORS ARE NOT CON- Set the Console Assembly (91) on the left side of the Wire Harness should slide easily into the connector and snap...
... two Crossbar Star Washers (12) (only one of the Console Assembly (91) in the location shown. The end of the treadmill. 54 11 14 1 9 51 4. Do not tighten the Frame Pivot Bolts yet. IF THE CONNECTORS ARE NOT CON- Set the Console Assembly (91) on the left side of the Wire Harness should slide easily into the connector and snap...
Uk Manual
Page 9
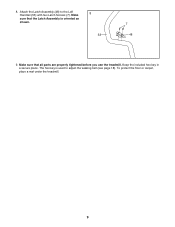
Make sure that all parts are properly tightened before you use the treadmill. Keep the included hex key in a secure place. To protect the floor or carpet, place a mat under the treadmill. 9 Make sure that the Latch Assembly is used to the Left 8 Handrail (53) with two Latch Screws (7). The hex key is oriented as shown. 53 7 48 9. Attach the Latch Assembly (48) to adjust the walking belt (see page 18). 8.
Make sure that all parts are properly tightened before you use the treadmill. Keep the included hex key in a secure place. To protect the floor or carpet, place a mat under the treadmill. 9 Make sure that the Latch Assembly is used to the Left 8 Handrail (53) with two Latch Screws (7). The hex key is oriented as shown. 53 7 48 9. Attach the Latch Assembly (48) to adjust the walking belt (see page 18). 8.

Uk Manual
Page 10
...: Make sure that is secure and the screw has been tightened before using the power cord. 2 Screw Adapter Cover Pins Adapter Metal Clips FR/ See drawing 3. IT creased risk of electric shock. Important: If the power cord is not compatible with all local codes and 3 ordinances. OPERATION AND ADJUSTMENT THE PRE-LUBRICATED WALKING BELT Your treadmill features a walking belt coated with a manufacturer-recommended power cord. IMPORTANT: Never apply silicone spray or other...
...: Make sure that is secure and the screw has been tightened before using the power cord. 2 Screw Adapter Cover Pins Adapter Metal Clips FR/ See drawing 3. IT creased risk of electric shock. Important: If the power cord is not compatible with all local codes and 3 ordinances. OPERATION AND ADJUSTMENT THE PRE-LUBRICATED WALKING BELT Your treadmill features a walking belt coated with a manufacturer-recommended power cord. IMPORTANT: Never apply silicone spray or other...

Uk Manual
Page 11
... console, causing the walking belt to slow to the key (see page 10). The console also offers four speed programs. Each program automatically controls the speed of the treadmill as it guides you exercise, the displays will light. if the key is selected, the speed and incline of the treadmill can be pulled from the console, adjust the position of the clip. 11 Find the clip attached to a stop. Then, insert the key...
... console, causing the walking belt to slow to the key (see page 10). The console also offers four speed programs. Each program automatically controls the speed of the treadmill as it guides you exercise, the displays will light. if the key is selected, the speed and incline of the treadmill can be pulled from the console, adjust the position of the clip. 11 Find the clip attached to a stop. Then, insert the key...

Uk Manual
Page 12
... interested in succession. HOW TO USE THE MANUAL MODE 1 Insert the key into the console. See HOW TO TURN ON THE POWER on the treadmill, the indicators around the track will be shown in the displays. 3 Press the Start button or the Speed increase button to move at 2 km/h. if a button is pressed, the walking belt will change the speed of 400 meters (1/4 mile). The lower left display-As you exercise, the lower left or right display. 12
... interested in succession. HOW TO USE THE MANUAL MODE 1 Insert the key into the console. See HOW TO TURN ON THE POWER on the treadmill, the indicators around the track will be shown in the displays. 3 Press the Start button or the Speed increase button to move at 2 km/h. if a button is pressed, the walking belt will change the speed of 400 meters (1/4 mile). The lower left display-As you exercise, the lower left or right display. 12

Uk Manual
Page 13
... Speed increase button to hold the metal contacts-avoid moving your heart rate, stand on /off switch to the "off" position and unplug the power cord. 13 For the most accurate heart rate reading, continue to change the unit of clear plastic from the metal contacts. In addition, make sure that your heart rate will appear in the upper display. To reset the displays, press the Stop button, remove the key...
... Speed increase button to hold the metal contacts-avoid moving your heart rate, stand on /off switch to the "off" position and unplug the power cord. 13 For the most accurate heart rate reading, continue to change the unit of clear plastic from the metal contacts. In addition, make sure that your heart rate will appear in the upper display. To reset the displays, press the Stop button, remove the key...

Uk Manual
Page 14
... walking belt will appear in See step 7 on page 11. 2 Select one of the displays to a stop the program, press the Stop button. The program will flash in the upper display for a few seconds to the speed setting that is programmed for the second period, the speed setting will continue until all 30 periods are finished exercising, remove the key. HOW TO USE A SPEED PROGRAM 1 Insert the key into the console. See HOW TO TURN...
... walking belt will appear in See step 7 on page 11. 2 Select one of the displays to a stop the program, press the Stop button. The program will flash in the upper display for a few seconds to the speed setting that is programmed for the second period, the speed setting will continue until all 30 periods are finished exercising, remove the key. HOW TO USE A SPEED PROGRAM 1 Insert the key into the console. See HOW TO TURN...

Uk Manual
Page 15
.... make sure to lift with your legs rather than your left hand, pull the latch knob to the desired location. Place one foot against the latch pin. 1. As you raise the frame, make sure that the catch is past the latch pin. To reduce the risk of direct sunlight. HOW TO FOLD AND MOVE THE TREADMILL HOW TO FOLD THE TREADMILL FOR STORAGE Unplug the power cord.
.... make sure to lift with your legs rather than your left hand, pull the latch knob to the desired location. Place one foot against the latch pin. 1. As you raise the frame, make sure that the catch is past the latch pin. To reduce the risk of direct sunlight. HOW TO FOLD AND MOVE THE TREADMILL HOW TO FOLD THE TREADMILL FOR STORAGE Unplug the power cord.

Uk Manual
Page 17
... treadmill is in . c Tripped Reset d On Position PROBLEM: The power turns off switch located on the treadmill near the power cord. b. If the power cord is plugged in, unplug it back in , make sure that the power cord is no longer than 1.5 m (5 ft.). Remove the key from the console and UNPLUG THE POWER CORD. If the treadmill still will not run, please see the front cover of this manual. PROBLEM: The displays of this manual. PROBLEM: The power...
... treadmill is in . c Tripped Reset d On Position PROBLEM: The power turns off switch located on the treadmill near the power cord. b. If the power cord is plugged in, unplug it back in , make sure that the power cord is no longer than 1.5 m (5 ft.). Remove the key from the console and UNPLUG THE POWER CORD. If the treadmill still will not run, please see the front cover of this manual. PROBLEM: The displays of this manual. PROBLEM: The power...
Uk Manual
Page 18
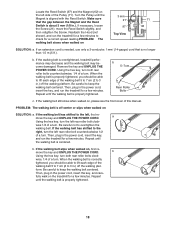
... POWER CORD. PROBLEM: The walking belt is centered. Then, plug in .) off the walking plat- Remove the key and UNPLUG THE POWER CORD. form. b. Repeat until the walking belt is properly tightened, you should be able to lift each edge of the Pulley (71). Then, plug in .) off -center or slips when walked on , first re- When the walking belt is properly tightened. b 5-7cm Rear Roller Bolts c. b Using the hex key, turn . When the walking belt is aligned with the Reed Switch...
... POWER CORD. PROBLEM: The walking belt is centered. Then, plug in .) off the walking plat- Remove the key and UNPLUG THE POWER CORD. form. b. Repeat until the walking belt is properly tightened, you should be able to lift each edge of the Pulley (71). Then, plug in .) off -center or slips when walked on , first re- When the walking belt is properly tightened. b 5-7cm Rear Roller Bolts c. b Using the hex key, turn . When the walking belt is aligned with the Reed Switch...

Uk Manual
Page 19
... intensity of heart rate readings. Fat Burning To burn fat effectively, you to exercise with preexisting health problems. The pulse sensor is to oxygenate the blood. The key to success is not a medical device. The three numbers define your everyday life. 19 CONDITIONING GUIDELINES WARNING: Before beginning this or any exercise program, consult your movement, may complete up -Start each workout with 5 to...
... intensity of heart rate readings. Fat Burning To burn fat effectively, you to exercise with preexisting health problems. The pulse sensor is to oxygenate the blood. The key to success is not a medical device. The three numbers define your everyday life. 19 CONDITIONING GUIDELINES WARNING: Before beginning this or any exercise program, consult your movement, may complete up -Start each workout with 5 to...
Uk Manual
Page 20
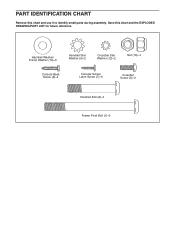
Handrail Washer/ Frame Washer (14)-6 Handrail Star Washer (9)-2 Crossbar Star Washer (12)-2 Nut (16)-4 Console Back Screw (4)-4 Console Screw/ Latch Screw (7)-6 Crossbar Screw (5)-2 Handrail Bolt (2)-4 Frame Pivot Bolt (1)-2 4 Bolt (120)-2 PART IDENTIFICATION CHART Remove this chart and the EXPLODED DRAWING/PART LIST for future reference. Save this chart and use it to identify small parts during assembly.
Handrail Washer/ Frame Washer (14)-6 Handrail Star Washer (9)-2 Crossbar Star Washer (12)-2 Nut (16)-4 Console Back Screw (4)-4 Console Screw/ Latch Screw (7)-6 Crossbar Screw (5)-2 Handrail Bolt (2)-4 Frame Pivot Bolt (1)-2 4 Bolt (120)-2 PART IDENTIFICATION CHART Remove this chart and the EXPLODED DRAWING/PART LIST for future reference. Save this chart and use it to identify small parts during assembly.

Uk Manual
Page 21
... Tie Holder Reed Switch Clip Belly Pan Grommet Grommet Walking Platform Controller Transformer Filter Power Cord Console Assembly Console Crossbar Console Back Belt Guide Ground Wire Ground Wire Reed Switch Wire Harness Outlet Plate Assembly Lift Motor Bolt Stop Bracket Lift Motor Nut Belly Pan Incline Wire Transformer Screw/ Filter Screw Shield Incline Motor 6" Red Wire, M/F 4" Black Wire, M/F 4" Blue Wire, M/F 8" Blue Wire, 2F 10" Blue Wire, 2F 6" White Wire, 2F 10" White Wire, 2F User's Manual #These parts are subject to change without notice. Description 1 2 Frame Pivot Bolt 41 20...
... Tie Holder Reed Switch Clip Belly Pan Grommet Grommet Walking Platform Controller Transformer Filter Power Cord Console Assembly Console Crossbar Console Back Belt Guide Ground Wire Ground Wire Reed Switch Wire Harness Outlet Plate Assembly Lift Motor Bolt Stop Bracket Lift Motor Nut Belly Pan Incline Wire Transformer Screw/ Filter Screw Shield Incline Motor 6" Red Wire, M/F 4" Black Wire, M/F 4" Blue Wire, M/F 8" Blue Wire, 2F 10" Blue Wire, 2F 6" White Wire, 2F 10" White Wire, 2F User's Manual #These parts are subject to change without notice. Description 1 2 Frame Pivot Bolt 41 20...

Uk Manual
Page 23
... (WETL13706.0) • the NAME of the product (WESLO CADENCE M6 treadmill) • the SERIAL NUMBER of the product (see the front cover of this manual) • the KEY NUMBER and DESCRIPTION of the needed part(s) (see the PART LIST and the EXPLODED DRAWING in the centre of this manual) Part No. 239999 R0706A Printed in China © 2006 ICON IP, Inc. ORDERING REPLACEMENT PARTS To order replacement parts, contact the ICON Health & Fitness, Ltd.
... (WETL13706.0) • the NAME of the product (WESLO CADENCE M6 treadmill) • the SERIAL NUMBER of the product (see the front cover of this manual) • the KEY NUMBER and DESCRIPTION of the needed part(s) (see the PART LIST and the EXPLODED DRAWING in the centre of this manual) Part No. 239999 R0706A Printed in China © 2006 ICON IP, Inc. ORDERING REPLACEMENT PARTS To order replacement parts, contact the ICON Health & Fitness, Ltd.


